
Monday, May 26, 2008

Sunday, May 18, 2008
The Ultimate Blueberry Muffin
 Like cookies, there are a bazillion different muffin recipes out there. And, like cookies, some are better than others.
What do you look for in a muffin?
I personally like a muffin that isn't trying to be a cupcake (a la Costco), that isn't too oily, and that has a nice firm, even slightly crisp top. I look for a delicate crumb and simple flavours, a moist texture but one that isn't going to fall apart and crumble to to bits before I get it to my mouth.
This recipe is all these things. Adapted from Little Cakes from the Whimsical Bakehouse, I bring you...
The Ultimate Blueberry Muffin
1/2 cup butter, softened
1 1/3 cups sugar
2 large eggs
3/4 tsp vanilla
2 cups flour
2 tsp baking powder
1/2 tsp salt
1 cup buttermilk (or 1 cup milk mixed with 1 tbsp lemon juice; let sit 5 minutes)
2 cups fresh or frozen blueberries
zest of one lemon or one orange
Cream the butter and sugar together until very light and fluffy. Add eggs, one at a time, and the vanilla. Whisk together the dry ingredients and add, alternating with buttermilk in 2 or three additions, to the butter mixture. Add zest. Fold in blueberries. Scoop into muffin tins, greased or with papers, and bake at 350F for 25 - 30 minutes. You should get 12 large muffins.
This is a versatile batter. You can replace the blueberries with any berry you want to, or make something like Orange Chocolate Chip, Lemon & White Chocolate Chip, Pineapple Coconut (drain the pineapple very well and pat dry with paper towels). Use your imagination; the sky's the limit!
NB: Nutritional information per muffin is here.
Friday, May 16, 2008
Kazakh Family Loaf
 As you may have read, last week I made a meal using recipes from Beyond the Great Wall: Recipes and Travels in the Other China. One of the items on the menu was Kazakh Family Loaf, made in a cast iron pot (see review). I feel the urge to make bread today, and that loaf turned out so well last week that I decided to use it as a base for my own version. It's a large recipe that would easily split into two smaller, more North American-looking loaves, and what I decided to do was make a square, flat version in a 9" dish and a more recognizable version in a loaf pan. After all, the original recipe has you baking the loaf in a pot; why not experiment with other shapes? We made loaves in springform pans in culinary school.
The flavour of this bread is impressive, and I think it has a lot to do with the addition of full fat yogurt. In my version, I've heightened the fibre content a bit by adding oatmeal and some seeds. I also used more yeast than the original recipe because not only am I high altitude (3500 feet) but I was skeptical that 1 tsp of dry yeast would rise up to 5 cups of flour (though I realized the yogurt contains its own bacteria, so who knows?).
Kazakh Family Loaf (adapted, by me, from Beyond the Great Wall)
2 1/4 tsp (or 2 1/2 if you're 3500 feet or more above sea level) quick rise or instant yeast
1 1/2 cups warm water
4 cups bread flour
2 tsp salt
1/2 cup oatmeal
1 tbsp each sesame seeds & poppy seeds
1/2 cup plain, full fat yogurt
2 1/4 tsp (or 2 1/2 if you're 3500 feet or more above sea level) quick rise or instant yeast
1 1/2 cups warm water
4 cups bread flour
2 tsp salt
1/2 cup oatmeal
1 tbsp each sesame seeds & poppy seeds
1/2 cup plain, full fat yogurt
See bread baking tutorial for instructions.

This is a lovely dough to work with. Split it in half for two small loaves, cook it in a cast iron pot as I did last week, or you could even make this into buns. It's very versatile. The crust is just as it should be - crusty! - while the inside is tender and sponge-like. It is, simply, awesome.
Enjoy!
Saturday, May 10, 2008
Cookbook Review: Beyond the Great Wall
 The flap reads: "In the West, when we think about food in China, what usually comes to mind are the signature dishes of Beijing, Hong Kong, and Shanghai. But beyond these urbanized eastern areas lies the other China: the high open spaces and sacred places of Tibet, the Silk Road oases of Xinjinag and Qinghai, the steppelands of Inner Mongolia, and the sleepy terraced hills of Yunnan and Guizhou. The people who live in these regions - Tibetans, Mongols, Uighurs, Miao, Hui, Dong, Yi, Dai, and others - are culturally distinct, with their own culinary traditions."
Beyond the Great Wall is indeed a cookbook like no other. It combines the best of many writing genres: travel, autobiography, National Geographic-quality photography, history, geography, and culinary literature. The content is as varied as the some fifty-five other minorities living in the three fifths of land of China not dominated by the Chinese majority, the Han. And the Han is what we typically see or think of when it comes to Chinese people, and their food traditions are the ones we are most familiar with, the ones that come from the well-known urban centres of Beijing and Hong Kong. The authors, couple Jeffrey Alford and Naomi Duguid, also authors of Hot Sour Salty Sweet, take the reader on a very experiential tour of those minorities that lay beyond the Great Wall of China, sometimes the tiniest, most isolated corners of a vast former empire that encompasses today an ethnic variety that is truly stunning.
The book is divided into chapters as most cookbooks are: soups, salads, breads, fish, etc. Accompanying each chapter and interspersed between recipes, we get small vignettes of travel stories written from the authors' own experiences while travelling beyond the Great Wall, in addition to histories written about the minorities being explored in the book. The photographs are lush and capture so well the unique qualities and characteristics of some of the worlds most fascinating, but little heard of, cultures.
The food is stunning, too. For the purposes of this review, I decided to have my family over for dinner last night and make a menu derived from the book. My initial response to the recipes was, Uh, I'm not going to be able to find any of the ingredients I'd need to make this here in the boonies. But the more I read, the more I was able to figure out substitutes, and the more recipes I found were very appealing and would involve simple ingredients prepared through simple methods. I now go through the book pretty much thinking that I could make any of these dishes, and bring some little semblance of these out of the way cultures into my home, a world away.
The menu consisted of:
Kazakh Family Loaf (page 195)
Napa & Red Onion Salad (page 86)
Beef-Sauced Hot Lettuce Salad (page 67)
Hui Tomato-Lamb Noodle Soup, which I substituted beef in for the lamb (page 59)
Savory Boiled Dumplings with Soy-Vinegar Dipping Sauce (pages 150-151)
Beef with Mushrooms & Cellophane Noodles, which I substituted chicken for the beef (page 280)
Green Tea Shortbread with Poppy Seeds (page 329), served with Watermelon

 Here we have the Kazakh Family Loaf at two stages: dough and
The salad is Napa & Red Onion, and this is the baked loaf and the shortbread.
Napa & Red Onion Salad (page 86)
Beef-Sauced Hot Lettuce Salad (page 67)
Hui Tomato-Lamb Noodle Soup, which I substituted beef in for the lamb (page 59)
Savory Boiled Dumplings with Soy-Vinegar Dipping Sauce (pages 150-151)
Beef with Mushrooms & Cellophane Noodles, which I substituted chicken for the beef (page 280)
Green Tea Shortbread with Poppy Seeds (page 329), served with Watermelon

 Here we have the Kazakh Family Loaf at two stages: dough and
 fully risen. It's baked in a cast iron pot.
The salad is Napa & Red
 Onion, and this is the baked loaf and the shortbread.
These are the dumplings before cooki
 n
n
 g and after cooking, and the Hui soup.
And finally, this is the Chicken and Mushrooms with Cellophane Noodles.

Some dishes we liked more than others. The unanimous favourite was the dumplings, and the least popular was the soup. Not that it was bad at all, it was just a bit bland, so we used the dipping sauce left over from the dumplings to spice it up, and then it was great. I thought the mushroom dish was really good, too. The shortbread was excellent, as was the Kazakh Loaf, which I think will become one of my staple bread recipes.
All in all, Beyond the Great Wall is an excellent book. It's probably, at the moment, the nicest, most interesting book I own. It would make a great gift for someone with wanderlust or for a cultured friend who might appreciate the experiences the book narrates. Definitely a keeper on my shelves!
Friday, May 02, 2008
101 Uses for a Roasted Chicken #4
 I am a huge fan of making homemade chicken stock. It's really easy once you get the hang of it, and the most time-consuming part is actually straining all of the stock ingredients out of the liquid and picking the bones of their meat. But, it's kind of a brainless activity you can do to settle down after a long day. Here are some directions on how I usually make mine. I use a large crock pot and it works excellently, and you can vary your stock ingredients according to your own tastes. I hate celery, for instance, so I don't buy it and I don't use it in any of my cooking. But I love lemon and cilantro, and these two things make a blah chicken stock brilliant.
I make two versions of this soup, an Indian Version and a Thai version. Both are awesome.
Chicken Curry Soup (Indian version)
12 cups chicken stock
1 large can (28oz) crushed tomatoes
2 cups shredded chicken, ideally from your stock bones/parts
3 cups shredded cabbage
1 can mini corn cobs
2 carrots
1/2 cup chopped cilantro
1 large onion, sliced
4 - 5 tbsp (or to taste) Patak's (or similar) Mild Curry Paste
3 (or to taste) cloves garlic
Basically, you can chuck all of these ingredients into a big soup pot and just simmer until the veggies are tender. I like using more robust veggies that freeze well and don't wilt or turn that unappealing military green colour when reheated. That's why I like to use cabbage a lot in soup: it stands up in the freezer and in the thawing/reheating stage of leftover usage. Mini corn cobs also freeze well and work beautifully in soup. You can get them cut up, or you can just roughly chop the whole ones. This soup should feed about 10, and I just keep some in the fridge to reheat and portion the rest into containers for freezing. For an approximate nutritional analysis, you can go here.
By all means, vary the veggies. That's what soup is all about: using what's at hand and what you like. There are no hard and fast rules.
And yes, I have a camera now!
Bon appetit!
Monday, April 28, 2008
Peppermint Chocolate Cake
This is the cake recipe I used in the grad cake in the post below. It's a wonderfully moist, fudgey cake, and dense enough to use if you're making a tiered special occasion cake. Adapted from Cooking Pleasures Magazine. Honestly, one of the most superb cakes I've made in a long time - not just the decoration part of it, but the cake itself was just to die for. I'm going to be making it again and again, and without the mint, it's a very versatile recipe.
Peppermint Chocolate Cake
3/4 cup unsalted butter
5 oz. semisweet chocolate, chopped (good quality semisweet chocolate chips work, too; that's what I used)
1 1/2 cups sugar
3 eggs
1 1/2 tsp peppermint extract
1 tsp vanilla extract
2 1/4 cups cake flour (all purpose is fine if that's all you have; I used it and it worked)
1 tsp baking soda
3/4 tsp baking powder
3/4 tsp salt
1 1/2 cups sour cream (I used 1 cup 2% yogurt thinned with about 1/2 cup buttermilk)
Icing
1/2 cup unsalted butter
1 8oz. package cream cheese, softened (light is fine; it's what I used, but DON'T use fat-free!)
3 1/2 - 4 cups icing sugar
1/2 tsp peppermint extract
1. Preheat oven to 325F. Grease & flour the bottom of a 9" springform pan and cut a disc of parchment paper to line the bottom of the pan.
2. Over a bain marie, or directly in the bottom of a KitchenAid Mixer bowl, melt together the butter and chocolate. Stir until smooth. Let cool slightly.
3. Depending on what you're using, put the chocolate in a large mixing bowl and beat in the eggs one at a time. If using a KitchenAid, beat in the eggs one at a time. Beat in the peppermint and vanilla. In a separate bowl, whisk together the dry ingredients. Alternately beat the sour cream and flour mixture into the chocolate mixture, beginning with sour cream, until smooth. DON'T OVERWORK. Pour into prepared pan.
4. Bake 1 hour to 1 hour 15 minutes, or until toothpick inserted in centre comes out clean. Cool completely on wire rack. Remove from pan.
5. To prepare the icing, beat the butter and cream cheese together until very smooth. Add the peppermint extract. Add 3 1/2 cups icing sugar and combine until smooth. Keep adding more icing sugar until you get a nice, creamy, but not runny consistency.
6. Ice the cake. Eat it.
If you want, glaze with: 1 oz. semisweet chocolate chips, 1 tbsp unsalted butter, 1/2 tsp vanilla extract melted together over a bain marie until smooth.
Enjoy!
Peppermint Chocolate Cake
3/4 cup unsalted butter
5 oz. semisweet chocolate, chopped (good quality semisweet chocolate chips work, too; that's what I used)
1 1/2 cups sugar
3 eggs
1 1/2 tsp peppermint extract
1 tsp vanilla extract
2 1/4 cups cake flour (all purpose is fine if that's all you have; I used it and it worked)
1 tsp baking soda
3/4 tsp baking powder
3/4 tsp salt
1 1/2 cups sour cream (I used 1 cup 2% yogurt thinned with about 1/2 cup buttermilk)
Icing
1/2 cup unsalted butter
1 8oz. package cream cheese, softened (light is fine; it's what I used, but DON'T use fat-free!)
3 1/2 - 4 cups icing sugar
1/2 tsp peppermint extract
1. Preheat oven to 325F. Grease & flour the bottom of a 9" springform pan and cut a disc of parchment paper to line the bottom of the pan.
2. Over a bain marie, or directly in the bottom of a KitchenAid Mixer bowl, melt together the butter and chocolate. Stir until smooth. Let cool slightly.
3. Depending on what you're using, put the chocolate in a large mixing bowl and beat in the eggs one at a time. If using a KitchenAid, beat in the eggs one at a time. Beat in the peppermint and vanilla. In a separate bowl, whisk together the dry ingredients. Alternately beat the sour cream and flour mixture into the chocolate mixture, beginning with sour cream, until smooth. DON'T OVERWORK. Pour into prepared pan.
4. Bake 1 hour to 1 hour 15 minutes, or until toothpick inserted in centre comes out clean. Cool completely on wire rack. Remove from pan.
5. To prepare the icing, beat the butter and cream cheese together until very smooth. Add the peppermint extract. Add 3 1/2 cups icing sugar and combine until smooth. Keep adding more icing sugar until you get a nice, creamy, but not runny consistency.
6. Ice the cake. Eat it.
If you want, glaze with: 1 oz. semisweet chocolate chips, 1 tbsp unsalted butter, 1/2 tsp vanilla extract melted together over a bain marie until smooth.
Enjoy!
Sunday, April 27, 2008
The Cake!
I couldn't wait to post this! This is the graduation cake I made for my brother's grad from a music technology program.
I'm so pleased with how it turned out I almost feel like crying. I thought perhaps I'd lost my touch, but I think the spark is still in me somewhere... My hands are shaky because of meds, but this is the nicest cake I've done since culinary school! And it's culinary school quality, too.
Thanks to my roommate for allowing me to photograph it since I still don't have a camera.
More later! In the meantime, drool!


I'm so pleased with how it turned out I almost feel like crying. I thought perhaps I'd lost my touch, but I think the spark is still in me somewhere... My hands are shaky because of meds, but this is the nicest cake I've done since culinary school! And it's culinary school quality, too.
Thanks to my roommate for allowing me to photograph it since I still don't have a camera.
More later! In the meantime, drool!


Saturday, April 26, 2008
Lesson
Today, I did something ridiculously stupid while baking a cake.
If you don't know this, I have a mental illness (or three) and right now I'm going through a significant medication change. Read about it here.
The point of this confession over here on my foodblog: my brain is functioning way below normal levels right now.
So, this morning I was making a cake for my brother's graduation. (I still have no camera, but will hopefully get a picture tomorrow when we have the celebration for the graduation, and I can get my sister-in-law to take some photos with her camera.) I did this in my KitchenAid Mixer and while I was mixing the wet ingredients together on speed 2 with the paddle attachment, I for some strange reason stuck my hand into the bowl to scoop out a bit of batter to test.
My hand got caught between the side of the bowl and the turning paddle.
If I had a camera, I would have taken a picture of the huge, swollen, purple bruise surrounding the knuckles at the base of the index and middle finger of my right hand, and the red puffiness of the knuckles themselves.
I'm not in any pain, but the bruise is spectacular and I suspect tomorrow my hand will be wee bit stiff and sore.
Oh yes. I am an idiot.
Lesson? It's obvious, isn't it? Don't bake a cake for your brother's graduation.
If you don't know this, I have a mental illness (or three) and right now I'm going through a significant medication change. Read about it here.
The point of this confession over here on my foodblog: my brain is functioning way below normal levels right now.
So, this morning I was making a cake for my brother's graduation. (I still have no camera, but will hopefully get a picture tomorrow when we have the celebration for the graduation, and I can get my sister-in-law to take some photos with her camera.) I did this in my KitchenAid Mixer and while I was mixing the wet ingredients together on speed 2 with the paddle attachment, I for some strange reason stuck my hand into the bowl to scoop out a bit of batter to test.
My hand got caught between the side of the bowl and the turning paddle.
If I had a camera, I would have taken a picture of the huge, swollen, purple bruise surrounding the knuckles at the base of the index and middle finger of my right hand, and the red puffiness of the knuckles themselves.
I'm not in any pain, but the bruise is spectacular and I suspect tomorrow my hand will be wee bit stiff and sore.
Oh yes. I am an idiot.
Lesson? It's obvious, isn't it? Don't bake a cake for your brother's graduation.
Friday, April 25, 2008
Pastry Chef in the Making!

Still awaiting my new camera, and it's getting annoying. Soon, I keep telling myself; be patient.
Meanwhile, here is a photo I thought you'd enjoy. Me at 7 (or thereabouts) with a cake I made for Brownies (as in Brownies/Girl Guides/Pathfinders /Girl Scouts). If memory serves (and it rarely does these days), this was auctioned off to raise money for something Brownie/Guide-related. Someone in Girl Guides bought the cake and was apparently quite happy with it.
The cake itself is a typical Betty Crackpot recipe from my mother's ancient Betty Crackpot Cookbook. Since it was winter, I decorated it with snowmen made from marshmallows stuck together with toothpicks and their hair and faces and clothing painted on with food colouring. My mom got me some Jujube Christmas trees and some colourful Smarties. The base was a piece of old paneling from our recent basement reno, covered with tin foil. The dress I am wearing, as well as the apron, were made lovingly by my mom.
Sunday, April 20, 2008
Lemon-ginger Frozen Yogurt
So, my camera died a couple of weeks ago, and though a new one is on the way, I'm reluctant to post anything here until I can take a photo of it! Ah, well. I'll give you something simple to tide you over. I made this amazing frozen yogurt recipe today. I subscribe to both Bon Appetit and Gourmet, having been lured with a screaming "professional" deal. I've never regretted it.
Lemon-ginger Frozen Yogurt
3/4 cup water
3/4 cup sugar
1/4 cup light corn syrup
2 teaspoons finely grated peeled fresh ginger
1 cup plain nonfat yogurt (I used 2% because I hate fat-free yogurt)
1 cup low-fat buttermilk (I used whole buttermilk)
1/4 cup fresh lemon juice
1 teaspoon finely grated lemon peel (I used twice this amount)
Preparation:
Bring water, sugar, light corn syrup, and grated ginger to boil in medium saucepan, stirring until sugar dissolves. Boil 2 minutes. Strain into medium bowl and chill until cool. Whisk in yogurt, buttermilk, lemon juice, and lemon peel. Process in ice cream maker according to manufacturer's instructions; cover and freeze. (Don't discard the strained ginger; it'll make a pretty garnish.)
I have this Cuisinart ice cream maker:
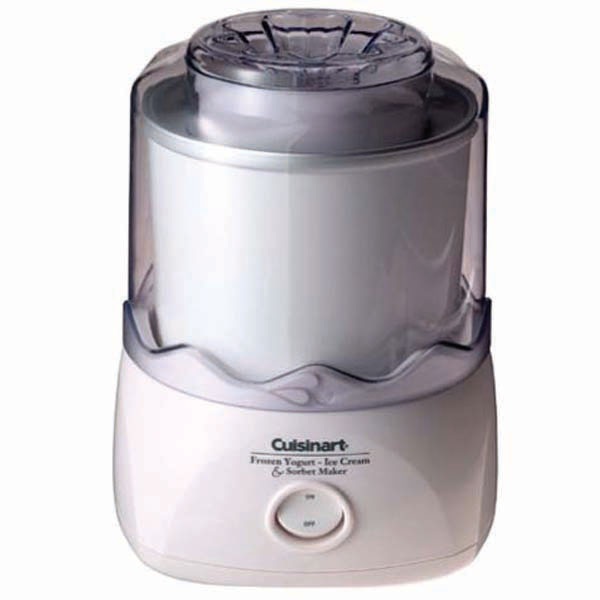
Man, do I love this machine! I've used it for so many things, including this lemon ice cream recipe, which is do die for. This is a really great appliance, and it's simple to use and makes fantastic products.
FYI, I've been using a web site called The Daily Plate to track my eating. If you haven't already heard of it, check it out - I highly recommend it. You can plug in a recipe of your own and create a nutritional label for it. According to TDP, this frozen yogurt recipe (which makes approximately six 1/2-cup servings) has 93 calories, 16.75g total carbs, 1.83g total fat, and 14.88g sugar. Not bad, eh?
Enjoy.
Lemon-ginger Frozen Yogurt
3/4 cup water
3/4 cup sugar
1/4 cup light corn syrup
2 teaspoons finely grated peeled fresh ginger
1 cup plain nonfat yogurt (I used 2% because I hate fat-free yogurt)
1 cup low-fat buttermilk (I used whole buttermilk)
1/4 cup fresh lemon juice
1 teaspoon finely grated lemon peel (I used twice this amount)
Preparation:
Bring water, sugar, light corn syrup, and grated ginger to boil in medium saucepan, stirring until sugar dissolves. Boil 2 minutes. Strain into medium bowl and chill until cool. Whisk in yogurt, buttermilk, lemon juice, and lemon peel. Process in ice cream maker according to manufacturer's instructions; cover and freeze. (Don't discard the strained ginger; it'll make a pretty garnish.)
I have this Cuisinart ice cream maker:
Man, do I love this machine! I've used it for so many things, including this lemon ice cream recipe, which is do die for. This is a really great appliance, and it's simple to use and makes fantastic products.
FYI, I've been using a web site called The Daily Plate to track my eating. If you haven't already heard of it, check it out - I highly recommend it. You can plug in a recipe of your own and create a nutritional label for it. According to TDP, this frozen yogurt recipe (which makes approximately six 1/2-cup servings) has 93 calories, 16.75g total carbs, 1.83g total fat, and 14.88g sugar. Not bad, eh?
Enjoy.
Monday, March 31, 2008
Tuesday, March 25, 2008
101 Uses for a Roasted Chicken: #2 & #3
This week, a bit of a no-brainer and a yummy sandwich.
The no-brainer, #2 on the list of 101, is a chicken caesar salad: cubed chicken, romaine, dressing, parmesan cheese, some croutons. I had this for dinner last night.
The yummy sandwich, #3 on the list, is a spin on the traditional grilled cheese: grilled chicken, swiss, and pesto on whole-grain bread. This is a to-die-for combination, and if you want to make it even more awesome, you can add a strip or two of bacon.
I have been eating grilled sandwiches regularly this winter, and I don't really know why. I usually have a grilled Black Forest ham & swiss, but because I'm avoiding the deli now, the chicken was a very tasty replacement, and it pairs brilliantly with pesto and swiss cheese.
With this one roasted chicken, I got about 4 - 5 meals, and I have saved the carcass to make stock and then soup. I definitely got my $9 worth from this one bird.
Friday, March 21, 2008
Easter Cookies
Yesterday, trying to get myself into a springy mood, I invested in some Easter-themed cookie cutters.  I had an earthy vision in mind, something different from the brightly coloured stuff that is so prevalent at this time of year, so I found a generic sugar cookie recipe and spiced it up with some espresso powder. I have had a bag of organic raw turbinado sugar kicking around, and the granules are large and suitable for decorations. This is what I came up with.
I made royal icing with one egg white (at room temperature) and between 2 - 3 cups of icing sugar, got out the old piping bag and small plain tips (Wilton #2 and #4), and away I went.
The egg-shaped cookies didn't quite turn out the way I'd envisioned them. I'm not sure why, but I think it was a combination of the granules being too large for the size of cookie vis a vis the tips I used. With the flower shapes, I decided to keep it simple and only use the royal icing as decoration. I liked how they turned out far better.

The recipe for the cookies is as follows, adapted from The Cookie Bible's recipe for Butterfly Cookies on page 132. I highly recommend this book; everything I've made from it has turned out fantastically.
2 1/4 cups flour
1/4 tsp salt
1 cup sugar
3/4 cup butter, softened
1 egg
1 tbsp vanilla
2 tsp instant espresso powder (I use Nescafe's and it works just fine)
- 350F oven
- form the dough into two disks and chill until firm, either in the fridge or freezer
- roll out on lightly floured surface
- bake for 12 - 15 minutes, or until just barely golden along the edges
Well, that's about it for my Easter baking, I think. It was never a "baking" holiday in my family the way Christmas was. It was more of a "let the Easter Bunny do all the work" kinda holiday.
However you celebrate, if you celebrate or if you don't, be well this weekend.
 I had an earthy vision in mind, something different from the brightly coloured stuff that is so prevalent at this time of year, so I found a generic sugar cookie recipe and spiced it up with some espresso powder. I have had a bag of organic raw turbinado sugar kicking around, and the granules are large and suitable for decorations. This is what I came up with.
I made royal icing with one egg white (at room temperature) and between 2 - 3 cups of icing sugar, got out the old piping bag and small plain tips (Wilton #2 and #4), and away I went.
The egg-shaped cookies didn't quite turn out the way I'd envisioned them. I'm not sure why, but I think it was a combination of the granules being too large for the size of cookie vis a vis the tips I used. With the flower shapes, I decided to keep it simple and only use the royal icing as decoration. I liked how they turned out far better.

The recipe for the cookies is as follows, adapted from The Cookie Bible's recipe for Butterfly Cookies on page 132. I highly recommend this book; everything I've made from it has turned out fantastically.
2 1/4 cups flour
1/4 tsp salt
1 cup sugar
3/4 cup butter, softened
1 egg
1 tbsp vanilla
2 tsp instant espresso powder (I use Nescafe's and it works just fine)
- 350F oven
- form the dough into two disks and chill until firm, either in the fridge or freezer
- roll out on lightly floured surface
- bake for 12 - 15 minutes, or until just barely golden along the edges
Well, that's about it for my Easter baking, I think. It was never a "baking" holiday in my family the way Christmas was. It was more of a "let the Easter Bunny do all the work" kinda holiday.
However you celebrate, if you celebrate or if you don't, be well this weekend.
Thursday, March 20, 2008
Memory Lane: Cadbury's Edition
 Recently, my super cool fellow foodblogger, Cakespy, posted an interview she did with a Cadbury's Creme Egg. This inspired me to dig around through my old photos in search of some pictures I took nearly 11 years ago on a visit to Cadbury's World. In celebration of Easter, here are those photos, freshly scanned with my new scanner!
The first photo is of one of the several Cadbury's Creme Egg cars near the entrance to Cadbury's World. Yes, this is a car. With a steering wheel and the whole nine yards.

The second photo is of me with my cousin, posing in front of a Cadbury's Creme Egg car. We have just come from the store, where I bought quite a bit of chocolate that day. And, on our tour through the facility, we got quite a bit of free stuff, too - and I'm not talking about those Halloween-sized chocolate bars, either! I'm talking regular-sized chocolate bars at pretty much every turn!
The third photo is of my cousin in front of a Cadbury's Mini Egg car. It is also a mini car in comparison with the Creme Egg car. Very cool indeed. It was such a fun day, too.

I haven't had any Creme Eggs yet this season, but I'm hopeful either the Easter Bunny will humour me, or that Shoppers Drug Mart, my new favourite place to buy cheap chocolates, will have a whole bunch on sale after Easter is over, because I do love a Creme Egg (or fifty).
Wednesday, March 19, 2008
101 Uses for a Roasted Chicken: #1
New idea for the old food blog here. We'll see how it goes. I came across a book called Rotisserie Chickens to the Rescue a few months ago, and I thought it was a neat idea. I didn't buy the book in the end, so this is my version.
I can get rotisserie chickens at my local overpriced grocery store, but I don't see the point in spending the money when it's perfectly simple to bung a chicken in the oven and cook it myself. It's ridiculously simple.
 I am trying to cut down my meat intake, so I'm going for less meat but better quality cuts instead. So, I'm cutting out deli stuff like Black Forest ham, and I'm going to lay off the bacon and start buying buffalo instead of beef. Having a whole roast chicken around is a convenient way of providing me with decent meat for sandwiches, salads, and a lot of other things, and I always freeze the carcass to make my own homemade stock. So, as you can imagine, it's quite economical for me on my piddly budget.
Tonight, I made a chicken pasta salad for dinner:
1 cup chicken, diced
1 cup small pasta, such as penne or macaroni, etc., (raw measure - then cook it)
1/2 cup dried cranberries
1 cup broccoli florets, chopped small
2 green onions, sliced
1 clove garlic, grated
crumbled feta cheese, to taste (optional)
1/4 cup sunflower seeds
1/4 cup low fat mayo
1/4 cup low fat sour cream
2 tsp dried dill
salt & pepper to taste
Do you really need instructions? It's a pasta salad! You get the picture, right? Just blanch the broccoli in the pasta water for a couple of minutes at the end of boiling, then drop it all into a collander and run it under cold water until completely cool. Mix. Eat. Enjoy.
I can get rotisserie chickens at my local overpriced grocery store, but I don't see the point in spending the money when it's perfectly simple to bung a chicken in the oven and cook it myself. It's ridiculously simple.
 I am trying to cut down my meat intake, so I'm going for less meat but better quality cuts instead. So, I'm cutting out deli stuff like Black Forest ham, and I'm going to lay off the bacon and start buying buffalo instead of beef. Having a whole roast chicken around is a convenient way of providing me with decent meat for sandwiches, salads, and a lot of other things, and I always freeze the carcass to make my own homemade stock. So, as you can imagine, it's quite economical for me on my piddly budget.
Tonight, I made a chicken pasta salad for dinner:
1 cup chicken, diced
1 cup small pasta, such as penne or macaroni, etc., (raw measure - then cook it)
1/2 cup dried cranberries
1 cup broccoli florets, chopped small
2 green onions, sliced
1 clove garlic, grated
crumbled feta cheese, to taste (optional)
1/4 cup sunflower seeds
1/4 cup low fat mayo
1/4 cup low fat sour cream
2 tsp dried dill
salt & pepper to taste
Do you really need instructions? It's a pasta salad! You get the picture, right? Just blanch the broccoli in the pasta water for a couple of minutes at the end of boiling, then drop it all into a collander and run it under cold water until completely cool. Mix. Eat. Enjoy.
Subscribe to:
Posts (Atom)
LinkWithin
