Showing posts with label baking. Show all posts

Friday, June 20, 2014

Biscuits X2

Today was baking group at the clubhouse, and we made biscuits.  The original plan was to make scones to go with tea, but I discovered there were no eggs, so we made biscuits instead.  They turned out great!  We added cheese, dried chives, and dill to the mix, and the flavours were great.  Here they are.


When I got home, I decided to keep the baking momentum going and make something to accompany my cabbage rolls.  I was out of bread, too.  So, I decided to make this recipe, Pull-Apart Drop Biscuits.  They involved a very wet but rich dough that was very sticky to work with, but they turned out fantastically!  I was super impressed.  Both biscuit recipes came from the May 2010 issue of Canadian Living Magazine.  The above recipe is the Flaky Biscuits, and the recipe for the Pull-Apart Drop Biscuits is here.


Thursday, June 19, 2014

A Pair of Upside Down Cakes/Cooking with Betty Crackpot

I am currently facilitating a baking group at my local mental health clubhouse, which is part of my volunteer requirements for the peer support training program I'm in.  Once a week, we bake something simple that can be accomplished in 2 hours, and recently I was asked if I could use up a pineapple that the clubhouse had on had that had gone overripe.  It was a pretty pathetic looking specimen, but once I cut into I thought it would be OK for a pineapple upside down cake.  I sliced up the pineapple and went ahead with the project.

It turned out superbly!  The recipe for the cake is Betty Crackpot's Dinette Cake, and you can find that recipe here.  For the upside down part of the cake, i.e. the bottom, mix together 1/4 cup melted butter and 1/2 cup of packed brown sugar. Spread evenly over the bottom of the cake pan. Arrange pineapple slices on top, make the cake batter, then spread it evenly over the pineapple.  I know this is supposed to have maraschino cherries in it, but honestly, it didn't need them (and they're not in my budget).  Here is the cake!
Pineapple Upside Down Cake


Also, very recently, I went over to some friends' place and divested them of all their rhubarb.  Two of these friends had never had rhubarb before, and one didn't like it, so the rhubarb plant was basically going to waste.  After the success of my pineapple upside down cake, I decided to make a rhubarb version.  And this is it:

Rhubarb Upside Down Cake
 Same deal with the bottom, except rhubarb needs a bit of help.  I used about a cup and a half of finely chopped rhubarb, and combined it with about 1/4 cup of sugar, and some cinnamon & ground ginger.

This was TO.DIE.FOR.  In fact, it's one of the best things I think I've ever baked!

I loved it!  And I ate 3/4 of it in four days, I'm slightly sheepish to admit.  I gave the other quarter to a friend.

I have in the freezer a bag of wild blackberries.  I think I'll make a blackberry upside down cake next!


Friday, April 25, 2014

Fresh Orange Cookies

I made these the other day for a housewarming party I'm no longer having.  They are soooooo good.  I didn't have any walnuts, but I had a ton of coconut, so I substituted that.  Pure win!  The recipe came from The Cookie Bible.

Fresh Orange Cookies

1 1/2 cups flour
1/2 tsp baking soda
1/4 tsp salt
1/2 cup butter, softened
1/2 cup granulated sugar
1/2 cup brown sugar
1 egg
1 unpeeled orange (seedless, of course), finely chopped, either in a blender or food processor
1/2 cup chopped walnuts or shredded coconut

Orange Glaze

1 cup icing sugar
1 - 2 tbsp fresh orange juice
1 tbsp butter, softened
zest of one orange
- mix all this together in a bowl until smooth

1. Beat butter & sugars until light & fluffy.  Add egg and orange and beat well.  Gradually blend in dry ingredients, then stir in nuts or coconut.  Cover and chill the dough in the fridge for at least an hour.  Drop dough by tablespoonfuls onto cookie sheets and bake at 375F for 10 - 12 minutes, or until lightly golden.  Spread with glaze.

Awesome!  And a great way to use up oranges you have kicking around that might be past it slightly.

Sunday, April 06, 2014

Lemon "Brownies"

I have been back on Pinterest - that's how bored I am!  What a time-sucker it is.  But it's irresistible at the same time.  I have posted a few recipes I've found there on here, but then they marked this blog as spam and I was pissy about it, sent an email, which was never responded to, and then I promptly left the site for over a year and a half.  Now I am back...and once more addicted.

There is so much food on Pinterest it's ridiculous.  I found this recipe for Lemon Brownies the other day and was immediately intrigued.  I love a good lemon square, but this was a different kind of bar, so I wanted to try it.  There is a bit of risk with Pinterest recipes; some of them don't turn out and you never really know if they're as tried and true as they claim to be.  But this worked out wonderfully, despite the fact that there is no leavening agent in it.  I was worried about that small detail; I thought perhaps the cake part of the brownie would turn out like a chunk of cement.  I needn't have worried.  Though I slightly over baked it, the cakey part was just great.

I took them to a dinner for dessert and they were a big hit!  I will definitely make these again!

The recipe is here.

Enjoy!

Friday, May 18, 2012

Cooking with Betty Crackpot: Ranger Cookies

This is another childhood recipe we made when we needed a change from chocolate chip cookies - or wanted cookies in addition to chocolate chip cookies.  Ranger Cookies (I have no idea where the name came from) have a great texture since they have a bunch of textured ingredients in them, like the corn flakes (which we used instead of Wheaties) and coconut.  As the recipe says in its intro, these cookies are chewy on the inside and crisp on the outside.  Until the other day, I hadn't had these in years, and again, tasting them gave me a feeling of nostalgia.

Ranger Cookies, from page 135 of Betty Crocker's Cookbook, 1969 version

1/2 cup shortening (I used butter)
1/2 cup granulated sugar
1/2 cup packed brown sugar
1 egg
1/2 tsp vanilla
1 cup flour
1/2 tsp baking soda
1/4 tsp baking powder
1/4 tsp salt
1 cup quick cooking oats
1 cup Wheaties or Total (like I said, I used corn flakes)
1/2 cup shredded coconut

375F oven.  Cream, combine, scoop.  Bake about 10 minutes or until golden.  Yield is about 3 dozen.  I got about 2 dozen since I wanted a bit larger a cookie.

Awesome!  Good old corn flakes!

Thursday, May 03, 2012

Cooking with Betty Crackpot: Corn Bread

I needed something to go with a killer soup I made the other night (recipe upcoming) and decided to make cornbread.  I love things made with cornmeal.  My mom had a great recipe, but I doubt it came from Betty because this was underwhelming.  I even have a way better recipe. 

In typical Betty Crocker cake-ish fashion, you just dump everything into a bowl and beat the crap out of it.  But that wasn't the problem; it was just not very interesting.  I will admit to over-baking it slightly, which might have accounted for the dryness, too.  But, still, I don't think I'll be making this again.

Corn Bread (page 49 of Betty Crocker's Cookbook)

1 cup yellow cornmeal
1 cup flour
2 tbsp sugar
4 tsp baking powder
1/2 tsp salt
1 cup milk
1/4 shortening or butter (I used butter)
1 egg

Preheat oven to 425F.  Grease or line with parchment paper an 8x8" square baking pan.  Throw all ingredients in a bowl and beat the crap of out them ("blend for 20 seconds.  Beat vigourously for 1 minute").  Pour into pan and bake 20 - 25 minutes or until golden brown.

There are two variations.  The first is to make this into 12 muffins.  The second is "Double Corn Bread" which directs the baker to prepare a 9x9" pan, use 2 eggs, and stir in 1 can (7 - 8 oz) whole kernel corn, well-drained, into the batter.  This actually appeals to me more than the regular recipe.


Meh!

Tuesday, April 24, 2012

Cooking with Betty Crackpot: Chocolate Chip Cookies

It was only a matter of time before I made this recipe as part of this series.  I've been making this very cookie recipe since I was a kid and to this day I still think it's the best.  This was the first recipe I ever experimented with, replacing one of the fats with peanut butter to get a wonderful peanut butter chocolate chip cookie, and the summer I turned 16 I made a huge batch of these to take to a camp I was working at for the summer to share with the staff for break time.  That was when my mom declared "you have these down to a science!"  I had the exact timing down pat - 17 minutes (we were at high altitude) to the perfect cookie.

A couple of notes, though.  First, I never bake anything with chocolate over 350F, and this recipe says to bake at 375F.  Also, the original recipe says this makes about 7 dozen cookies and I have never, ever gotten that many out of it!  When I made these the other night, I got about 3 dozen.  To get 7 dozen out of this you'd have to make very tiny cookies.  And this time I did use shortening, even though I don't believe in baking with it, but I had some on hand and it was already softened so I thought, what the hell.

Chocolate Chip Cookies, from Cooking with Betty Crocker, page 136

2/3 cup shortening
2/3 cup butter or margarine
1 cup granulated sugar
1 cup packed brown sugar
2 eggs
2 tsp vanilla
3 cups flour
1 tsp soda
1 tsp salt
1 cup chopped nuts
2 packages (6 oz each) chocolate chips (I used about 1 1/2 cups)

Heat oven.  Mix thoroughly fats, sugars, eggs and vanilla.  Stir in remaining ingredients.  (The original recipe says here "for a softer, rounder cookie, add 1/2 cup flour" - I have never needed to do this.)

Drop dough by rounded teaspoonfuls 2" apart onto baking sheet.  Bake 8 - 10 minutes or until light brown.  Cool slightly before removing from baking sheet.

YUM!  So, so good, and again, very nostalgic for me.  These did not last long in this house, I can tell you that!

Friday, April 20, 2012

Cooking with Betty Crackpot: Kitty Cat Cake!

Growing up with my mom's Betty Crocker cookbook from 1969 was a key element in creating my love for baking and cooking, and I've mentioned before on this blog how, as a kid, I just used to love to curl up with the book and look at the cake pictures. To a child, they looked marvelous. To me as a woman pushing 40, they look quite amateurish, but they still have a lot of charm to them. The cat cake (instructions on page 116) always tickled my fancy, and my mom and I did make it together. I don't have any photos of it, but I remember my mom using yellow smarties for the eyes and snipping lengths of black licorice for the whiskers. I did find a picture of the Betty Crocker version of the cake online, so that's what you see to the right.

Last weekend, while at Jodi's, Jodi decided it was high time to indulge in her own cat cake dreams and make the the cake herself, which she didn't have the joy of making as a child. She used the Silver White Cake recipe from page 94, and the recipe for that is HERE. The cake came out great; it's indeed very white and just like the Dinette Cake, it was fluffy and moist and plain awesome.

And now, let me present to you, Jodi's Kitty Cat Cake! She used Dots candy for the eyes and paws and piped on the whiskers with melted chocolate.

Cute, eh? The frosting is Betty's Chocolate Butter Frosting from page 125.

Betty Crocker's Chocolate Butter Frosting (page 125 of the 1969 edition)

⅓ cup soft butter or margarine
2 ounces melted unsweetened chocolate (cool)
2 cups confectioners’ sugar
1 ½ teaspoons vanilla
About 2 tablespoons milk

Mix thoroughly butter and cooled chocolate. Blend in sugar. Stir in vanilla and milk; beat until frosting is smooth and of spreading consistency.

Fills and frosts two 8- or 9-inch layers or frosts a 13x9-inch cake.

There was just enough frosting for the cat cake.

There you go! Another Betty Crackpot success!

Saturday, April 07, 2012

Bagels Redux

I was nearing the end of my last batch of bagels, so this weekend I decided to make some more. I am determined to become a bagel-making queen! Again I used Rose Levy Beranbaum's recipe from The Bread Bible, but I did a few things differently this time.

  • I made 12 bagels from the recipe instead of 10. This worked very well and I was very happy with the size this batch came out as
  • I reduced the black pepper to 1/2 tsp instead of a full tsp. The last batch was too peppery. I might forgo the pepper altogether next time
  • I used a whole egg for egg wash instead of just the whites. Not a big change, but it worked just as well
  • most notably, I boiled the bagels for a longer time than I did previously. This, I think, was key in making them nice and chewy
  • I baked them at a higher temperature for a shorter period of time
  • I did half with sesame seed topping and half with coarse salt
I still need a lot of practice portioning and shaping the bagels. One of the reasons I decided to go with 12 bagels over 10 is that it was easier for me to eyeball the portions, but even with this change I had different-sized bagels. What I might do next time is weigh the dough out before portioning and divide the weight by 12 so I'll get the most consistent size. Shaping is still an issue, though it was better this time than it was before. Rolling ropes of dough, or making holes in dough like this, is not one of my fortés.


So, things are coming along. These should last me over 2 weeks, so I'll make more then.

Wednesday, April 04, 2012

New Series: Cooking with Betty Crackpot

I was having a bad day today, but it wasn't a complete write-off because I came up with a new idea, a series for this blog based on recipes from my mom's 1969 copy of Betty Crocker's Cookbook. I've mentioned several times here that I grew up with this book and that it was partially responsible for my wanting to become a baker. Last fall, I was on holiday in PEI, where my mom lives, and I asked her if she still had the book, and she did! It's a little worse for wear - the spine is missing and the binding is falling apart, and it's stained and dog-eared and definitely "well-loved" - and after not very much convincing at all, Mom let me take the book home with me.

Growing up, my mom always wittily referred to Betty Crocker as Betty Crackpot, and it stuck with me (why wouldn't it?), so that's why I'm going with it for the title of the new series. This book has everything under the sun in it, and the food styling is absolutely horrendous by contemporary standards. My aim is to reacquaint myself with some childhood favourites for nostalgia purposes, as well as try out some new old funky stuff that might be good - or not. I also aim to entertain! I'll try to stay as true as possible to the original recipes, except I will not be using any vegetable shortening and I'll probably cut down on the fat a bit because, man, some of these recipes are decidedly not healthy. Then there will be things I can't find because maybe they don't make them anymore. I should be interesting, and it should be fun.

First up, something not very unusual or unattractive Dinette Cake, found on page 97. I believe this is the batter we made when I first used my Easy Bake Oven when I was very young. It's a very simple recipe, but the method of beating the crap out of the batter seemed counter-intuitive to me. But nonetheless, I beat the batter as the directions stated.

Dinette Cake, Betty Crocker's Cookbook, page 97

1 ½ cups cake flour or 1 ¼ cups all-purpose flour
1 cup sugar
1 ½ teaspoons baking powder
½ teaspoon salt
¾ cup milk
⅓ cup shortening
1 egg
1 teaspoon vanilla

Heat oven to 350°F. Grease and flour square pan, 8x8x2 or 9x9x2 inches. Measure all ingredients into large mixer bowl. Blend ½ minute on low speed, scraping bowl constantly. Beat 3 minutes high speed, scraping bowl occasionally. Pour into pan.

Bake 35 to 40 minutes or until wooden pick inserted in center comes out clean. Cool.

The original recipe suggests Peppermint Cream Cheese Frosting or Coconut Broiled Topping.

I chose no topping because I have homemade mint chocolate chip ice cream on hand!

As you can see there are some darker brown spots on the surface of the cake; this is because there were a lot of air bubbles in it as it baked. I used an 8x8" pan.

And the finished product:


The verdict: OMG, so awesome! I could have eaten the whole thing on my own. The texture was amazing, the flavour was amazing...The beating of the batter didn't seem to harm the texture of the cake, which was good. Such a simple recipe with such a super result. And the scent of it really brought back memories...Yum!

Monday, April 02, 2012

Cream Egg Brownies

Here is another Pinterest find that I couldn't resist. I do loves me a Cadbury Cream Egg around Easter time, though I prefer the mini eggs because they're less sweet. I thought this brownie idea was pretty fracking brilliant. And I had all the ingredients on hand, so that was cool, too. Thanks to my roommate T for having a huge bag of milk chocolate chips on hand!

The original recipe is HERE.

Here is my product:
I had one issue with the recipe and that was the filling: 1/4 cup of corn syrup wasn't enough moisture to absorb all the icing sugar, so I had to add some whipping cream to it to loosen it up.

I don't have any yellow food colouring at the moment, so I didn't bother tinting part of the filling.

These were a huge hit with my roommate, who claimed they were better than a cream egg. This recipe has been kid-tested and approved, too, by my young roommate, R, and her friend who was over playing when I made these.

Definite keeper of a recipe!

Friday, March 23, 2012

Doughnut Time!

Today I ventured into as yet uncharted territory: the making of doughnuts.

As I mentioned in this post, I went to Top Pot in Seattle this month and picked a copy of their cookbook. When my roommate, T, went through the book, she spied a recipe that tickled her fancy right away: the Pumpkin Old-Fashioned Doughnuts. T, like me, loves pumpkiny baking, and since I had some of the stuff stashed in the freezer after making the pull-apart loaf, I was in.

Here is the recipe, which I lazily cut and pasted from this site (thank you, Nicky).

Pumpkin Old-Fashioned Doughnuts

For the Doughnuts

  • 3 cups cake flour, plus more for rolling and cutting
  • 2 tsp. baking powder
  • 1 tsp. iodized salt
  • 3/4 tsp. ground nutmeg
  • 2 tsp. pumpkin pie spice
  • 1/2 cup sugar
  • 2 Tbsp. shortening/vegetable lard
  • 2 large egg yolks
  • 2/3 cup sour cream
  • 1/2 cup canned pumpkin
  • Canola oil, for frying

For the Pumpkin Glaze

  • 4 1/2 cups confectioners sugar
  • 2 tsp. light corn syrup
  • 1/4 iodized salt
  • 1 tsp. pumpkin pie spice
  • 1/4 cup canned pumpkin
  • 1/2 tsp. vanilla extract
  • 1/4 cup hot water
  1. To make the doughnut dough: Sift the flour, baking powder, salt, nutmeg, pumpkin pie spice together into a medium bowl, and set aside.
  2. In a stand mixer fitted with a paddle attachment, mix the sugar and shortening for 1 minute on low speed, until sandy. Add the egg yolks, then mix for 1 minute on medium speed, scraping the sides of the bowl with a rubber spatula if necessary, until the mixture is light colored and thick.
  3. Add the dry ingredients to the wet ingredients in three separate additions, alternating with the sour cream and pumpkin, mixing until just combined on low speed and scraping the sides of the bowl each time. The dough will be sticky, like wet cookie/biscuit dough.
  4. Transfer the dough to a clean bowl and refrigerate, covered with plastic wrap/cling film, for 45 minutes (or up to 24 hours).
  5. Meanwhile, make the pumpkin glaze: Place the confectioners sugar, corn syrup, salt, pumpkin pie spice, pumpkin and vanilla in the work bowl of a stand mixer fitted with the paddle attachment. With the machine on medium speed, add the water in a slow, steady stream, and blend until all the sugar has been incorporated, scraping the bowl a few times if necessary. Set aside.
  6. Using a candy thermometer to measure the temperature, heat oil (at least 2 inches deep) in a deep fryer, large pot, or high-sided frying pan to 325 degrees F. Roll out the chilled dough on a generously floured counter or cutting board to 1/2 inch thick, or about 8 inch in diameter, flouring the top of the dough and the rolling pin as necessary to prevent sticking. Cut into as many doughnuts and holes as possible, dipping the cutter into the flour between each cut. Fold and gently re-roll the dough to make extra holes (working with floured hands makes the dough less sticky), and cut again.
  7. Shake any excess flour off the doughnuts before carefully adding them to hot oil a few at a time, taking care not to crowd them. Once the doughnuts float, fry for 15 seconds, then gently flip them. Fry for 75 to 90 seconds, until golden brown and cracked, then flip and fry the first side again for 60 to 75 seconds, until golden. Transfer to a rack set over paper towels/absorbent paper.
  8. While the doughnuts are still quite hot, dip the side with the deepest cracks on each into the warm Pumpkin glaze. Let dry on cooling racks, glazed side up for about 15 minutes.

Needless to say, these came out just amazingly. I especially loved all the little "Timbits"! Of course, now we have a bunch of doughnuts kicking around the house, but I've had worse problems.

One issue I had was that there was too much glaze for the number of doughnuts I had, so I have put the remaining glaze aside for another use. I'm not sure what that use would be at this point, but it's there should inspiration strike.


As you can see from the photo, I deep fried in my wok. This is my preferred deep frying vessel and it always works great.

This was definitely a worthwhile experience and I'm sure I'll be making more recipes from the book, but next time a yeast doughnut, perhaps. I have my eyes on the Raspberry Bullseyes!

Wednesday, March 14, 2012

Crumb Cake Heaven

Yes, another post about baking Jodi did while I was visiting her recently! This time, a heavenly crumb cake with tons of crumb topping that was probably my favourite thing she made while I was there.


Jodi found the recipe here. Funnily enough, it originated from a Cook's Illustrated issue from 2007, which we found ironic after this post & video, but Jodi assured me there weren't 80 ingredients in it and the recipe was easy to follow. :)

Yes, the amount of crumb topping on this cake was very impressive. Usually, crumb cakes don't have enough crumbs on them for my liking, but this cake was not lacking in that department at all. Also the texture of the cake was blissfully velvety, probably due to the fact that it was made with cake flour. The recipe states that one should not substitute the cake flour with regular all purpose flour; I'd concur with that after eating the cake - it would not have been the same.


We ate quite a bit of the cake in one day, but Jodi did pack me with two slabs to take home with me on the train, for which I am very grateful. I'm definitely going to have to try this one out myself, soon.

Friday, March 09, 2012

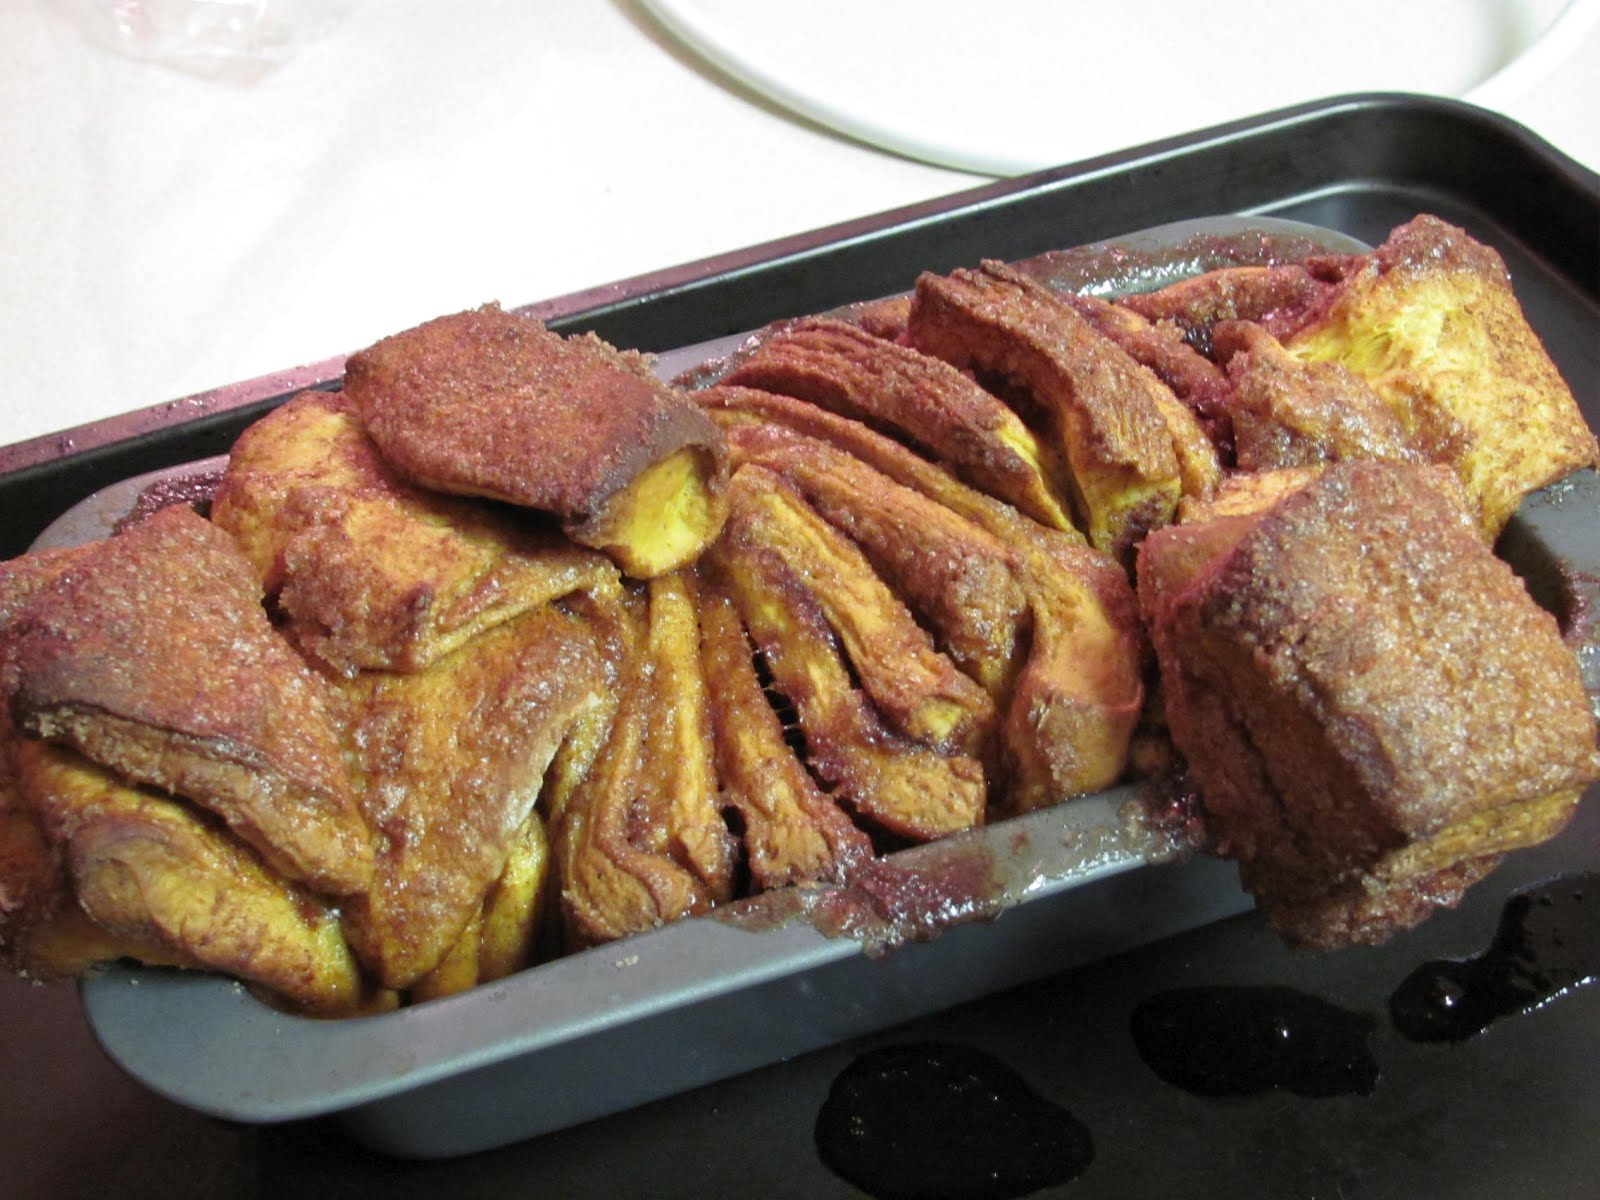
Pull-apart Cinnamon Sugar Pumpkin Bread with Rum Butter Glaze

Oh, Pinterest, how do I love thee? Sometimes, way too much. But as I've said before, the food on it is unbelievable, and when I saw the recipe for this treat I knew I had to make it, and last week, I did. I even went and purchased a mini of rum for the glaze!

The original blog post & recipe is here.

So, let's get down to business. After making the dough (I used instant yeast so I didn't have to go through the extra step of activating it) and letting it rise, I went about shaping it. The instructions say to roll the dough out into a 20x12" rectangle, spread with the cinnamon sugar mixture, and cut that into six strips. Then you take those strips and lay them on top of each other, and then cut them into six squares. After that, you stack the squares on their edges in a loaf pan. I greased my loaf pan pretty well.


Then the loaf goes for another rise. This is where I had some issues. The squares were quite tightly packed in the pan, but as the loaf rose, the end ones rose up and out of the pan.


Upon baking, I got quite an odd-looking and lopsided loaf:


The other issue I had was that the bottom of the loaf caramelized to the loaf pan and I couldn't get the loaf out of the pan until it was rather cool and I could get my hands in and kind of tear it out by the roots. I just removed it straight to a platter for serving.


So, it wasn't over attractive. But so what? This was absolutely delicious! The rum & butter glaze was absolutely to die for, and that little recipe is going up my sleeve for some other ideas I have for it, like as a cinnamon roll glaze, for instance.

The only criticism I had was that the pumpkin flavour was quite lost with all the other flavours going on in here. It added a nice colour to the dough, though. But if I do this again, I might use more pumpkin or alter the recipe so that it's more of a brioche dough and just do a more plain pull apart loaf. But look at it! It's gorgeous!


My roommates and I tore into it and dipped the pieces in more glaze until we nearly devoured it. We left just enough for a small snack the next day.

Here it is again, from another angle:


Definitely a keeper of an idea. Go Pinterest! My roommate and I are working on another Pinterest recipe now, but it takes a while so I won't get a post up about it quite yet, but it should be worth the wait, especially if you love Reese's Peanut Butter Cups and vodka. :D

Sunday, August 28, 2011

Shindig Rundown

Yesterday I had a small gathering at my place as a kind of going-away party, with the ulterior motive of using up as many of my leftover baking ingredients as possible before I move - all part of OPC (Operation Pantry Clear-out). It was lovely to just bake and bake for a couple of days. I realize I've been missing that in my life. However, the weather here was so hot, and continues to be, so it was a tad uncomfy to be in my kitchen for the amount of time I was. But it's OK.

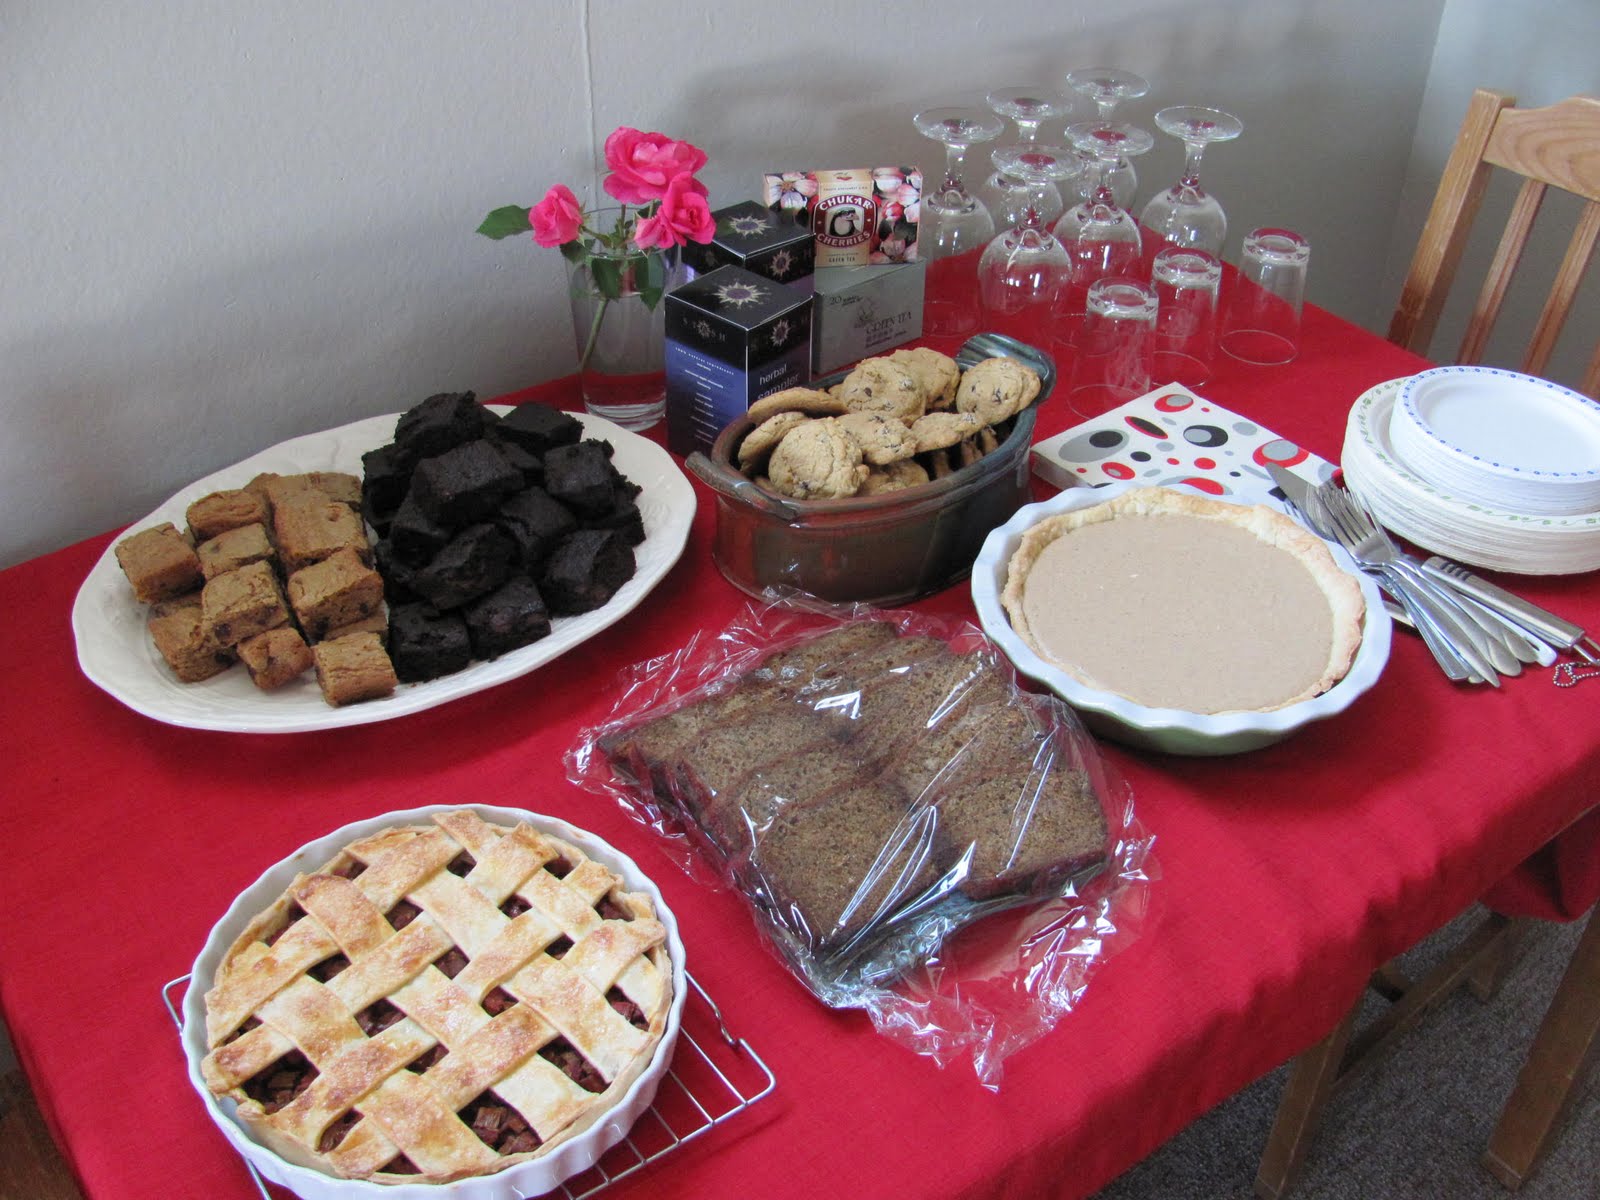
Here is a shot of my spread:


So, on the white platter, top left, we have these rum & chocolate chip blondies, only without pecans because I'd already used them all up. Also on that plate are sour cherry & chocolate chip brownies. That recipe is basically my usual blondie recipe, only I replaced 1/2 cup of the flour with 1/2 cup of sifted cocoa powder. They are amazing!

In the pottery bowl next to that platter (the pottery was made by my super-talented potter friend, S) are these cookies. They were great.

Bottom row, left, we have a rhubarb tart. I made the pâte brisée recipe from Earth to Table, which you can see here. Incidentally, that's the same pumpkin pie recipe I used for the pumpkin pie you see in the bottom row, right, in the photo. It's sooooooooo gooooooood! I love that pumpkin pie recipe! It was a big hit at the shindig yesterday. For the rhubarb tart, I used frozen rhubarb, that, as it thawed, shrunk into probably just less than 4 cups of rhubarb; very annoying. But it was perfect for a tart, and I decided to do a lattice top. The rhubarb tart was a hit, too. The filling also contained 1/2 cup sugar, 1/2 tsp ginger, 1 tsp cinnamon, and about 1 tbsp of cornstarch.

Finally, between the two fruit pies/tarts, we have a basic banana bread. Very basic. I got this recipe from my friend Anita, who made this regularly when we were in university together. It's been my go-to recipe ever since because it's super simple and super moist.

Anita's Banana Bread

2 ripe bananas, mashed
2 eggs
1/2 cup butter, melted
1 cup brown sugar
1 1/4 cups flour
1 tsp baking soda
dash of salt
1/2 cup walnut pieces, optional

Beat the eggs with a whisk and add butter, brown sugar, and bananas until well-combined. Sift in the flour, soda, and salt until the batter comes together. Add nuts, if using. Pour into a greased or lined loaf pan and bake at 350F for about an hour.

Everyone went home with a baking doggy bag. I'm leaving soon after all - I didn't want to keep any of it.

Up next, my trip to the Maritimes, Wolfville, Nova Scotia and Charlottetown, PEI, to visit family, I just know there is going to be absolutely TONS to food blog about! I can't wait!

Sunday, August 21, 2011

Chocolate Chip & Sour Cherry Cookies

I'm moving to the coast at the end of September, which has prompted me to start Operation Pantry Clear-out (OPC). I'm trying to use up as much as I can so I have less to move. Makes sense, right? Next Saturday, I'm throwing myself a little going away shindig and I thought it would be a great opportunity to bake like a madwoman in order to use up all kinds of stuff. Today I started, and this cookie recipe was the first thing on my list. Originally, this came from Tish Boyle's The Good Cookie, but I adapted it slightly since I don't have any white chocolate on hand (and why would I go and buy it, since OPC is in full swing) and I didn't use slivered almonds (again, not on hand so tough luck). My version is hugely delicious, however!

Chocolate Chip & Sour Cherry Cookies (adapted from Tish Boyle's The Good Cookie, page 59)

2 1/2 cups all purpose flour
1 tsp baking soda
1/4 tsp salt
1 cup butter, softened
3/4 cup granulated sugar
3/4 cup firmly packed brown sugar
2 large eggs
1 tsp vanilla extract
1/4 tsp almond extract
3/4 cup dried sour cherries
1 cup chocolate chips

You know the drill (don't you?). 350F for 15 or so minutes. I got about 3 dozen.

Incidentally, as part of OPC, I also made the blondie recipe right below this post - and used up the rest of my rum! They are very rummy indeed!
EDIT: the cherries are Chukar cherries, and my friend Jodi - giver of great foodie gifts - got them from here.

Monday, August 01, 2011

Chocolate Chip Pecan Blondies...With Booze!

The Good Cookie is a book I bought a few years ago and have not used enough. It's not that it doesn't have good recipes in it - it does - but I seem to always go back to my tried & true recipes and I seem to overlook it. But, in an attempt to reassess what cookbooks belong on my dedicated bookshelf and which ones I can do without - because I'm moving - I revisited the book to look for inspiration. And I found this recipe, which turned out to be just killer. The rum is essential, let me tell you! In fact, I doubled the amount to make these extra boozy! Yeah, I'm keeping this book. I gave the blondies, again, to family members because, again, what is a single gal trying to watch her waistline going to do with a big pan of blondies?

Chocolate Chip Pecan Blondies, adapted from The Good Cookie, page 119, by Tish Boyle

1 1/2 cups all purpose flour
1/2 tsp baking powder
1/4 tsp salt
1 cup butter
2 cups firmly packed brown sugar
3 large eggs, at room temperature
2 tsp vanilla
1/4 cup amber rum
1 1/2 cups chopped pecans
1 cup chocolate chips

1. Preheat oven to 350F and line a 9x13" baking dish with parchment paper, or grease & flour it very well.

2. In a medium bowl, whisk together the dry ingredients.

3. In a mixer, beat butter & brown sugar until light and fluffy, about 2 minutes. Scrape down the sides of the bowl. Beat in eggs, one at a time. Beat in vanilla and rum. At low speed, mix in the dry ingredients until just combined. Fold in the pecans & chocolate chips.

4. Scrape batter into prepared pan and smooth the top. Bake for 35 - 40 minutes, or until just golden brown and the centre is set. A toothpick should come out clean but not dry. DO NOT OVERBAKE THESE!

5. Cool completely, portion, and serve!

Magazine Monday #82: Pumpkin Coconut Pound Cake

In addition to having a lot of frozen rhubarb on hand to use up before I move at the end of September when I move to the coast, I also have a ton of pumpkin in the freezer I really don't want to go to waste, either. I have a lot of pumkin recipes kicking around, and this one I have had in my binder for a few years; it's from Cooking Pleasures Magazine, which I used to get with my membership in the Cooking Club of America. I let my membership to this lapse a few years ago because it was getting too expensive with all my other various subscriptions (which have also gone by the wayside by now, too) but I still have quite a few recipes I've saved I want to try.

I made this last week and gave it to some family members to eat; I certainly didn't need an entire cake hanging around my house, especially as it was my birthday and I knew I was going to have lots of leftovers from my celebration (more about that later). I did take one slice, however, just to taste. I'll give you my critique after the recipe! Originally, this recipe is accompanied by a creamy vanilla sauce, but I didn't do that. I also didn't add the pecans as I had just used mine up in another project.

Pumpkin-Coconut-Pecan Pound Cake, from Cooking Pleasures Magazine

1 cup butter
2 cups sugar
4 eggs
1 can (15oz) pumpkin puree (I used 2 cups of my own pumpkin puree)
2 tsp vanilla extract
3 cups all purpose flour
2 tsp baking powder
1 tsp baking soda
1 tsp ground cinnamon
1/2 tsp ground nutmeg
1/4 tsp salt
1/2 cup sweetened flaked coconut (I used unsweetened)
1/2 cup chopped pecans

1. Preheat oven to 350F. Grease & flour a 12-cup bundt pan. In a large bowl, beat the butter until light & fluffy. Beat in the sugar until light & fluffy. Add eggs one at a time, beating well after each addition. Beat in pumpkin & vanilla until well combined. Mixture will look curdled.

2. In another bowl, whisk together the dry ingredients. At low speed, slowly add them to the wet ingredients. Fold in coconut & pecans.

3. Spoon into prepared pan & bake...about an hour or so, or until done.

4. Cool & serve!

Now I really liked the combination of pumpkin & coconut. I love both flavours and they work well together. But this cake wasn't super pumpkin-y, which was disappointing. The colour was a bit pale. I also over-baked this slightly, so it was a bit dry. My bad for sure. The taste was good and I would try this again, just perhaps with a bit more pumpkin in it and I'd be a little more careful with the baking time.

If you make it, let me know how it goes!

Saturday, June 04, 2011

Magazine Monday #81: Peanut butter, chocolate chip, and bacon cookies

I have to admit, until today, I hadn't ventured into the whole chocolate-bacon flavour combination craze. But as is common with me, strange cravings come upon me suddenly, and I get to thinking about recipes I've come across that didn't appeal to me at first glance but all of a sudden seem like something I just have to have right now. This recipe was one of those times.

Thank God - and my mom! - for Food Network Magazine! In the most recent issue, they had a recipe for peanut butter, chocolate chip, and bacon cookies, and so I made them this afternoon when a craving inserted itself into my brain.

The recipe is here.

Usually not a fan of savoury items paired with chocolate, these cookies were awesome! In fact, I think they could have used more bacon than what the recipe called for. I didn't put the chilli powder in the dough because I thought that was going a bit too far and seemed a bit too weird, but the bacon paired with the peanut butter and chocolate was just great. The cinnamon was a perfect little hint of spice. My dad came over and I fed him some, and he thought they were the oddest combination of ingredients out there - and he couldn't taste the bacon. So next time, more bacon! Also, I had to add a few tbsp of milk to the dough as mine was too dry to form into balls.

Other than that, a totally keeper recipe!

Sunday, May 15, 2011

Scones for a Crowd

This is a recipe we make weekly at work, and they all go up to the hospital coffee shop. We alternate between blueberry one week and cranberry the next. This is a pretty good recipe, I have to say. It makes four big rounds that we cut into eight triangles.

Cream Scones

9 cups flour
4 tbsp baking powder
1 1/3 cups sugar
2 tsp salt
2 cups butter
8 eggs
3 cups cream or milk
egg wash & granulated sugar for topping
blueberries, cranberries - frozen - optional

Whisk together the dry ingredients and cut in the butter until it's small pea-size. In a separate bowl, whisk together eggs and cream. Make a well in the dry ingredients and add the wet until combined. Add fruit at this point. It's always better to use frozen fruit so the juices don't saturate the batter with tons of colour. It's an aesthetic thing. Don't overwork the dough, but make sure you get a nice consistent dough. It will be sticky. Turn it out onto a well-floured surface and cut into four even pieces. Pat each piece into a circle about 1" thick. Place on greased baking sheet and cut into desired number of triangles. Glaze with egg wash & sprinkle with sugar. Bake at 350F until golden brown and cooked through.

Enjoy!

LinkWithin

Blog Widget by LinkWithin