I'll be leaving tomorrow for my Christmas vacation with my family. I thought I'd post some of my favourite Christmas recipes for you to check out. I don't know if I'll make any of them while away, but if you try them, let me know how they turn out! In the meantime, I wish all my readers a holiday time full of good food, good fun, and good fellowship.
Christmas for me always meant having special things we never had at any other time of the year. The following two recipes were made by my mother every year, only at this time of year. I looked forward to Christmas because I loved these two particular items. They're very simple but very good.
Creamy Salmon Spread
1 can drained red salmon
1 package cream cheese, at room temperature
1/2 small onion, grated
4 tsp fresh lemon juice
2 tsp horseradish
1/2 tsp Worcestershire sauce
1 or 2 drops tobasco sauce
salt & pepper
Directions.
Combine.
How hard is that?
Cheese Ball
8 oz cream cheese, at room temperature
8 oz medium or sharp cheddar cheese, grated
1/3 cup mayonnaise
1 small grated onion
1 clove garlic, crushed
Directions
Mix well. Roll into a ball and roll the ball in some chopped nuts. Or, press it into a bowl.
Got it?
Christmas Chip Cookies
I can't remember where I got this recipe, but it was during my time in Ottawa. These are really good. I bought the Christmas (i.e. red and green) M&Ms or Smarties at Bulk Barn.
1 1/4 cups firmly packed brown sugar
3/4 cup butter
2 tbsp milk
1 tbsp vanilla
1 egg
1 3/4 cups flour
1 tsp salt
3/4 tsp baking soda
2 cups M&Ms or Smarties
1. Preheat oven to 375F.
2. Cream butter and sugar until light and fluffy. Add egg, milk, and vanilla and beat until fluffy. Sift in the dry ingredients and combine. Add the M&Ms or Smarties until mixed in. Drop onto cookie sheet and bake 8 - 10 minutes for chewy cookies or 11 - 13 minutes for crisp cookies.
Two-Tone Chocolate Shortbread
This came from the 1998 Bakefest insert that comes in Canadian Living. I love these little booklets and get lot of great recipes from them. In fact, I look forward to the Christmas edition of Canadian Living just for the Bakefest booklet!
1 cup softened butter (DON'T use margarine, for crying out loud! This is shortbread!)
1/2 cup granulated sugar
1 1/2 cups all purpose flour
1/2 cup cornstarch
2 oz (or 2 squares) semi sweet chocolate, melted
1. In a large bowl with electric mixer, beat butter and sugar until fluffy. Sift together flour and cornstarch. Beat into butter mixture until just mixed.
2. In a 9" square baking pan, drop half of dough in small portions, scattering randomly. Combine melted chocolate with remaining dough. Drop small chocolate portions in between white dough portions in pan. Press top lightly to flatten.
3. Bake at 300F for 25 minutes or until firm to touch in centre. Let cool and cut into squares or bars. These also freeze very well.
Nanaimo Bars
Okay - I definitely only make these at Christmas because they are so decadent and having them around the house at any other time of the year is just not a good plan. These are one of my absolute favourite food items ever! This particular recipe comes from Canadian Living magazine.
Base:
2 cups graham cracker crumbs
1 cup flaked coconut
1/2 cup finely chopped walnuts
1/2 cup butter, melted
1/3 cup cocoa powder, sifted
1/4 cup granulated sugar
1 egg, beaten
- In a bowl, stir together all ingredients. Press into a 13x9" pan, greased or parchment-lined. Bake at 350F until firm, about 10 minutes. Let cool completely on a rack. Like, completely, eh? As in cold.
Filling:
1/2 cup butter
1/4 cup custard powder (like Bird's)
1 tsp vanilla
4 cups icing sugar, sifted
1/4 cup milk
In a large bowl, beat the butter, custard powder and vanilla until light and creamy. Alternately beat in icing sugar and milk in two additions of each. Spread over COOLED base. Refrigerate for one hour or until cold.
Topping:
8 oz semi-sweet chocolate, chopped
2 tbsp butter
- Melt chocolate and butter in a bain marie, i.e. in a bowl over a saucepan of hot, not boiling water. Spread over filling. Refrigerate until almost set. With the tip of a sharp knife, score into bars. Refrigerate until the chocolate is set. Cut into bars along lines. (NB: if this isn't working neatly, use a hot knife. Put hot water into a pitcher and dip the knife in, then cut the bar. Repeat, wiping off the knife with a clean cloth or papertowels.)
Enjoy, everyone! See you in the New Year!

Sunday, December 18, 2005
Sunday, December 04, 2005
Party Salads
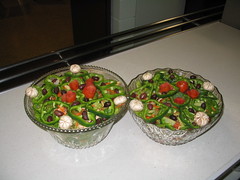
Party Salads
Originally uploaded by wanderingcoyote.
This was something I was pleased with: the salads I made for the the Christmas party dinner last night. This was my first attempt at tomato roses and I spent a long time carving those mushrooms into stars, also something I'd never done before. The picture hardly does them justice!
Christmas Cake
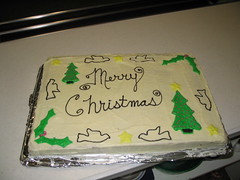
Christmas Cake
Originally uploaded by wanderingcoyote.
This is the cake I made for a luncheon we catered last Thursday. It's a 16"x24" slab of Orange Cake. I was not happy with how it turned out at all. I am capable of so much better and just couldn't make my vision conform to what I wanted in reality. Everyone but me was thrilled with it.
Pulla
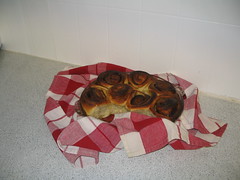
Pulla
Originally uploaded by wanderingcoyote.
This is a Finnish recipe I got from my friend Anita, who is half Finnish. Her mom gave her a copy of a cookbook (keittokirja) put out by the Emmaus Lutheran Church in Burnaby and all most of the recipes are from the homeland, and all are printed in both Finnish and English. Anita has fond memories of pulla, as her grandmother used to make it. She was craving it last weekend and I offered to make her some. She frowned and said, "It's a little complicated." I frowned back and said, "I'm a professional." That sealed it, and away I went.
This is very similar to the French milk bread (pain au lait), only flavoured with cardamom. Try to get the freshest cardamom you have for the best results.
Finnish Pulla Dough
2 cups milk, 120 - 150F (or very warm but not scalding)
2 tbsp quick yeast
2 tsp salt
1 egg, beaten
3/4 cup sugar
1 tbsp ground cardamom
approx. 2 cups all purpose flour
1 cup butter, softened
1. Throw all your dry ingredients into a large bowl. Add the milk and mix. Add the egg and mix. Remove the dough onto a floured surface and begin kneading it, gradually adding the butter in knobs. Alternately, put the warm milk into the Kitchen Aid bowl and throw all your dry ingredients on top. Add the egg and mix on speed one. Develop the dough on speeds 2 - 6, gradually adding the softened butter.
2. Knead the dough until smooth and elastic. It might be slightly sticky after the butter is added, but that's ok. By hand, this'll take a good 6 - 8 minutes of muscle power; in the KA it'll take about 4 - 5 minutes.
3. Let the dough rest for 5 minutes. Then roll it out into a rectangle approximately 1/4" thick. Spread it with thin layer of butter, and on top of this sprinkle brown sugar and cinnamon. Dot with more butter. Roll up as in a jelly roll and slice into 1 cm thick slices. I got 9.
4. Place in a greased baking dish. In this case, I used a 9" glass pie plate. Allow the dough to rise to double its bulk. I typically turn my oven onto low and turn the light on. Once the temperature light has gone out, I let some of the heat out and place a pan of boiling water in the oven. This should be sufficient heat to rise and mine took about an hour to double.
5. After the dough has risen, preheat the oven to 400F. Bake for 30 minutes or until golden brown. (The original recipe calls to brush the dough with sugar water before baking.)
Notes
- You can do several things with this dough other than make cinnamon buns. You can make Boston Cake, which is like a cinnamon bun only includes raisins and apple chunks. You can make Shrove Tuesday buns, which involves dividing the dough into small buns and baking them. Once out of the oven, you cut the buns and spread them with the following filling: 2 cups icing sugar, 2 cups ground almonds, 1 egg white. Whipping cream can also be added to the middle along with this filling. Additionally, you can braid this dough, dividing it in 3 and rolling it out into 15" strips. Braid, pinch ends, and tuck under.
- I halved this recipe to make the 9 cinnamon buns, and that's about all the Kitchen Aid bowl I used could tolerate.
Saturday, November 26, 2005
Baked Rigatoni and Meatballs
My mom got this recipe from an old issue of Canadian Living and made it once in a blue moon. It was so good though and I have since made it for dinner parties I've thrown with good friends to ooh and ahh over it. There are a lot of ingredients, but don't be put off.
Baked Rigatoni and Meatballs
2 tbsp olive oil
1 onion, diced
2 cloves garlic, crushed (use as much as you'd like, though)
3 cups sliced mushrooms
1 green pepper, diced
1 1/2 tsp each dried basil and sugar
1 tsp dried oregano
1 tsp salt
3/4 tsp pepper
1 can (28oz) diced tomatoes, or whole tomatoes broken up
2 tbsp tomato paste
3 1/2 cups rigatoni pasta
1 1/3 cups grated mozzarella cheese
1/4 cup grated parmesan cheese
Meatballs:
1 egg, beaten
1/3 cup finely chopped onion
1/4 cup fine breadcrumbs
2 cloves garlic, crushed
3 tbsp parmesan cheese
1 tsp dried oregano
salt & pepper
1 lb lean ground turkey (you can use lean ground beef if you'd like; I prefer the turkey myself)
1. For the meatballs, combine the ingredients until well blended and shape into balls. My mom used to put them in a plastic colander on a plate and microwave them and this worked very well. You can bake them or brown them on the stovetop for 8 - 10 minutes - whatever works. Cook them just before you put them into the sauce, and make sure they're thoroughly done (i.e. no longet pink in the middle).
2. Saute the veggies and spices in the olive oil until softened. Stir in tomatoes and paste and bring to a boil. Reduce heat and simmer for 30 minutes or until slightly thickened. Add meatballs.
3. Cook rigatoni until al dente. Drain and return to the pot; add sauce and meatballs. Transfer to an 8 cup casserole and sprinkle with cheeses.
4. Bake at 400F until cheese is melted and the top is golden.
Bon Appetit!
Friday, November 18, 2005
Pumpkin Harvest Cheesecake
For my American readers, heading into Thanksgiving, I present to you a fabulous change from the usual pumpkin pie (not that there's anything wrong with it). I made this a while back and it was great.
Pumpkin Harvest Cheesecake
Crust:
3/4 cup chocolate wafer crumbs
1/3 cup finely chopped pecans
3 tbsp butter, melted
- Heat oven to 350F. Combine ingredients and press onto bottom of 9" springform pan. Bake 10 minutes. Let cool.
Filling:
1 1/2 cups pumpkin puree (NOT the pie filling!)
3 eggs
1/2 cup firmly packed brown sugar
1 1/2 tsp cinnamon
1/2 tsp ground ginger and nutmeg
3 packages (250g each) cream cheese, softened
1/2 cup sugar
1 tbsp cornstarch
- Whisk together pumpkin, eggs, brown sugar, and spices. In a separate bowl, using an electric mixer, beat cream cheese, sugar and cornstarch; blend into pumpkin mixture. Pour over crust. Bake 50 - 55 minutes, or until centre is just set.
- Remove from oven and run knife around edge of cake. Cool completely. Refrigerate overnight.
As you can see, cheesecake isn't a complicated feat to take on. Here are a couple of tips, though, to help you not get a huge crack down the centre of your finished product.
1. Do run a knife around the edge of the cheesecake gently as soon as you take it out of the oven. The cake will sink as it cools (expansion and contraction of heated materials, etc.) and if you loosen the edges, they won't tug at the cake as it sinks.
2. Don't overbeat your filling. If you add too much air to it, it'll puff up too much and then sink even more as it cools.
3. Some recipes call for baking the cheesecake in a waterbath. I generally don't do this unless the recipe specifically states it. I have found that the extra moisture in the oven increases the baking time and inhibits the setting of the cake. But the waterbath does insulate the cake and this can help prevent cracking. Like I say, follow the recipe.
4. If you do get a crack, you can cover it by making a simple glaze using sour cream, a bit of sugar, and a bit of whipping cream to loosen it. I would only do that on cheesecakes that are predominantly white, though. In this case, just plate it and add a dollop of whipped cream, sift some cinnamon over top and voila! Enjoy!
Bacon and Cheese Strata
Funny how I'm the breakfast/brunch cook around here, yet this is the meal I have the least imagination for. I purchased a book over the summer to help me out called The Big Book of Breakfast, by Maryana Vollstedt. It has a lot of great recipes in it, and I made this one for a brunch one morning in August.
Bacon and Cheese Strata
4 slices day old white bread, crusts removed
6 slices bacon, cooked and crumbled
6 large eggs
1 1/2 cups whole milk
1/4 tsp salt
freshly ground pepper
2 drops of Tobasco sauce (or to taste)
1/2 cup grated cheddar cheese
3 tbsp chopped parsley
1/2 cups grated Monterey Jack cheese
1/2 red bell pepper, seeded, and cut into rings
1. Arrange the bread slices, slightly overlapping, in a lightly sprayed or oiled 8x11.5" baking dish. Scatter the bacon over top.
2. In a large bowl, whisk together the eggs, milk, salt, pepper, and Tobasco. Fold in grated Cheddar and parsley. Pour the egg mixture over bread and bacon. Sprinkle with grated Monterey Jack. Cover and refrigerate several hours or overnight.
3. Preheat oven to 350F. Bring strata to room temperature before baking. Arrange bell peppers over top. Bake, uncovered, until set - about 45 - 5o minutes. Let stand for 10 minutes. Cut into squares and serve.
Notes
- I used all Cheddar because we don't get Monterey Jack. The beauty of this recipe is you can really add whatever you want.
- This puffs up quite a bit, so make sure your pan is deep enough.
- This recipe makes multiples well. I made it for two dozen and this recipe is supposed to serve 4 - 6 people.
Here are some tips from the beginning of the strata chapter to help you along.
1. Use day old bread, or bread you've lightly toasted, or bread you've let air-dry. This is so the milk/egg mixture will soak up nicely into the bread.
2. Use whole milk, or half-and-half. Low fat milks don't provide enough structure.
3. Make the strata several hours ahead or the night before to allow the bread to absorb the custard. Press the bread down to be sure it is fully covered.
4. Bring the strata to room temperature before baking, or allow an extra 10 minutes of baking time (which is what I did).
5. If the strata becomes too brown on top, cover it with foil for the rest of the baking time.
6. Let the strata stand for 10 minutes before serving.
Bon Appetit!
Tuesday, November 15, 2005
Cake Decoration
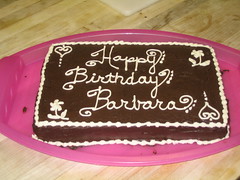
Birthday Cake
Originally uploaded by wanderingcoyote.
I did this yesterday and I think it's the nicest cake I've done yet.
The cake is the chocolate cake recipe I posted a month or so ago. The icing is just a simple buttercream. I piped the writing with a #4 plain tip and the scalloped border was done with a small star tip. For the flowers, I used a petal tip that came with the set I bought back in July. I need more practice with that, but I think this is pretty good. Way better than anything from the local supermarket, that's for sure!
For this cake, I'd charge $15-18. What do you think?
Wednesday, October 19, 2005
Snickerdoodles
I first had these cinnamon flavoured butter cookies in Baddeck, Nova Scotia, where I spent a few nights during my honeymoon. There is a fantastic little bakery there that I highly recommend if you ever get to Baddeck (it's not the one listed on the web site, though). I found a recipe in a friend's cookbook and I make these very regularly here at work, but I usually double the batch to make about 70 cookies.
Snickerdoodles
1/2 cup butter
3/4 cup sugar
1 egg
1 tsp vanilla
1 1/2 cups all purpose flour
1 tsp baking powder
1/2 tsp baking soda
1/4 tsp salt
1/2 tsp cinnamon
2 tsp cinnamon plus 2 tbsp sugar, combined
1. Preheat oven to 375F.
2. Cream butter and sugar until light and fluffy. Add the egg & vanilla and cream until smooth. Sift in the dry ingredients and mix well, but don't over mix.
3. Drop by teaspoonfuls on greased or parchment-lined baking sheet and press down to flatten, either with a fork or a wet hand. Sprinkle cinnamon sugar on top. Bake until golden brown.
The original recipe says you should form the dough into balls and roll the balls in the cinnamon sugar, then press the dough down to form the cookie. I can't be bothered and usually don't have the time. The ones I had in Baddeck didn't have this, they just had the cinnamon in the cookie dough. I kinda prefer it this way.
So, enjoy with a large glass of milk or a cup of cocoa!
Tuesday, October 18, 2005
The Ultimate Chocolate Cake
If you love chocolate, and if you love moist, delicious cakes, you'll love this recipe. I got it originally from a friend in Ottawa and it has never failed me.
Chocolate Cake
1 3/4 cups flour
2 cups sugar
3/4 cups cocoa, sifted
1 1/2 tsp baking soda
1 1/2 tsp baking powder
1 tsp salt
2 eggs
1 cup milk
1/2 cup vegetable oil or melted butter
2 tsp vanilla
1. Grease & flour a 9x13" oblong cake pan, or line it with parchment paper. Preheat your oven to 350F.
2. Sift together your dry ingredients in a large bowl. Beat eggs and milk in a separate bowl, adding the vanilla. Add the oil. Gradually pour the wet ingredients into the dry and combine well with an electric hand mixer. Don't overmix! Add 1 cup of boiling water and mix until just combined.
3. Pour into prepared pan and bake 40-45 minutes, or until tester inserted in centre comes out clean.
This is the best chocolate cake I've ever had. I have also done the following variations:
- I substituted the milk for 2/3 cup Bailey's Irish Cream and 1/3 cup milk; I iced this cake with a buttercream icing that was make with Bailey's instead of milk or cream - this was the best cake ever!
- I have added a couple of teaspoons of instant coffee granules when adding the boiling water
- I have also added Khalua, about 1/4 cup, with the hot water (and only 3/4 cups hot water in that case)
Enjoy!
Thursday, October 13, 2005
Chicken Noodle Soup
I haven't posted anything savoury in quite some time, but fall is upon us and soup is called for now during the chilly weather. I can't remember where I got this recipe from, but it's a very good one. If you have homemade chicken stock, all the better.
Chicken Noodle Soup
2 tbsp vegetable oil
12 oz boneless, skinless chicken breasts, cut into bite size pieces
1 medium onion, chopped
1 grated carrot
1 tsp each dried oregano and basil
4 cups chicken stock
2 tsp Dijon mustard
3 oz. spaghettini, broken up (about 1 cup)
2 cups sliced celery
2 tbsp all purpose flour
2 1/2 cups milk
salt & pepper to taste
1. Brown chicken is a large saucepan with oil. Remove to a bowl. Add onion & carrot and saute until onion is softened.
2. Add stock and mustard; bring to boil. Stir in celery and pasta and return to the boil, stirring occasionally. Reduce heat and simmer until noodles are almost tender. Add chicken with accumulated juices and cook for 5 minutes longer.
3. Whisk flour into milk and gradually whisk this into the soup. Simmer, stirring, for about 3 minutes or until slightly thickened. Serve and enjoy!
Just make sure the chicken is cooked through, eh? I tend to cook it pretty much completely in step one just to be safe.
If you have leftovers, this thickens up quite a bit upon cooling. When you got to reheat it, you'll probably need to add some liquid to it just to make it soupy again.
Pumpkin Pie
This is a little late for my Canadian readers, but my American friends may appreciate this. I just made six of these for the Thanksgiving dinner here last weekend, and this recipe has been a favourite amongst my friends at previous Thanksgivings. It's simple and delicious. I'll admit, however, that I got the recipe from the label of a Carnation evaporated milk can.
Pumpkin Pie
1 1/2 cups canned pumpkin puree (NOT pumpkin pie filling from E.D. Smith or similar!)
1 cup sugar
2 eggs, beaten
1 tsp ground cinnamon
1/2 tsp salt
1/4 tsp each ground ginger, cloves, nutmeg
1 tin (385mL) evaporated milk (2% is fine, whole is better, DON'T use skim whatever you do)
1 9" unbaked pie shell
In a large bowl combine pumpkin, sugar, eggs, salt, & spices. Gradually stir in the evaporated milk, mixing well. Pour into pie shell. Bake at 350F for 50 - 55 minutes, or until a knife inserted in the centre comes out clean. Let cool completely.
I serve this with a sweetened whipped cream and a sprinkle of cinnamon over the top. I have also been known to make decorative pastry cutouts to put on top of the pie as a garnish.
See how easy this is? I tend to be more liberal with my spices than this recipe indicates, so do everything to your own taste, and be sure to taste the mixture before you put it in the oven, just so you know that it's seasoned properly. And that you haven't forgotten anything, like, say, the sugar. If you've been to Wandering Coyote lately, you might have read about my rather enormous booboo on Sunday. I am over it.
Enjoy!
Saturday, October 08, 2005
Dinner Tonight: Roast Pig
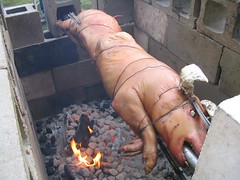
RoastingPig
Originally uploaded by wanderingcoyote.
So, this weekend is a big one here at The Centre. Not only is it Thanksgiving up here in Canada, but we host a big to-do for the friends of the centre, who come here for a weekend of working and studying. They volunteer for various jobs, pray, etc., and we feed 'em copious amounts of food. The staff here look forward to this because it's got a real family feel to it.
One of the big traditions is the pig roast on Saturday night. The pig was purchased in town earlier on in the week and spent a few days on a low shelf in my walk-in fridge. I had someone put a bag over its head because I couldn't stand going in there and seeing it's little face poking out of the butcher's paper. It almost looked as if it was smiling at me.
We got this thing trussed and on the spit just before 11 this morning. Supper is supposed to be at 6, but I don't know if this'll be ready on time. At about 3, as I was coming off shift, you could see and hear the fat boiling inside the skin. At one point, it burst and the drippings caught fire and we had a big spurt of flame and black smoke. Luckily, there was a hose nearby.
I am planning on having a left over egg salad sandwich. Sorry, I just can't do this one.
Saturday, October 01, 2005
Honey Cake
I made this for lunch today and it was a big hit. I got the recipe from an old Canadian Living from 1993. This is apparently a Jewish cake, containing no dairy and traditionally consumed at Rosh Hashana.
Honey Cake
1 1/3 cups liquid honey
1 cup strong coffee
1 tbsp grated orange rind
2 3/4 cup all purpose flour
2 tsp baking powder
1 tsp baking soda
1 tsp cinnamon
1/2 tsp ground nutmeg
1/4 tsp each cloves and ground ginger
pinch of salt
1 cup chopped walnuts
4 eggs
1/4 cup vegetable oil
1 cup granulated sugar
icing sugar to sprinkle over the top, if desired
1. In a small saucepan, bring honey just to the boil. Remove from heat and stir in coffee & orange rind. Let cool slightly.
2. Stir together flour, soda, baking powder, salt, spices. Add walnuts and toss together.
3. In a large mixing bowl using an electric mixer, beat eggs until lemon-coloured. Beat in the oil. Add sugar gradually, beating until pale & thickened, about 3 minutes.
4. Using a whisk, alternately fold dry ingredients and liquid mixture into the eggs, making 3 additions of dry and 2 of liquid.
5. Pour the batter into a 10" or 3L bundt pan (or you can use two 9"x5" loaf pans) that is either non-stick or has been well buttered/floured. Bake at 325F for 60 - 65 minutes, or until tester comes out clean and the cake springs back when lightly pressed.
6. Let the cake cool in the pan for 30 minutes, then invert onto a rack to cool completely. Sift icing sugar over the top.
Notes.
- I found this took longer to cook than the recipe stated by about half an hour. Keep an eye on it and you should be fine.
- Like many cake recipes, you add the flour and liquid in in stages. This is mainly so you don't overwork your flour and get a denser cake, or a cake that flops. Don't skip this step!
- The recipe mentions some variations. One is that you can substitute the walnuts for candied citron (citrus peel), raisins, or walnuts. The other thing you can do is substitute 3 tbsp of cognac for 3 tbsp of the coffee.
Let me know how it goes and enjoy!
Saturday, September 24, 2005
Real Lemon Pie
RealLemonPie
Originally uploaded by wanderingcoyote.
Now I am truly back in business. I dug out my camera software from the depths of my little closet and installed it on this staff computer. Now you'll be seeing more of my creations!
I'm sure you're reading the title and groaning because it is yet another lemon/citrus recipe. Well, tough! I served this for staff dinner last night and it was fantastic. Not only did it look wonderful, it was bursting with lemony flavour. This is a simple recipe with few ingredients. I hope you like it.
Real Lemon Pie
Filling
4 thin-skinned lemons (I don't know how you tell a thin one from a thick one without cutting it first, but I just used what I had on hand)
2 cups granulated sugar
4 large eggs
Shortcrust Pastry
1 3/4 cups all purpose flour
150g (5oz) chilled unsalted butter, chopped
2 tbsp granulated sugar
3 - 4 tbsp cold water
1 egg, beaten, for glazing
1. Wash the lemons. Slice 2 unpeeled lemons very thinly and remove the seeds. Peel the other lemons, removing all pith and seeds, and slice the flesh thinly. Put all this in a bowl, not metallic, with the 2 cups of sugar and mix well, coating all the lemon with sugar. Cover and refrigerate over night.
2. Preheat oven to 350F. For the pastry, sift together the salt and the sugar. Sable in the butter. (Remember what sable means, from the previous post? No? Ok. Rub the butter in with your fingertips - quickly so it doesn't melt.)
3. When you have a cornmeal-like consistency, add the water, one tablespoon at a time and toss gently with a fork. Add just enough water so that the dough comes together and is rollable. Divide in half and roll out 2 10 inch circles.
4. Lightly grease a 9" pie plate. Line the pie plate with one disk of dough; cover and chill. Somehow chill the other disk of dough, too; I put it into a second pie plate for easy tranferring.
5. Beat the eggs well and add the lemon slices, mixing gently but thoroughly. Pour the filling into the shell and put on the "lid." Crimp the edges to seal them. Decorate the top with pastry scraps. Brush on the beaten egg you reserved for the glaze, and bake until golden brown - 55 minutes to an hour. But keep an eye on it. Let it cool completely before serving.
Notes to the Readership
- this is a great shortcrust recipe that comes out crisp and cookie-like. It can be used for other pies and tarts as well. Be sure to add the water gradually as I described because it shouldn't be sticky or wet. Neither should it be too dry so it's difficult to roll out. Also, be sure not to work your flour too much or else you'll get a tougher pastry.
- letting the lemons sit in the sugar overnight draws out the liquid from the fruit. This, combined with the eggs, creates a custard-like filling, so don't skip this step.
Questions? Comments? You know the drill.
Tuesday, September 20, 2005
Hot Water Gingerbread
Fall's the time for warm, spicey baking that screams comfort food. This is such a recipe. I got this from Cook Great Food by The Dieticians of Canada, an excellent cookbook if you're in the market for simple, tasty, healthy meals for yourself and/or your family. They recommend serving this with a lemon sauce, but that flavour combination doesn't quite do it for my palate. When I have served this (warm, of course), I've accompanied it with a scoop of vanilla frozen yogurt or a simple custard sauce (Bird's is just fine).
Hot Water Gingerbread
1 1/2 cups all purpose flour
1 tsp baking soda
1 tsp ground ginger
1/2 tsp ground cinnamon
1/4 tsp salt
1 egg
1/2 cup brown sugar, packed
1/2 cup molasses
1/2 cup boiling water
1/3 cup melted butter
1. In a large bowl, combine all dry ingredients except the brown sugar.
2. In a second bowl, beat the egg, brown sugar, molasses and boiling water together until smooth. Stir this mixture into the flour mixture until just blended. Pour into a lightly greased or non-stick 8" square pan. Bake at 350F for about 35 minutes or until a tester inserted in the centre comes out clean.
It's as easy as that.
As usual, any feedback is appreciated.
Enjoy!
Friday, September 16, 2005
Alas...
Dear Readers,
I have been invaded by a series of spammers. Shocking! I have enabled the Blogger anti-spamming tools in order to combat this pesky business. Sorry to all you non-Bloggers for having to take such drastic action.
I have been invaded by a series of spammers. Shocking! I have enabled the Blogger anti-spamming tools in order to combat this pesky business. Sorry to all you non-Bloggers for having to take such drastic action.
Friday, September 09, 2005
Lemon Scones
Miss me?
I sure have! Man, have I been busy this past month, and with limited computer access to boot.
For some bizarre reason, I have become famous for these scones. Of all the things I could be famous for, it had to scones. Well, what's a girl to do? Take what fame she can and run with it, baby!
Next week we are hosting a weekend for social workers, case workers, challenged families and others regarding food availability issues for underpriviledged people, and the organizer mentioned to my supervisor that she knew someone at the recent music camps who was raving over these scones, which I had served for Sunday brunch once. I'm sure I'm going to have a request made to me for these scones at a planning meeting tomorrow. So here is what all the hubbub is about.
Lemon Scones
2 cups all purpose flour
1/3 cup granulated sugar
2 tbsp baking powder
1/4 tsp salt
2/3 cup cold butter
2 eggs
1/3 cup 10% cream
2 tsp finely grated lemon rind (approximately the zest of 2 - 3 lemons)
1/4 cup freshly squeezed lemon juice
Glaze:
1 tbsp lemon juice
1 tbsp icing sugar
1. In a large bowl, whisk together the first 4 ingredients. Sable (see notes) in the butter with your hands quickly, until the mixture resembles something slightly chunkier than cornmeal.
2. In a separate bowl, whisk together the eggs, lemon rind, lemon juice, and cream. Drizzle over the dry ingredients and toss gently until the mixture clumps into a very soft sticky dough.
3. Turn out onto a very well-floured surface. With floured hands, form into a ball, kneading about 8 times. The dough will be very wet, so use lots of flour. Place on a parchment paper-lined sheet or lightly floured rimless baking sheet. Pat into a 1.5 cm thick circle and cut into 8 wedges. Do not separate.
4. Bake in 350F oven unitl golden.
5. For the glaze, combine the juice and sugar. Apply the glaze with a pastry brush just after the scones come out of the oven while they're still piping hot.
Notes.
- To sable means to rub the dry ingredients and the butter together with your hands. I don't bother with the pastry cutter or two knives crap because my hands are much more efficient, especially when I quadruple this recipe for a larger batch.
- Don't make these in a mixer for God's sake: you'll overwork the flour. The key here is mixing as little as possible and kneading as lightly as possible to get a delicate product in the end.
- Please, please, please use real lemons! That stuff that comes in the yellow lemon-shaped bottle from the store is awful! You cannot beat the real McCoy here, or anywhere for that matter. Get yourself a cheap citrus juicer and a zester and away you go.
- I make several variations of this. For instance, the lemon zest and juice is directly interchangable with orange zest and juice, and I do that a lot. Also, I often add blueberries, but while still frozen because they're easier to mix in and they'll keep their shape. Frozen raspberries would also work, or just skip the citurs altogether and add raisins and a bit of cinnamon.
Well, let me know how they turn out.
I hope to be updated this blog more often now that I have more time and more reliable internet access. I miss this a lot.
Monday, August 08, 2005
First Professional Cake Decoration
firstprocakejob
Originally uploaded by wanderingcoyote.
This was my first ever professional, paid cake decoration. I want to stress that I didn't make the icing, my co-cook did. It was raspberry and quite runny. I can't remember now what the actual cake was...
Birthday Cake
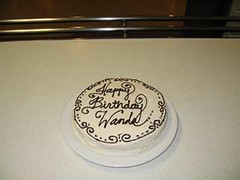
wandacake
Originally uploaded by wanderingcoyote.
I did this cake a couple of weeks ago for a guest whom I never met but heard was tickled pink when this was presented to her. It's an 8" cake and this is a border similar to the one I did for my final exam back in March.
Family Reunion Cake
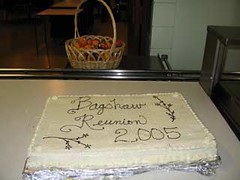
bagshawcake
Originally uploaded by wanderingcoyote.
This is the cake I did on Thursday for the family reunion we catered that night. The family just loved it and were posing for pictures with it and everything. The cake recipe I used was the orange cake from a couple of posts ago. This is a 16x24-inch slab, which is 4 times the original cake recipe. The icing is orange cream cheese buttercream and the piping of the words was done in chocolate.
Tuesday, July 19, 2005
Orange Oat Cookies
I am obsessed with citrus flavours. I love lemon, grapefruit, and things that are flavoured with orange. I don't actually eat whole fresh oranges except at Christmas when we get the Mandarin oranges in. But I do love the flavour of orange. This is a cookie recipe that's come to be very popular amongst the staff where I'm working.
Orange Oat Cookies
1 cup oats
1/2 cup butter
1/2 cup granulated sugar
1/2 cup lightly packed brown sugar
1 egg
1 tbsp orange zest
1 tsp vanilla
3/4 cup flour
1/2 tsp baking soda
1/2 tsp baking powder
1/2 tsp salt
3/4 cups coarsely chopped pecans or walnuts
Preheat oven to 350F. In a shallow baking pan, spread out the oats and toast them for about 10 minutes, stirring occasionally. Cool completely. Cream together the butter and the sugars with a mixer, adding the egg, zest and vanilla. Craem until light and fluffy. Combine flour, salt, soda, powder and add to the creamed mixture, beating at low speed until well blended. Add oats and nuts. Mix well. Drop by tablespoonfuls onto an ungreased baking sheet and bake for 9 - 12 minutes, or until golden brown.
As usual, enjoy. And, as usual, let me know how you like them!
Monday, July 18, 2005
Baking for a Crowd
So I'm responsible for desserts for over 100 people now. Cookies are a popular choice for lunch, since I can bake lots off during the morning. But we wind up going through lots and lots of cookies. Thankfully, Chef Maurice, my advanced instructor at PICA, gave everyone a booklet of his own recipes to take out into the world with us upon graduation. I am so grateful for this, because many of them are suitable for commercial operations, such as the one I'm currently employed at. Here is a cookie recipe I've been using. It makes approximately 16lbs of cookie dough, which usually yeilds 300+ cookies for me. Don't try these at home! You'll need a huge mixer and a scale. I just thought I'd post this to give you an idea of what a professional, commercial-sized recipe looks like. It's kind of amusing, when you think about it.
Cookies for a Crowd (approx. 16lbs dough; 300+ small cookies made with #100 cookie scoop)
3 lbs white fat (use margarine, butter, Crisco shortening)
4 lbs brown sugar
8 eggs
2 oz baking powder
2 lbs oatmeal
4 lbs soft flour (all purpose or cake & pastry)
2 lbs raisins
pinch of salt
I have been dividing the dough in half and making half oatmeal raisin and half oatmeal chocolate chip. I have also added coconut and craisins and these were very popular, too.
The last couple of Sundays, I've served brownies for dessert. Who doesn't love brownies with their roast beef dinner? This recipe makes a large sheet tray measuring 16"x24", and I usually double it to feed over 100 people. I have iced these with a few things: strawberry icing, and last night I used a mocha buttercream.
Brownies for a Crowd (yield 1 large sheet, or 2 half sheets)
1 lb butter, softened
2 1/2 lbs brown sugar
12 eggs
6 oz pastry flour
6 oz all purpose flour
6 oz cocoa powder
1 lb roasted pecans
This is actually the most fudgey brownie recipe I've ever made. They are fairly thin brownies, unlike the thick cakey ones you usually see in bakeries and at the grocery store. Through trial and error, I've discovered that baking these at a lower temperature for longer yeilds a much moister product in the end. 325F for 40 - 45 minutes is usually just fine. You want them a bit underbaked when you take them out so they remain nice and fudgey.
Nice, eh? Such quantities are mind-boggling to the eye, I know. But trust me: I have been saved by these recipes! Thank you Chef Maurice!
Orange Cake
I have been neglecting this blog far too long! Finally, I have some uniterrupted time on the computer, so I can tantalize you all with a new recipe. This is something I've made at work a few times and have had rave reviews over it. It's so simple, so moist, so delicious...
Orange Cake
1 large orange
1 cup raisins
1/2 cup walnuts
2 cups flour
1 cup granulated sugar
1 tsp baking soda
1 tsp salt
1 cup milk
1/2 cup softened butter, margarine, or Crisco shortening
2 eggs
1. Juice the orange and reserve the juice until later. In a food processor or blender, grind the rest of the orange (it helps to quarter it first), the raisins and the nuts together until you get a consistent yet rough paste. Do not puree! Set this aside.
2. Combine the rest of the ingredients in a large mixer bowl. Beat at low speed just until blended, then on medium speed for about 3 minutes. Add the orange juice and the orange/raisin/nut mixture. Stir until just combined.
3. Spread evenly in a 9"x13" oblong cake pan. Bake at 350F.
I usually top this with a cream cheese icing containing orange zest and a little OJ.
This is a truly amazing cake. The paste made from the orange, raisins, and nuts makes it flavourful and moist. There are no other seasonings in it, and they are not necessary. The use of the whole orange is absolutely brilliant - no waste at all and pure orange flavour. Just remember: if there are seeds in your orange, pick 'em out first!
Enjoy! As usual, if you make this, let me know how it turns out.
Sunday, June 12, 2005
Apple Phyllo Cups
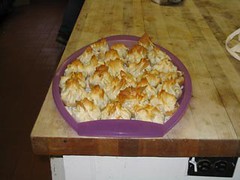
applephyllo
Originally uploaded by wanderingcoyote.
I made these at work this week and they were a huge hit. The other staff kept coming into the kitchen and looking in on me as I made these up, all saying, "We never get stuff like this here!" Indeed. I have seen what they're used to in terms of baking and I'm not surprised they're easily impressed.
These are super easy to make and make quite an elegant dessert or snack. They can be plated up with a rasperry coulis or just eaten cold. We made something like these in school, which is where I got the idea.
Here's what you need:
- about 2lbs of apples, preferrably Granny Smiths because they're nice and tart and keep their shape during the cooking process
- some lemons (juice and zest)
- cinnamon, ground ginger, nutmeg, allspice, cloves - all to taste
- melted butter
- raisins if you like them
- candied citrus peel, if you like it
- left over cake crumbs, cookie crumbs, or even bread crumbs (not entirely necessary but a good idea if your filling is too liquidy)
- a package of phyllo pastry, thawed
- muffin tin
Get yourself a large bowl and fill it with water. Quarter a lemon or two, squeeze out the juice and throw the quarters and juice into the bowl. This will keep the apples from turning brown. Peel & core the apples and place them in a bowl of water as you go. When they're all done, dice them roughly. Place in a saucepan with about a cup of water and bring to a boil. Add your spices, raisins, and peel, if using. Add the juice and zest of another lemon. Simmer until the apples are tender, which should take about 5 - 10 minutes, depending on how big you cut them. Add about 2 tbsp of cornstarch dissolved in an equal amount of cold water. Stir until thickened and bubbly. Remove from heat.
You'll need to make your cups about 4 - 6 sheets of phyllo thick. Lightly grease the muffin tins with melted butter. Very carefully separate your sheets out and cover the remaining phyllo with plastic wrap; it dries out quickly and it must be covered when you're not working with it. Now separate the phyllo into 2 - 3 layers each and brush lightly with melted butter; put your layers back together. Depending on how large your muffin cups are, cut the phyllo with a sharp knife into squares as best you can. The corners should come up well over the sides and when you press the middle into the bottom of the tin, and should be tall enough when pulled to gether to form little points. Rectangles are ok, and often inevitable. You can move around your phyllo layers to make the points work, but make sure the sides are high enough to accommodate the filling. You don't want any leaks or you'll never get these out after baking.
Check out your filling. If it's liquidy, you'll want to put in your crumbs to absorb some of the liquid and help prevent the filling from making the phyllo mushy. Or, add an extra layer or two of phyllo. Put a bit of filling in, enough so that you can pull the corners of the phyllo over the top and twist closed. Twist close, and work quickly from now now on so the phyllo doensn't dry out. When you've completed making the cups, brush the tops with some more melted butter. Bake at about 375F until just golden brown on the tops. Lift one out carefully to make sure they're golden on the bottom. Remove immediately from the muffin tins, preferrably with tongs, and cool on a wire rack. This step is essential, or the steam will turn the cups mushy on the bottom.
Serve warm or at room temperature. Creme Anglaise and ice cream would be lovely with this, as would the aforementioned raspberry coulis. Do not store in the fridge; the humidity will make the phyllo go soft.
Notes to the readership.
1. Work very, very carefully with phyllo as it is extremely fragile. Also, as I mentioned, it dries out quickly, so make sure you have your filling and muffin tins all ready to go before you cut your phyllo up.
2. Deeper muffin tins are better than shallower ones, just for the sake of presentation and use of phyllo, but use what you have on hand.
Enjoy - and as always, let me know what you think!
Sunday, June 05, 2005
Lemon Ice Cream
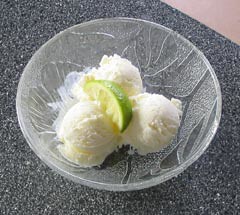
LemonIce
Originally uploaded by wanderingcoyote.
Anita found this recipe yesterday in one of Richard's cookbooks. I'd been looking for a lemon ice cream recipe, actually, and this was absolutely fantastic! Anita, upon tasting it, thought she'd died and gone to heaven. She, like me, is a lemon fanatic. Aside from being delicious and refreshing, this also is a great palate cleanser.
My ice cream maker is a Cuisinart and it has a drum with a freezing liquid in it, and so you just freeze the drum over night, then plug the machine in and attach the drum, add your mixture, turn it on, and about 20 minutes later, you have ice cream. You put the ice cream into the actual freezer for a bit just to firm it up.
Here is the lemon ice cream recipe.
zest of 2 lemons
juice of 3 lemons
3/4 cup sugar
1 1/4 cups whipping cream (35% only!)
1 cup whole milk
I whisked this all together in a clear glass measure and away I went. Like I said, it was great.
You don't have to worry about the lemon curdling the milk and cream because the citric acid won't curdle anything with a fat percentage above 35%, so make sure you use the full whipping cream. Don't cut corners or calories by using half and half because this just won't work.
I used the zest and juice of one lime because I was down a lemon, and it worked fine.
My basic ice cream recipe is the following.
2 cups whipping cream
1 cup whole milk
3/4 cup sugar
To this you can add pretty much whatever your heart desires. I usually add about a tablespoon of vanilla extract. Also try cocoa powder to taste (sift it in), chocolate chips, mint & chocolate chips (about a tsp or two of mint extract but use your own judgement), or Grand Marnier or Bailey's Irish Cream to taste. But beware: adding alcohol will affect the freezing of your ice cream, so add it at the very end when the ice cream has already done it's freezing so you won't get a slushie!
Homemade ice cream is the best because you can use all natural ingredients and you know exactly what goes in it. Store bought contains all kinds of nasty chemicals and crap you really don't want in your body. My ice cream maker cost me about $80 Canadian, and I've gotten a lot of use out of it. A great investment, I must say.
Enjoy!
Saturday, June 04, 2005
Reflections on Failure
I just made a chocolate chip cookie recipe that was, in my mind, a resounding failure. I'd made the recipe successfully before once or twice back home, and didn't think I'd have any problems here.
There were some differences. For one thing, I used whole oats instead of quick oats, which may have affected the absorption of liquid. The baking soda may have been too old. The oven, I know, is not accurate. And the elevation may be different here than in Ottawa.
Nonetheless, I'm super annoyed. I rarely make anything at home that is this off the mark, and I feel like I've wasted some precious ingredients that were not purchased by me to begin with. There is no rum ball bin here to hide my shame or make something of them at later date to disguise my mistake. I will just have to live with this and do my best to learn from it. I know where the possible mistakes might have been, and so I must keep them in mind in the future. And that's pretty much all I can do.
But bear this in mind: no recipe is necessarily foolproof. Change one ingredient or make the recipe under completely different circumstances and you may find you get a completely different product in the end, as I have just done. But the important thing is to not panic and throw away the recipe. The important thing is to analyze and theorize, and keep experimenting. If you believe the recipe is worth it, you might be rewarded in the end.
And when in doubt, change the name. I will call these oatmeal chocolate chip cookies, "oatmeal chocolate chip lace cookies." Chances are, no one is going to know the difference, and you can claim you invented the whole thing yourself, thus making yourself out to be brilliant.
It isn't necessarily failure, it's revisionism.
Sunday, May 29, 2005
Chocolate Fudge Pudding
My mom used to make this for us once in a while and it's still one of my favourites. I made it the other night before my friend went back on her wheat free diet and it was a big hit. The cake is dense, moist, and fudgy and the beauty of this is that it's self-saucing! This is a great low-fat chocolate fix. It's very simple to make, and be sure to serve it warm - it's not the same cold. And there should be no leftovers!
1 cup flour
3/4 cup sugar
2 tsp baking powder
1/2 tsp salt
1/3 cup cocoa powder, divided
1/2 cup chopped nuts
3/4 cup lightly packed brown sugar
1/2 cup milk
2 tbsp veg oil or melted butter
1 tsp vanilla
2 cups hot (not boiling) water
1. Preheat the oven to 350F. In an ungreased 8" square pan, stir together the flour, sugar, baking powder, salt and 2 tbsp of the cocoa.
2. In a separate bowl, stir together the remaining cocoa powder, nuts, and brown sugar; set aside.
3. Stir milk, oil, and vanilla into the flour mixture in the pan and blend well. Spread out evenly. The batter will be thick.
4. Sprinkle nut mixture evenly over the batter and carefully pour the hot water over everything. DO NOT STIR!
5. Bake until tester inserted comes out clean. Serve warm. Enjoy!
Notes to the readership.
- Whatever you do, mind you DO NOT STIR the mixture after the water has been added! This is going to make the lovely pudding-like sauce. It will thicken on it's own – trust me.
- For some strange reason, the nuts tend to all gravitate towards the centre of the cake during baking. I have never been able to figure this out, but you may notice this, too. You'll just have to live with it.
- Make sure you use an 8" pan for this. They didn't have one here, so I had to make it in something a bit smaller and it nearly overflowed over the sides. I would also recommend you put the pan on a baking sheet when you go to bake this, just to be safe.
Monday, May 16, 2005
Pasta with Seafood, Sundried Tomatoes, and Feta Cheese
Who says pasta needs to have sauce? Not I!
Remember this? Well, today's recipe is a variation and it's just as easy and tasty. With one day to go before I head off into the great wide world, where, remember, my blogging may be irregular, I present to you Pasta with Seafood, Sundried Tomatoes, and Feta Cheese. Enjoy!
You will need:
Pasta - as much as you need or want
Shrimp - large, shelled and deveined - as many as you like (or other shellfish - clams, mussles, squid, etc.)
Salmon filet - an equivalent amount to your shrimp
Some oil-packed sundried tomatoes, finely chopped
Fresh Italian flat-leaf parsley, finely chopped
One or two green onions, finely sliced
Good quality olive oil, salt & pepper
Feta cheese, crumbled
Season your salmon with some olive oil, salt & pepper. Bake in the oven at 400F until cooked through. Remove from oven and take a fork to it, chunking in up. Cook your pasta & shell your shrimp. When the pasta is nearly al dente (with a bit of bite to it), put in the raw shrimp and continue to cook until the shrimp are pink. Drain the whole thing and return it to the pot. Drizzle some olive oil over and season with salt & pepper, giving it a good stir. Add the onions, sundried tomatoes, salmon, parsley, and feta. Stir together and serve, garnished with a little parmesan cheese (and remember to spend the cash and get the real stuff, eh?).
Easy enough for you?
Notes to the readership.
- Italian flat leaf parsley is lovely stuff, with a more distinct flavour than the curly parsley. It looks a lot like cilantro, so make sure you know what you're buying.
- You can use any pasta you like or have in your pantry. I have used penne and spaghettini and both work well.
- I know shrimp are expensive, but the less expensive frozen shrimp are just fine. You can often find them "zipperback", which means they've made a slit in the back to remove the vein, and it is so worth it get these as opposed to fresh shrimp, because deveining shrimp can be a time-consuming and annoying task.
- If you're not fond of salmon, omit it, or use a fish you do like. You might get a good result with tinned salmon, too, though it tends to be a bit mushy.
- Seasoning the water you boil your pasta in very well with salt is something I've just recently started doing, and I recommend you do, too. It makes a huge difference! Add enough salt so the water tastes salty.
Questions? Comments? You know the deal!
Ta ta for now! Be well and eat well everyone! I shall return, never fear!
Monday, May 09, 2005
ReTorte Reappearance, But...
Thanks to my vigilant readership, I was alerted on Saturday that this blog was unaccessible over the weekend. I couldn't access it myself, and quickly fired off an email to Blogger, who quickly responded with a form email containing some useless links. Later on that day, shortly after I emailed them back again to tell them their links were useless, the ReTorte reappeared. I do not know what the issue was, but I was panicking quite a bit. Thank God the problem seems to have been solved.
I am experiencing some upheaval in my life right now and will be moving shortly. I will have access to a computer, but with dial-up instead of high-speed. So I won't be posting here very much after next week, but rest assured, I won't have disappeared from the world of blogging, and I'll update as I can. Same goes for my Wandering Coyote blog. I will try to visit your blogs as often as I can, too, but just not as much as usual. And please keep commenting on both blogs!
I am experiencing some upheaval in my life right now and will be moving shortly. I will have access to a computer, but with dial-up instead of high-speed. So I won't be posting here very much after next week, but rest assured, I won't have disappeared from the world of blogging, and I'll update as I can. Same goes for my Wandering Coyote blog. I will try to visit your blogs as often as I can, too, but just not as much as usual. And please keep commenting on both blogs!
Wednesday, May 04, 2005
Thai Curry
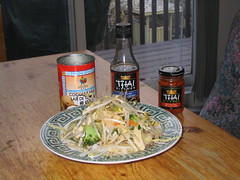
IMG_0475
Originally uploaded by wanderingcoyote.
My husband claims this is as good as what they serve at our local Thai restaurant, Sweet Basil. If nothing else, this will clear your sinuses! Here's what I did:
For the stirfry: I took two boneless skinless chicken breasts, sliced them up, and stirfried them until cooked through in some sesame oil. When that was done, I added: some broccoli florets, 2 julienned carrots, some sliced mushrooms, a sliced onion, 1 can water chestnuts (sliced in half), 1 can bamboo shoots, and 1 can miniature cobs of corn (quartered). I obviously drained the canned stuff first! I stirfried this a few minutes until the broccoli turned bright green. Then I added the sauce.
For the sauce: Thai cuisine has a balance between salt, sweet, sour, and spicey. Here are the five ingredients for the sauce: red curry paste (spicey), fish sauce (salty), coconut milk, lime juice(sour), sugar (sweet). As you can see in the picture, I used Thai Kitchen brand fish sauce and curry paste, and I basically followed the recipe on the jar of paste when making this. But I don't like really spicey food, so I cut down the amount of curry paste. The approximate measurements were 2 tbsp fish sauce, 1 tsp curry paste, juice of 1 - 2 limes (mine weren't juicy so bear that in mind), 1 - 2 tbsp sugar, and 1 can (398mL) coconut milk. I whisked this all up in a glass liquid measuring cup.
I added the sauce and stirfried until heated through. I then added a couple of handfuls of freshly chopped cilantro, and garnished with bean sprouts. I served this over a bed of basmati rice.
Notes to the readership.
- Fish sauce smells RANK. The first time I bought it, back in my university days, I chucked it out before using it because I thought it stank too much. But, those were my salad days and I was concentrating on things other than food. Do not sniff this or you may be put off! But it tastes great and is a must for any Thai dish.
- Make sure you buy coconut milk for cooking rather than baking. The baking variety is much thicker. Also noteworthy about coconut milk is that it isn't so bad for the waistline: 1/4 cup contains only 60 calories and 1 gram of carbs.
- Re. the sauce, do everything to your own taste. My husband likes this much spicier, and if you like it hot, add more curry paste. When you're mixing the ingredients, put them in a glass measure as I did and taste the sauce first before adding it to the stirfry, so that you can adjust it at will. Also, many Thai sauces tend to be more soupy as they didn't adopt thickeners when their cuisine was evolving, so don't do anthing stupid like adding cornstarch to this - it isn't necessary.
- The key to any good stirfry is having everything chopped up and ready to go before even starting to cook. This is essential! You don't want to be chopping one thing up as another cooks. That is a recipe for stirfry disaster! Also essential is that you ensure that your ingredients are approximately the cut the same size and thickness, to promote even cooking.
- You do not need a fancy wok to stirfry, although it's more fun. A cast iron skillet or large frying pan is perfectly fine - as long as you don't get overzealous and start flinging your veggies around as you stirfry.
- Always add the cilantro last. It's a fresh herb and very delicate. Overcooking it will only kill it.
Tuesday, May 03, 2005
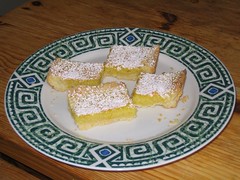
Sunday, May 01, 2005
Two Grain Cranberry Bread
This is a fantastic breakfast item full of fibre and flavour. I usually have it with some cheese to add some protein.
1/2 cup butter, softened
2/3 cup brown sugar
2 eggs
1 cup quick oats
1 cup all purpose flour
2/3 cup whole wheat flour
1/2 tsp each baking powder & baking soda
1/2 tsp salt
1/4 tsp ground cloves
1 cup dried cranberries (Craisins)
1/2 cup chopped pecans, toasted
1 1/4 cups unsweetened applesauce
1. Preheat oven to 350F. Prepare a 9"x5" loaf pan - grease & flour, or grease & parchment (what - you haven't bough parchment paper yet? C'mon!).
2. In a large bowl, beat the butter and sugar until fluffy. Beat in eggs, one at a time. Is this sounding familiar?
3. In a separate bowl, whisk together oats (reserving 2 tbsp), flours, baking soda, baking powder, salt, and cloves. Add cranberries & pecans. Stir into butter mixture alternately with applesauce, making 3 additions of oat mixture and 2 of applesauce.
4. Scrape into loaf pan. Sprinkle with reserved oats. Bake approximately one hour or until tester comes out clean. Let it cool in the pan 10 minutes before turning it out onto a wire rack to cool completely.
Notes to the readership:
- Hmmm...I have no notes this time. That's a first! If you have questions, you know what to do.
Friday, April 29, 2005
Harira
Love cilantro? I do! This is a soup that comes from the Middle East, and apparently Muslims often break their fast with this during Ramadan. This is so incredibly flavourful, and healthy to boot. It's easy to make and the ingredients aren't hard to find.
1 each large bunch fresh cilantro and parsley
8 cups of vegetable or chicken stock
1 cup brown or green lentils
1 can (19oz) chickpeas, rinsed and drained
2 cans (19oz) tomatoes, chopped (I use 1 28oz can of diced)
2 onions, chopped
2 tsp cinnamon
1 tsp each ground cumin, turmeric, ginger, pepper
1/4 cup lemon juice
2 tbsp olive oil (optional)
1. Chop 1/4 cup each of the cilantro and parsley and set aside. Take the rest and tie it together with some kitchen string and stick it in a large pot. Add the stock and bring it to a boil. Reduce heat to low; cover and simmer for 15 minutes. Discard herb bundle. Add lentils and simmer for 15 minutes.
2. Add chickpeas, tomatoes, onions, spices. Cover and simmer for 30 minutes.
3. Puree 3 cups of the soup. Return to the pot and heat through. Stir in the lemon juice, oil (if using), and reserved chopped herbs.
Notes to the readership:
- instead of tying the herbs together, I use a piece of cheesecloth and make a bundle out of it. It works really well and is much easier to handle when it comes time to discard it. Cheesecloth is super cheap, and has a few other uses in the kitchen, too.
- I have an immersion blender, so I just use it to puree at the end. I like this a bit smoother, but puree as much or as little as you'd like - but puree at least the 3 cups because this soup shouldn't be super chunky.
- I first had Harira in a Moroccan place in Old Quebec City and I was hooked! Theirs had a bit of pasta in it, but not very much. I'm sure there are many recipes for this soup.
- if you serve this with some kind of rice, you'll get a complete protein.
- I never add the olive oil in order to keep it fat free, and I've never missed it. Don't skip the lemon juice - and squeeze it fresh, eh? - you'll regret it; it adds such a bright flavour to this.
Wednesday, April 27, 2005
Info
Just realized I still had my other blog blocked off from my profile. This was because I didn't want the school I was at tracking me down. So I do have a regular blog, and now will engage in some shameless blogwhoring..........
Please feel free to visit visit my den here. A link is conveniently located on my sidebar.
Please feel free to visit visit my den here. A link is conveniently located on my sidebar.
Cardamom Loaf
This is a fantastic, tasty and moist loaf, perfect for a snack, with coffee or herbal tea, and amazing right out of the oven smeared with butter.
1/2 cup butter
2/3 cup granulated sugar
2 eggs
1 tsp vanilla
2 cups all purpose flour
2 tsp baking powder
2 tsp ground cardamom
1/2 tsp salt
2/3 cup milk
1. Preheat oven to 325F and grease/flour - line with parchment paper (you'll need a bit of grease on the sides so the paper'll stick)! - a small loaf pan (22cm x 11cm, of for my American readers 8.5 x 4.5 inches).
2. In a large bowl, with an electric mixer, cream butter and sugar until fluffy. Add eggs, individually, and cream some more. Add vanilla.
3. In a separate bowl, sift your dry ingredients together. Alternately stir this into the egg/butter mixture with the milk, until well-combined.
4. Pour into the prepared pan and smooth the top with a knife. Bake for 55 - 60 minutes, or until a tester inserted comes out clean. Let it cool in the pan for 5 minutes before turning it onto a wire rack to cool completely.
Notes to the readership.
- If using a glass pan, decrease the oven temperature by 25 degrees.
- Cardamom is an expensive spice. I tend to buy it in small amounts from the bulk store to keep costs down. It's a wonderful spice, though, and can be used in savoury dishes as well. The Afgan Horsemen (see sidebar under Vancouver) use it in their cooking and it's so fragrant and tasty. It's delicate and warm, so don't overpower it with stronger flavours. In baking, it's often paired with citrus because they make a great team, and the citrus helps bring out the flavour. In school, I made an orange cardamom white chocolate mousse that was excellent. Paired with orange, it would make a great addition to cheesecake, too, I think, or even creme brulee. In this recipe, it's on its own, so you'll get a real sense of its flavour and what else you can pair it with.
- I don't think I've ever baked this for the full hour or so, but I have a hotter oven. Just keep an eye on it and give it at least 45 minutes before checking on it the first time.
Monday, April 25, 2005
Farmland Flax Cookies
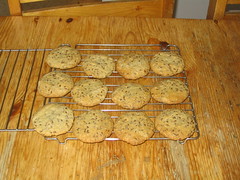
IMG_0472
Originally uploaded by wanderingcoyote.
This is a great recipe, and as healthy as a cookie as you'll ever get. The flaxseeds provide, on top of Omega-3 fatty acids which we all know are so healthy, a great crunch.
1/2 cup butter, softened
1/2 cup packed brown sugar
1/3 cup granulated sugar
1 egg
1/2 tsp vanilla
1 cup all purpose flour
3/4 cup quick oats
2/3 cup flaxseeds
1 tsp baking soda
Preheat your oven to 350F. Cream your butter and sugars until fluffy. Add the egg and vanilla, and cream some more. Combine flour and soda and add until well combined. Add the oats and flaxseeds and mix to combine. Drop by generous spoonfuls onto a greased cookie sheet, or one lined with parchment paper. Bake about 12 minutes, or until golden brown.
Notes to the readership:
1. This is a really stiff dough, so you may need to use a mixer - either the stand kind or electric hand-held variety. You can make it by hand, too, but you may need to get your actual hands in their to get everything properly combined. So make sure you're hands are clean, eh?
2. I cannot say enough about parchment paper - really, it's the best thing out there for home baking. As I've said before, you can reuse it until it falls apart, and it isn't terribly expensive. You'll save yourself so much time and effort - I promise! You cannot substitute waxed paper (unless you're making a cake and the paper will by entirely covered by batter) - it'll just smoke up your place and make your fire alarm go off.
Enjoy!
PS. This is a purloined recipe from Canadian Living.
Profiteroles with Devonshire Clotted Cream
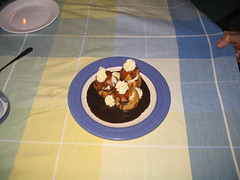
IMG_0471
Originally uploaded by wanderingcoyote.
So here is a shot of the dessert I made on Saturday night. The profiteroles (choux) are filled with orange-spiked whipped cream and a Grand Marnier ganache was poured over the top. The clotted cream I piped out with a star tip on the top of each profiterole and an extra few rosettes decorate the plate. I made something similar to this my first time doing dessert for the restaurant, way back in October.
Clotted cream is amazing stuff; I sweetened this with a bit of sugar and added some Grand Marnier to it as well. The combination of orange and chocolate is divine, and cream of any consistency is an amazing addition to any dessert.
Sunday, April 24, 2005
Fast and Easy Snacking Cake
This is a great, easy recipe that isn't incredibly fattening. It's versatile, as you can use either pumpkin, apple sauce, or mashed bananas. Ice with a simple buttercream icing or a cream cheese frosting.
2 eggs
1/3 cup melted butter, or vegetable oil
1/2 cup granulated sugar
1/2 cup brown sugar, packed
1 cup mashed over-ripe bananas, OR canned pumpkin puree, OR 3/4 cup smooth apple sauce
1 1/2 cups flour
1 tsp baking powder
1/2 tsp baking soda
1/2 tsp salt
1 tsp cinnamon
1/4 tsp each ground nutmeg, allspice, and cloves
Preheat oven to 350F. In a large bowl, combine the eggs, butter/oil (make sure the butter has cooled a bit) and sugars. With an electric mixer, beat until smooth and creamy - about 1 minute. Add whatever fruit you're using and blend very well. In a separate bowl, sift together your dry ingredients - flour, salt, baking powder, soda, and spices. You can omit the spices in the banana version if you don't think they work. Add the dry ingredients in two or three additions, with a wooden spoon or spatula, and stir just until all the dry ingredients are fully incorporated. Pour into a greased and floured 8" or 9" square pan. Bake 40 - 45 minutes, or until a tester comes out clean when inserted in the middle. Cool completely on a wire rack before icing it, slice and serve.
Notes to the readership.
1. For God's sake - don't overmix this or your cake might sink once it comes out of the oven because you've incorporated too much air.
2. Also, you can mix the dry ingredients in with the electric mixer - just be very brief about it. A) you don't want to overmix (see above) but B) you also don't want to work your flour too much. Cakes, cookies, etc. generally turn out better when you fold in the flour by hand because using an electric device tends to work the gluten in the flour too much, then you don't wind up with as tender a product in the end.
3. If you use the pumpkin, DO NOT use pumpkin pie filling! It's not pure pumpkin and contains sugars and seasonings that may or may not work here. You need to use pure pumpkin and pure pumpkin only.
Wednesday, April 13, 2005
Greek Pasta for One
My husband was out for dinner tonight, so I was on my own. I whipped this up on spec, using ingredients I had around for another meal. Don't get too caught up with measurements; everything should be to your taste. The flavours are strong, so tinker with this at will.
as much pasta as you want, whatever shape you want
6 kalamata olives, pitted and chopped
about 1/4 cup finely chopped parsley
1 generous tbsp oil packed sundried tomatoes, chopped
1 clove garlic, crushed
olive oil & pepper
crumbled feta cheese
Cook the pasta until al dente. Drain it and return it to the pot. Drizzle with a bit of olive oil, just to lightly coat it so it doesn't stick together. Add the olives, parsley, sundried tomatoes and garlic. Grind pepper over the top, to taste. Toss all this together, add more olive oil if necessary, and any of the other ingredients you think you want more of. Crumbe the feta cheese over the top and serve.
Notes to the readership
- you can use other fresh herbs; chives might be nice, as would a little fresh basil. Chop well with a sharp knife.
- you could use vegetables such as spinach, broccoli, red onions, and mushrooms as well. If using spinach, keep back a few tablespoons of the cooking water from the pasta in the pot and then add the spinach; toss until wilted. If using broccoli, cut it into bitesized pieces add it to the pasta pot in the last minute or two of boiling; you just want it to be bright green so don't cook it too long. Then just pour it out with the pasta into the colander.
- roasted garlic (see a few posts down) would be awesome in this, too.
Chocolate Chip Cookies
This is from Regan Daley's In The Sweet Kitchen and it's a good, junky, basic recipe.
1 cup unsalted butter,at room temperature
1 cup tightly packed brown sugar
1/2 cup white sugar
2 large eggs
1 1/2 tsp vanilla extract
3 cups plus 2 tbsp all purpose flour
1 tsp baking soda
1/2 tsp salt
16 oz chocolate chips, or a similar weight of good quality chocolate bar - bittersweet or semisweet - cut into chunks
1. Preheat your oven to 350F. Cream your butter and sugar until well creamed. I have a stand mixer, and if you're lucky enough to have one yourself, put on the paddle attachment and cream away for a few minutes. This is an essential step; the purpose of creaming the butter and sugar is to incorporate air, which gives you a lighter cookie. If you're doing this by hand with a wooden spoon, take the time to do it properly. The sugar should nearly be absorbed into the butter; it'll still feel grainy, but it should be homogenous.
2. Add eggs, one at a time, making sure the first egg is fully incorporated before adding the second one. Also a very important step in cookie making and baking, because you need to give the yolk time to absorb the fat of the butter. You'll get a curdled effect that you have to fix later otherwise.
3. Add the vanilla, salt, and baking soda until well combined, if using a mixer. Otherwise, sift the flour, salt and soda together, and mix until just combined. If using a mixer, still fold in the flour by hand, so it doesn't get overworked. Fold in the chocolate chips last.
4. Decide how big you want your cookies, and shape your chosen size into a knob on a greased cookie sheet, or better yet, invest in some parchment paper and line your cookie sheets with it (it's reusable; don't chuck it). With a wet hand, press the dough down a bit to flatten slightly. Make sure you have an inch or two between the cookies to allow for expansion. Bake for 12 - 15 minutes, less if you want a chewier cookie, more if you want a crisper one.
Notes to the readership:
- For one thing, I never use the whole amount of flour; usually the 3 cups is adequate
- the 16oz of chocolate is way too much for this recipe, in my experience. I've never been able to squeeze all the chocolate in. I know what you're thinking: you can't have too much chocolate! Well, yes you can. The dough will only hold a certain amount of chocolate chips/chunks before it becomes saturated and cannot take any more. Experiment. I've found just over a cup to be sufficient. I don't want to be forcing excess chocolate chips into my dough - it's ridiculous, and they just wind up falling out anyways.
Sunday, March 20, 2005
Giada's Salmon
Yesterday morning I watched Everyday Italian with Giada de Laurentiis, whom I like very much. She made something like this on the show so I thought I'd try it out for dinner last night. It was a big hit.
Here it is.
1. Take salmon. I used a side because I was feeding four people, but you can adjust this very easily to accommodate the number of people you're feeding. Put in a baking dish or on a piece of heavy duty foil.
2. Take some vine-ripened tomatoes and chop roughly - no need to peel or seed. You'll need enough to cover the top of the salmon you're making.
3. Put the chopped tomatoes into a bowl and add salt & pepper to taste, some dried herbs like oregano, thyme, basil, some finely chopped scallions or shallots or onion of some description, some fresh garlic to taste.
4. Pour over this some good quality olive oil, just to coat - you're not making a salad dressing with it. Over this, squeeze some fresh lemon juice to taste.
5. Spread this over the salmon evenly. If using the baking dish, cover well with foil and bake until salmon is cooked through. If you're just using foil, fold it around the fish firmly into a nice package and cook until done.
I served this with rice and a green salad.
Notes to the readership.
- You could use halibut, cod, or many other types of fish for this, including large shrimp.
- If fresh tomatoes are not available, canned ones are fine; just drain off the juice. But don't chuck the juice! Save it and put it in soup or something.
- Feel free to play around with the herbs. This has a distinctly Italian flavour to it with the oregano etc., but dill would be nice, too.
Wednesday, March 16, 2005
Sweet & Sour Chicken Recipe
This has got to be one of my favourite ways to make chicken. The sauce is amazing and it just bursts with flavour on your tongue. My mom used to make this, but alas, I cannot remember from whence this recipe came.
1 tbsp cornstarch
1 tbsp cold water
1/2 cup sugar
1/2 cup soy sauce
1/4 cup white vinegar
garlic to taste
1/2 tsp ground ginger
1/4 tsp ground pepper
1 small can (4.5oz) pineapple chunks or tidbits
4 - 6 chicken breasts, bone in or boneless skinless
Combine starch and water in saucepan. Add sugar, soy sauce, vinegar, garlic & spices. Cook, stirring constantly, over medium heat until the mixture thickens and is bubbling. Place chicken in greased pan, pour sauce over top and bake until chicken is cooked through. Add the pineapple at the end and return to the oven just for a minute to heat it through. Serve with rice and a steamed vegetable.
Sunday, March 13, 2005
Garlic Bread
I got this recipe from Chef Michael Smith of Chef at Home, a show on the Canadian food channel I really love. The guy is 6'7" and his stove and worktop are knee-high on him, so I wonder if he has major back issues... Whatever. He's very enthusiastic and he has inspired me to do my own experimentation in the kitchen.
Here's what you'll need and what to do.
1. Take 4 heads of garlic (not individual cloves - the full shabang) and trim the tops off with a sharp knife so the tops of the cloves are exposed. Place in a baking dish, drizzle with olive oil, and roast in a 400F oven until soft in the centre and most of the cloves look like they're about to pop out of the peels.
2. Take them out of the oven and cool them off. Then squeeze out the garlic into a bowl. This looks super cool. The cloves should be so soft and tender that they should easily just ooze out of the peels.
3. Once completely cold, mash well and add an equal amount of butter, softened. Stir well. Season with salt and pepper. To this, you can now add some herbs to taste: I added parsley, but you could add pretty much anything you like - chives would be nice, cilantro would be cool, too. Or just leave it as is.
4. Take a French baguette and slice it open lengthways like a book, leaving a "spine" in tact. Spoon in your garlic mixture evenly. Wrap in foil and bake in a hot oven until desired crispness and it's hot in the middle.
5. Slice and enjoy.
I love roasted garlic. It's easy to make and we do all kinds of things with it at school. In the pastry kitchen, we add it to bread. It has a really mellow flavour and can be added to cream soups (or any soup, for that matter), salad dressings, sauces, flavoured butters, or pretty much anything you like to add garlic to. The flavour changes completely once it's been roasted, so don't worry about garlic breath or anything.
Wednesday, March 09, 2005
Oyster Mushroom Sauce
Yesterday, while at the Food Service Expo, I happened by the Ponderosa Mushrooms exhibit and talked with the really nice lady manning the booth. There were packages of organic oyster mushrooms free for the taking, so I took one. I hadn't tried this particular mushroom before, and they were described to me as delicate, meaty, and earthy, and they shouldn't be overcooked. I made a nice stirfry with them last night, and tonight made the following recipe.
- 2 slices bacon (ok, I have some readers who don't eat pork; don't worry - you can substitute turkey bacon or, even better, if you can get a hunk of smoked chicken or duck, just don't saute for very long)
- 1/4 onion, diced
- a little wine or stock for deglazing
- about 1/2 a cup of cream
- 2 cloves garlic, crushed
- 1 tbsp REAL Parmesan cheese (again - spend the money, get a grater, and buy the real stuff - there's no comparison!)
- 1 - 1 1/2 cups oyster mushrooms
So fry up your bacon until desired crispness. Remove to paper towels to drain and drain most but not all of the fat from the pan; cut into small pieces. Saute your onions until tender. Deglaze the pan with whatever liquid you choose and then let the liquid reduce to a shadow of its former self. Add the oyster mushrooms and gently saute for a couple of minutes, stirring frequently. Season with pepper. Add the cream, garlic, bacon and cheese. Heat through thoroughly. Serve over pasta.
Notes.
1. Oyster mushrooms have long stems - do not remove these!
2. Do not overcook the mushrooms. They are delicate and shouldn't be browned or cooked as you would your regular button mushroom. You basically just want to heat them through.
3. The mushrooms are chewier than your button mushroom - this is normal and the way they should be.
4. These mushrooms are more delicately but distinctly flavoured than button mushrooms. Don't overpower your sauce with tons of cheese or meat or garlic; you want a nice balance and you want to be able to taste the flavour of those mushrooms.
5. If you want to use oyster mushrooms in other dishes, add them near the end to avoid overcooking.
Enjoy and let me know what you think.
Food Agony Aunt
So, now that I'm on the verge of graduation and will have some official documentation in 2 weeks that indicates I actually know what I'm talking about, I'll now make the following announcement:
If you have any baking questions at all that you wish to have answered, if you have a recipe that you can't get to work, if you have questions about ingredients, methods, names of things, techniques, equipment, or whatever, please leave a comment and I'll endeavour to answer your queries to the best of my ability. If I don't have an answer, I'll be honest about it and will at least be able to steer you in the right direction. If it's warranted, I'll write a post re. your question and my answer. If you are in need of a recipe, I also may be able to help.
I love this kind of thing, so fire away - don't be shy.
Don't all inundate me at once, though. I have exams next week!
Monday, March 07, 2005
Pastitsio Pie
The Great White Bear has spoken. Here is a new recipe. I love this dish. My mother passed it on to me and she originally got it from Canadian Living. It's Greek-ish and will feed a family with yummy leftovers.
Pastitsio Pie
2 cups macaroni
1 tbsp butter
1 chopped onion
garlic to taste (I like lots, but that's just me)
1 1/2 lbs ground turkey or lean ground beef (they are interchangeable; I like the turkey, though)
1/2 tsp each ground oregano, salt, and cinnamon (or to taste; I usually add more cinnamon)
1/4 tsp pepper
1 can (5.5oz/156mL) tomato paste
1 tbsp red wine vinegar
1/4 cup chopped parsley
2 tbsp dried bread crumbs (the fine ones, not the ones you may make stuffing out of)
1 cup parmesan cheese (for God's sake - spend the money and get the real stuff! It's worth it)
1 can (14oz/398mL) stewed tomatoes (in Canada, I have never seen the 14oz cans; the 19oz works fine)
Sauce
2 tbsp butter
2 tbsp flour
1 cup milk
1 cup cottage cheese
1 egg beaten
pinch of nutmeg, salt & pepper
1. Cook pasta and drain. In large frying pan, saute onion & garlic in the butter. Stir in turkey and spices and cook until the meat is no longer pink. Drain off the fat. Stir in tomatoes, paste, and vinegar. Cook for about 3 minutes, stirring. Remove from heat; stir in parsley & set aside. (You can make the mixture ahead of time and refrigerate it until you need it.)
2. For the sauce (which must be made right before you need it), melt the butter over medium heat in a small saucepan. Whisk in the flour and cook for 2 minutes (this will cook out the starch in the flour and make the texture of the sauce smooth on your palate). Pour in the milk & whisk for about 5 minutes or until it's thickened. You want it to be a nice thick sauce, not a runny one, but it shouldn't be too thick. Remove from heat and stir in the cottage cheese, egg, nutmeg, etc.
3. The original recipe calls for using a 10" pie plate; my experience is that this is too small a dish for this amount of food. A 9x13 casserole would probably work, or something along those lines. Anyways, grease your dish & sprinkle it with the bread crumbs. Spoon in half of the macaroni. Spread the meat mixture evenly on top. Sprinkle with 1/3 of the parmesan cheese. Spoon the remaining macaroni over that. Pour the sauce on top. Sprinkle with remaining cheese.
4. Place the dish on a baking sheet (to prevent a mess in case it bubbles over) and bake at 350 for 50 - 60 minutes, or until bubbling and sauce is golden on top.
You can never go wrong with Canadian Living. I make a lot of their recipes and they always turn out and taste great. One of my dream jobs would be working in their test kitchen. Sooo, anyone who knows anyone who knows anyone... I've been to culinary school....I can write...I love Canadian Living... I'm willing to go on t.v.... You know how to reach me.
Sunday, February 06, 2005
Fast Salmon for One
For this recipe, which I just made, you should either have a fresh filet of salmon, or a frozen one that has been completely thawed beforehand. Don't thaw in the microwave; do it in the fridge or out on the counter (which is against Food Safe, I know, but one salmon filet will pretty much thaw on the counter in about an hour and a half). Thawing in the microwave often is uneven and you wind up getting a frozen centre and cooked edges, which is bad.
So...
- Take a salmon filet. Take a frying pan. Put some olive oil in the frying pan and crank up the heat. The pan must be very hot - the oil should just start to lightly smoke.
- Gently lay the salmon in the pan; season with salt & pepper. Do not touch the salmon for at least 1 1/2 - 2 minutes - it will still stick to the pan at this point and you'll get a mess. After the minute and a half, look at the cross section of the salmon and if it's cooked aobut 1/4 of the way or so, then flip the salmon and season that side. It shouldn't stick. Again leave it for about a minute and a half to two minutes.
- Deglaze the pan with a generous splash of white wine. Add some dried dill and a clove of garlic. You can also add a shallot or a leek, if desired. Sprinkle with freshly squeezed lemon juice. Let the wine reduce, uncovered, until there's only a bit left. Check salmon for doneness. Reduce the heat to low. Put the lid on the pan and let the salmon gently cook until done.
- You can serve it now or, if you're feeling decadent, you can finish this off with a couple of tablespoons of cream (which is obviously less diet-friendly).
Serve with a salad, and you have a quick, yummy, healthy meal.
Sunday, January 30, 2005
The Most Excellent Seafood Chowder
I have just made the best seafood chowder I've ever made to date, and I've made a few of them, let me tell you. Here's what I did:
- In a large dutch oven, I fried up about 7 slices of bacon I had kicking around my fridge
- Once they were done - and I didn't cook them until very crisp, just until cooked through and they had some colour - I removed them to a paper towel to drain
- I deglazed my pan with about 1/2 - 3/4 cup white wine and stirred well to bring up the bits from the bottom of the pan
- I added 2 diced medium onions and sauted them until translucent
- Added 3 medium white potatoes and 2 sliced carrots
- Poured in enough water to just cover this, added some salt and pepper to taste and a sprinkling of dried oregano, then brought it to a boil
- Simmered it until the veggies were tender
At this point, I took a potato masher and gave the mixture a rough mash - I didn't turn it into a puree or anything resembling mashed potatoes, though. Just mashed it enough to make the chunks smaller. This also helps to thicken the chowder. To this I added:
- 1/2 lb thawed raw large shrimp
- 1 large salmon filet, skinned and boned, about 8 ounces
- the bacon, which I had chopped up
I let these cook thoroughly before adding
- about 1/2lb fresh mussel meat (out of the shell, coveniently enough; I found this yesterday at the local Chinese grocer)
- 300g fresh clam meat (also conveniently out of the shell; I found this at my favourite grocery store, The Real Canadian Superstore)
- 1 bottle (about 250mL) clam juice
- 2 large cloves of garlic, crushed
I let this heat through for a few moments before adding 1 cup of whipping cream. One this was heated through, it was ready to serve.
Notes for the Readership...
- Deglazing is a fancy term for adding a liquid, usually some sort of a stock or wine, to a pan that has just had meat browned in it. The deglazing brings up all the bits left from the meat off the bottom of the pan, which contain a lot of flavour. Always deglaze; you're just chucking out flavour otherwise.
- Don't do anything stupid like take an immersion blender to the potato/carrot mixture. You want chunks here, remember, not a puree. A potato masher can be purchased super cheaply at a dollar store. You can use it for other dishes, too, like making homemade refried beans and other stuff.
- You can use any type of seafood you like. I put in what I liked and what I could find. Fresh is best. Canned clams are fine; add 2 tins with their nectar and skip the bottle of clam juice. Other canned seafood I wouldn't recommend because of the sodium factor.
- Never boil or simmer the soup after the cream has been added; it will split.
- I always add my crushed garlic to anything after the main liquid ingredient has been added because this keeps the garlicky flavour nice and mellow but still noticable. I never saute garlic with the onions because it tends to caramelize and go bitter, and I can never taste the garlic when I do this. You will not have garlic breath, I promise (unless you add tons); it'll mellow out in the heat of the liquid.
- Don't skimp on the bacon, or skip it altogether, for God's sake. Bacon is superb for adding smokey, salty flavour to just about anything.
- I don't peel my potatoes when adding them to any soup. The peel is where the bulk of the vitamins and nutrients are, as well as the fibre. Don't use a baking potato; not a nice texture in a soup. I like new white or Yukons, or even the red skinned ones.
Subscribe to:
Posts (Atom)