I'm a huge fan of all things pumpkin (well, except soup). I am very grateful for good quality tinned pumpkin that is available year round. This is a great recipe I originally got from Canadian Living Magazine. These are fantastic with cheddar cheese, or all by themselves. The batter is thick, but don't worry; they bake up really nicely.
Pumpkin, Orange & Raisin Muffins
2 cups flour
1 cup raisins
1/3 cup packed brown sugar
1 1/2 tsp baking powder
1 tsp baking soda
1/2 tsp salt
1/2 tsp cinnamon, ginger, nutmeg
1 egg
1 3/4 cups pumpkin puree (not pie filling!) - this equals 1 can (398mL) pumpkin
2 tbsp orange zest
1/2 cup orange juice (I zested two large naval oranges and juiced them both, and this worked fine)
1/3 cup vegetable oil
1. Sift together the dry ingredients in a large bowl.
2. Combine the wet ingredients in a bowl, and add to the dry. Add raisins. Mix until it just comes together. Don't overmix.
3. Bake at 375F for 20 - 25 minutes, or until done.
This should yeild 12 muffins.
Enjoy!

Wednesday, May 31, 2006
Friday, May 19, 2006
Sourdough Bread
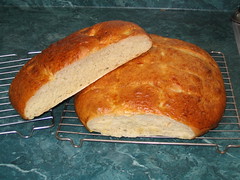
Sourdough Bread
Originally uploaded by wanderingcoyote.
I am a bread baking fiend.
The first thing we ever did in culinary school was learn how to make a starter, or, as the French say, levain. Starter is a mixture of flour, water and some sort of yeast that has fermented over a period of time. It's what makes sourdough bread sour. Now, there are lots of ways to make starter, from totally easy to quite time consuming and finicky. The starter we made at school was in between. What we did was take a potato and an onion and poke them full of holes with a fork or skewer. Then we put the potato and onion in the window sill for 48 hours. During this 48, the natural yeasts in the air collected on the veggies. After this 48 hours, we put the potato and onion - now looking quite yucky and black - in a bucket with 1kg bread flour, 1kg water, and one bottle of beer. We let this sit for 5 days or so and voila, you got a fermented yet pleasant-smelling, spongey, bubbly, gooey mixture we used to make most of our breads. Once a week or so, you feed it a smaller amount of flour and water, and whenever you used the starter to make bread, you had to replenish it with the amount you took out of it. There was no added yeast in this starter; it's cultivated right from the yeasts that naturally float around in the atmosphere, aided by the beer.
Now, that doesn't sound too hard, does it?
Well, I've never been able to make one on my own post-training. I have tried and tried, used different beers, different containers, all purpose flour, bread flour (always unbleached, of course). I've coaxed it, talked to it, sworn at it - and still no joy.
So, time to try a different method. I went for the super-easy, no fail, brainless starter recipe found in my trusty Fleischmann's cookbook.
2 cups flour
2 cups water
1 package or 2 1/4 tsp quick yeast
Mix the ingredients together until smooth. Cover tightly and let it ferment at room temperature for 2 - 4 days and Bob's your uncle. It will start to bubble and probably grow a bit, and it might darken and separate. This is natural. If it starts to smell moldy and goes an iffy colour, discard and start again. Mine turned kinda golden and did separate quite a bit. Just mix it up and on you go. Now to keep it alive, you have to feed it regularly (starter, I have discovered, is much like an ungrateful pet) with a small amount of flour and water, a few tablespoons of each. To replenish this one, add 1 1/3 cup water and 1 1/3 cups flour to it for each 1 1/2 cups you take out, and let it sit 12 - 24 hours. Store your starter in the refrigerator so it doesn't go wild, and make sure it comes to room temperature before you use it again.
No natural yeasts, no problem.
This is what it should look like: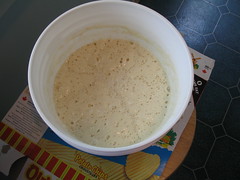
The bread recipe I used to make the sourdough also came from my Fleischmann's book.
Sourdough Bread
1 1/2 cups starter
3 1/2 - 4 1/2 cups bread flour
1 package quick yeast, or 2 1/4 tsp
1 tsp salt
1 cup very warm water
egg for egg wash (optional)
Today I got my big toy out (i.e. my KitchenAid mixer) because this dough was stickier due to the starter and I didn't feel like getting my hands mucky. However you do it, be sure to use the guidelines from my bread baking tutorial post.
Now my loaves didn't turn out fantastically in terms of appearance. I'm having a difficult time scoring my bread at home for some reason, so these deflated quite a bit when I did score them, and as a result they're kinda flat-looking. But the flavour was great. This starter had a mild flavour. Some sourdoughs are rather vinegary, and maybe as my starter ages it will change in flavour.
If anyone cares to try the potato/onion starter and you succeed, please let me know so I can discover what I keep doing wrong.
Questions? Comments? Concerns? You know the drill.
Happy baking!
Friday, May 12, 2006
Sundried Tomato Parmesan Bread

Sundried Tomato Parmesan Bread
Originally uploaded by wanderingcoyote.
You too can make beautiful artisan breads at home! I made this loaf this afternoon and baked it, as you can see, on my pizza stone (a Pampered Chef product). Most loaves I make at home I do in a pan, but I was in the mood to practice shaping a loaf free-form today, which was all we did in culinary school.
The recipe is a souped-up version of the white bread recipe in my Cordon Bleu Complete Cook book, an excellent resource for basic French cooking and baking using easy to find ingredients, and containing uncomplicated recipes that have well-written instructions. There is a great section at the end called "Chef's Techniques" that shows you step-by-step methods for many of the classical techniques. It's a big book that cost me $45 minus my 30% Crapters employee discount a few years ago, and I highly recommend it if you want to learn the basics. Great pictures, too.
Sundried Tomato Parmesan Bread
1 tbsp quick yeast
1 1/4 - 1 1/2 cups very warm water
1 tbsp sugar
4 cups bread flour
1 tsp salt
6 oil packed sundried tomatoes, chopped finely
1/3 cup freshly grated Parmesan cheese
approx. 1 tbsp olive oil from the jar of oil packed sundried tomatoes
1 egg for egg wash
Basically, follow the directions from my Bread Baking Tutorial post, adding the cheese and sundried tomatoes with the dry ingredients.
Watch your water amount in this recipe; I needed far more than what was called for. Just make sure you have a nice, elastic, smooth,pliable dough. You don't want a dry, stiff dough or you'll get a dry, dense bread. Do make sure you proof and bake the bread with a pot of boiling water in the oven with the loaf; it makes all the difference. You don't have to use an egg wash, but it looks so nice. Don't worry about extra egg wash; it can be refrigerated for a week in an airtight container and used to make scrambled eggs for breakfast.
As far as shaping is concerned, you can do one of a few things. You can put this in a loaf pan and bake it that way. For the loaf pictured here, I rolled this into a tight ball and tapered off the ends. Or you can roll the dough into a rectangle with a rolling pin and make a tight sausage shape with it. You'd need a cookie sheet for baking it in this case. Whatever you do, make sure you bake the loaf seam side down.
The flavour of this loaf was impressive, as was the texture: soft but a bit chewy. Get creative: you can add herbs like basil and oregano, other types of cheeses like asiago or sharp cheddar, and things like olives or chopped artichokes. Sky's the limit, really.
Bon Appetit!
Monday, May 01, 2006
Burger Buns
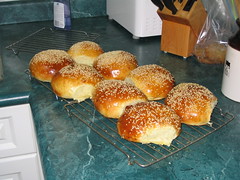
Burger Buns
Originally uploaded by wanderingcoyote.
Currently between jobs, I'm trying to make as much stuff from scratch as possible, especially if I already have the ingredients on hand. I bought a box of chicken burgers on sale last weekend and didn't want to spend money on buns. So I got out my trusty Fleischmann's recipe book and found a recipe for hamburger buns. The method can be found on my Bread Baking Tutorial post.
As you can see, these turned out gorgeously. And they tasted great. Impress your friends and family at your next BBQ with these guys - you'll get rave reviews, I promise.
Burger Buns
- 1/2 cup water, very warm (120-130F/50-55C)
- 3/4 cup milk, same temperature as above
- 3 tbsp butter or margarine (melted in the above liquids)
- 2 packages (4 1/2tsp) quick yeast
- 1/4 cup sugar
- 4 - 4 3/4 cups bread or all purpose flour
- 1 1/2 tsp salt
- 3 eggs (two for the dough, one for egg wash)
- poppy seeds, sesame seeds, or dried minced onions for the top, optional
Follow the method on the bread baking tutorial, with the addition of the two eggs, beaten, after you've added the other liquids and incorporated them into the flour.
Divide the developed dough into 8 and form balls. Press the balls in to 4" (approx.) discs and place them on a shallow, rimmed baking sheet, either greased or lined with parchment paper. Proof (rise) in a warm location for 1/2 - 1 hour depending on the temperature of the environment, or until doubled in volume. Beat the remaining egg well and brush the buns gently with the egg mixture. Sprinkle with seeds or onions (optional) and bake at 400F for 10 - 15 minutes, or until done. Depan immediately and let cool on wire racks.
Notes.
- It's important, as I found out the hard way, to use a greased or parchment lined baking sheet even if you have non-stick bakeware. The egg wash can cause the buns to stick to the pan and, as with me this afternoon, can cause problems when depanning the buns. I have come to think that non-stick bakeware is a bit of a scam. The only thing I've ever made successfully with my non-stick bakeware has been cookies - and that's because they're easy to slip a spatula underneath to ease them off the pans.
Enjoy!
Subscribe to:
Posts (Atom)