Sunday, May 20, 2012
Cooking with Betty Crackpot: Apple Crisp
Apple Crisp, from page 177 of Betty Crocker's Cookbook, 1969 version
4 cups sliced pared tart apples (about 4 medium)
2/3 - 3/4 cup brown sugar, packed
1/2 cup flour
1/2 cup oats
3/4 tsp cinnamon
3/4 tsp nutmeg
1/3 cup butter or margarine, softened
Heat oven to 375F. Grease square pan, 8x8x2". Place apple slices in pan. Mix remaining ingredients thoroughly. Sprinkle over apples. Bake 30 minutes or until apples are tender and topping is golden brown. Serve warm and, if desired, with light cream or ice cream.
I thought this was pretty good. It was definitely crispy and crunchy. The flavour and texture was great. I served it with a bit of whipping cream.
R's verdict: it was "OK." Well, I guess I didn't change her life after all.
R's mom, T, loved it though. We almost ate the whole pan that night.
Tuesday, October 06, 2009
Huckleberry Slump
According to the book, a "slump" is "essentially a twice-removed cousin of the cobbler family, consisting of cooked fruit filling topped with a biscuit crust that's cooked entirely on the stovetop" (page 44). The slump refers to how the biscuit topping "slumps" over the filling as it cooks.
The recipe for the original sour cherry version can be found online here.
Huckleberry Slump (adapted by me from Baked: New Frontiers in Baking by Matt Lewis & Renato Poliafito)
- 1 cup all-purpose flour
- 2 tablespoons sugar
- 1 teaspoon baking powder
- 1/4 teaspoon baking soda
- 1/4 teaspoon salt
- 2 tablespoons unsalted butter, melted and cooled
- 1/2 cup sour cream
- Raw sugar for topping (optional)
- 3 cups huckleberries
- 1/2 cup brown sugar
- juice of half a lemon (use some zest if you have it, too; I didn't)
Make the biscuit topping
In a large bowl, whisk together the flour, sugar, baking powder, baking soda, and salt. With a wooden spoon, stir in the melted butter and mix until combined. Add 1/4 cup of the sour cream and stir. Add a few heaping tablespoons of the remaining sour cream, stirring between each addition, until the dough feels wet. You may end up using slightly less than the 1/2 cup of the sour cream. Set aside while you prepare the huckleberries.Make the huckleberries
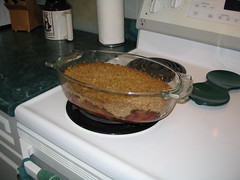
In a well-seasoned 8-inch or 8-1/2-inch cast-iron skillet, gently combine the berries, sugar, and lemon juice. (I used my nifty cast iron KitchenAid dutch oven and it worked great.)
Cover the skillet with a lid or a piece of tight-fitting foil and bring the mixture to a rapid boil over medium heat.
When the mixture reaches a boil, remove the skillet from the heat and scoop heaping tablespoons of the biscuit topping over the berries, covering as much surface area as possible. If using, sprinkle the top with raw sugar. Cover the skillet tightly and return it to low heat. Cook for about 15 minutes. Do not remove the lid. After 15 minutes, check the topping for doneness; it should be dry to the touch. (The topping will not brown the way it would in an oven.)
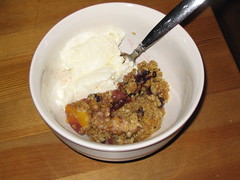
Serve the slump hot from the pan.
Tuesday, September 22, 2009
Camping Grub 2009 Part 1: Breakfast
And of course we ate well! Let's start my 2009 Camping Grub series off with breakfast.
On Morning #1, we opted for a cooked, greasy camping breakfast of bacon & eggs, cooked over the camp stove. We also had toast made from a loaf of no-knead bread I made the day before we left. The camping toaster gadget was broken, so my SIL toasted the bread gently over the BBQ.
On Morning #2, we had a super easy breakfast made by my SIL before we left: homemade peach crisp, made with local peaches. We had this with some vanilla yogurt and it was excellent!
The full camping Flickr set, including all our food, some gorgeous scenery, and a gigantic bug, is here.
Thursday, September 03, 2009
Pear & Apple Crisp for a Crowd
Thursday, February 05, 2009
"What To Do With A..."#3: Apple Mincemeat Crumble
Apple Mincemeat Crumble
4 cups peeled, sliced apples (I used these, which made this super quick and easy for me)
about 1 cup or so of mincemeat
1 tbsp corn starch
2 tbsp sugar
2 tsp lemon juice
Crumble topping:
1 cup oats
1/2 cup whole wheat flour
1/4 cup brown sugar, packed
1/2 tsp cinnamon
1/2 cup butter at room temperature
For the crumble, combine all dry ingredients. Break up the butter into small pieces and, using your hands, combine with the dry ingredients until crumbly. Put on top of apple mixture. Bake at 350F for 35 - 45 minutes, or until golden brown and the filling bubbles up through the topping.
My brother had a jar of double Devonshire cream kicking around, so we served the crumble with it and it was delish!
Enjoy!
Tuesday, August 26, 2008
Blueberry Apple Crumble
My local overpriced grocery store recently had blueberries on sale (Fraser Valley-grown, I believe, so, though not local, they are at least from the same province), 4lbs for $9.99. Out of this, I got 11.5 cups of berries that I promptly froze. In June, I bought frozen blueberries from a huge big-box store that is extremely evil but also the cheapest place around for many grocery items. I wanted to use the frozen ones up before baking with the newer berries. Last weekend, I had a family dinner to attend, and since my family and its extensions all love blueberries and I needed enough for 12 people, I made a blueberry crumble. I also had some apples kicking around, so I added them for good measure.
For the filling, I used:
5 cups of blueberries and about 1.5 cups of sliced apples
2.5 tbsp cornstarch
juice of 1 lemon
2/3 cup sugar
For the topping:
1 1/3 cups oatmeal
1 1/3 cups whole wheat flour
2/3 cups brown sugar
1 tsp cinnamon
1/2 cup butter
Now, I must admit this wasn't the greatest berry crumble I've ever made, and I think this had to do with the difference in quality in the frozen berries versus the berries I bought at the local overpriced grocery store. The crumble was a tad bland, and although I cut down on the sugar considerably because some people in the family are watching waistlines, one person had a fine enough palate to tell me that some of the berries seemed sweeter than others. Ah-ha! I can only imagine which berries were sweeter.
I learned, that for those of us who love to bake yet are on small budgets, buying fresh berries in season and freezing them is far cheaper than buying pre-frozen berries out of season. A good lesson.
Incidentally, I have no pictures of the dessert served up because we had dinner at the lake and it was dark out and busy and I just couldn't get it done properly.
Saturday, August 26, 2006
Peach Blueberry Crisp

Peach Blueberry Crisp
Originally uploaded by wanderingcoyote.
Oh, it's been a while, I know. Too long. It's been a long, rough summer and it ain't over yet. I've done little baking and even less cooking, though it's been a summer of eating quite possibly the worst food I've ever had to suffer through. Six and a half weeks of hospital grub is not fun at all.
I have moved - again. I am not working, and won't be for a while. I've been trying to keep myself occupied and have been making lots of bread. This crisp is the first sweet thing I've made in such a long time.
Peaches are in season, as are blueberries. My dad made a trip to the Okanagan earlier on in the week to get canning ingredients for us and a stash of farm-fresh fruit and veg for himself. On Wednesday, I canned over 48 pints of salsa and 26 1L jars of dill pickles with carrots with both my brothers' girfriends. The salsa was amazing. Today, the peaches my dad brought us were on the overripe side, and my sister-in-law, Shan, had some locally grown frozen blueberries kicking around. I decided to make this simple dessert, pictured here with some sugar free ice cream.
Peach Blueberry Crisp
8 fresh peaches, peeled and sliced
1 1/2 cups fresh or frozen blueberries
1/2 tsp cinnamon
1/4 tsp freshly grated nutmeg
2 tbsp sugar (the fruit was so ripe it didn't need a lot of sugar at all)
2 tbsp white flour
Topping
1 cup oats
1/3 cup whole wheat flour
1/4 cup brown sugar
1/2 tsp ginger
1/2 tsp cardamom
1/2 cup butter or margarine, cold
1. Preheat oven to 350F. In a bowl, combine the fruit with the sugar and spices, and lastly the flour. Put in the bottom of a 8" square pan that has been greased.
2. For the topping, combine all the dry ingredients with a whisk. Cut in the butter until you get a pea-sized consistency. Pour the crumble over the top and spread it out evenly. Don't press it down.
3. Bake for 35 - 45 minutes, or until golden on top and the filling is bubbling at the sides. Might be a good idea to put the pan onto a baking sheet in case of any boil-overs. Let it cool slightly and serve - with ice cream is nice, but not 100% necessary.
If you make it and like it let me know. Enjoy!
Sunday, March 26, 2006
Apple Rhubarb Crisp

IMG_0791
Originally uploaded by wanderingcoyote.
I know crisps are traditionally fall fare when apples are plentiful, and I know that rhubarb is not quite in season, but I made this today because Granny Smiths (the best baking apple ever) were on sale, my roommate, J, had rhubarb in the freezer, and I wanted to make a dessert to compliment J's roast chicken dinner.
Funny story about the rhubarb. It came from the neighbour's plant last year. J took some to a coworker who claimed it was the best rhubarb she'd ever tasted. When the coworker asked the rhubarb plant's owner if she could have a cutting of the plant to grow in her own garden, the lady said no way. It's a weed, right?
Speaking of which, we had a huge rhubarb plant in our back yard when growing up. I mean huge. My mom made rhubarb everything when we were kids, and it took a while for it to grow on me. My brother, on the other hand, hated the stuff. One spring, my dad and brother were out doing yardwork and my dad entrusted my brother with the weed killer to eliminate some pesky dandilions etc. Well, my brother went to town with the weed killer and sprayed it on the rhubarb plant. We had no rhubarb that year and my mom was pissed off. But it came back the next year! And, I hate to say it, we ate that rhubarb. I shudder to think what chemicals were floating around my body afterwards, and hope I don't get any cancer as a result!
So here's what I did this afternoon.
Apple Rhubarb Crisp
4 Granny Smith apples, peeled & sliced
approximately 3 cups chopped rhubarb
4 tbsp cornstarch
2 tsp ground ginger (or to taste)
2 tsp cinnamon (or to taste)
1/2 cup sugar (or to taste)
Topping:
I cup oats
1/3 cup whole wheat flour
1/3 cup brown sugar
cinnamon & ginger to taste
1/3 - 1/2 cup butter
Combine rhubarb & apples in a bowl. Add the cornstarch sugar and spices. Toss to coat thorougly. Chuck in a large casserole that has been well-oiled.
For the topping, combine the oats, flour and sugar. Add the spices. Cut the butter into in the mixture either with a pastry cutter or by rubbing the butter into the mixture with your hands. It should be crumbly and just hold together when squeezed. Sprinkle on top of the fruit and pat down gently.
Bake at 375F for 45 minutes to an hour, depending on the thickness of your apple slices and the depth of your casserole dish. You know it's done when it's bubbly and when you spear it with a sharp knife, the apples are tender.
Vanilla ice cream is a wonderful accompaniment, as is just straight whipping cream poured over the top. My mom used to serve this with evaporated milk poured over it.
My mom always claimed that by adding ginger to rhubarb it eliminated the feeling that you're teeth were sticking together, a sensation she claimed she had when eating rhubarb without ginger. I don't know about this. I've eaten rhubarb without ginger before and didn't have this experience. But they are a good combination nonetheless.
Rhubarb is quite tart, so don't skimp on the sugar. Taste the mixture after you've added the sugar to make sure it's sweet enough for you. Don't eat the raw rhubarb, but there should be some juices in the mixture at this point, so taste that.
We make strawberry rhubarb pies at work, and you can make a strawberry rhubarb crisp, too. Both fruit will be plentiful this summer.
Enjoy!
Friday, January 27, 2006
Apple Crisp Cheesecake
Crust:
2 cups graham cracker crumbs
1 cup quick oats
1/3 cup packed brown sugar
2/3 cup butter, melted
- combine these ingredients and press into a 10" springform pan, building the crust 1 1/2" up the sides of the pan. Chill.
Topping:
1/4 cup quick oats
1/4 cup packed brown sugar
1/4 cup all purpose flour
1 tsp cinnamon
2 tbsp butter
- combine in a small bowl until crumbly and set aside
Filling:
3 packages (250g each) cream cheese (light would probably work but DO NOT use fat free), at room temperature
1 cup packed brown sugar
3/4 cup sour cream (again, light would probably work but DO NOT use fat free)
4 eggs
1 3/4 tsp cinnamon
1/2 tsp nutmeg
2 small apples, sliced and peeled
- beat cream cheese, brown sugar, and sour cream in a large bowl on medium speed until well creamed. Add the eggs, one at a time, beating well after each. Ad spices and combine. Pour into crust. Spread apples over filling. Sprinkle on the topping.
- bake at 325F for 65 - 70 minutes, or until soft set in the centre. Immediately run a knife along the edge of the cake to loosen it from the pan, then cool completely on a wire rack. Chill overnight, or at least for a few hours.
See? Easy and spectacular. Serve with a caramel or butterscotch sauce. This cake also freezes well, if you want to make it in advance, and it should yield 16 servings. Enjoy!