Thursday, September 11, 2008

101 Uses for a Roasted Chicken #7: Chicken & Tortellini Soup

I totally enjoy making my own chicken stock, as mentioned here and here. It's super easy and helps get the very most out of a roasted chicken. I always freeze my chicken carcasses, along with the legs and wings with meat still on them, to make the stock, and I vary my aromatics. This time, I used carrots fresh from my garden, onions, several cloves of garlic, peppercorns, and salt. You can also use lemon, which I frequently do, and any left over parsley or cilantro stems, or other tasty veggies you may have kicking around.

I have gotten used to making my stock in my slow cooker because then I don't have to worry about leaving my stove on if I go out. It works great. It usually fits two carcasses and about 2L of water, plus the veggies.

One thing I am also doing with my stock now is letting it sit in the fridge over night so that the fat solidifies at the top of the stock and can be skimmed off quite easily for a nearly fat-free soup. From there, you just heat up the stock on the stove, and add to it whatever you want in your soup. Voila!

For the chicken & tortellini soup, I used:

2L homemade chicken stock
meat from the 2 leftover roasted chickens
basil, oregano, thyme, salt and pepper to taste
3 cloves fresh garlic, grated into the stock
carrots and wax beans from my garden
2 onions
1 cup white wine
1L jar of tomatoes I canned
1 package (350g) cheese tortellini (my overpriced grocery store only had small ravioli for a decent price, so that's what I used)

After skimming the stock of the fat, I brought it to a boil and added the veggies. I added the tortellini. 10 minutes later, I had dinner. I froze the leftovers in batches so I can have meals whenever I need them now.

Easy peasy!

Honestly, I never buy canned soup anymore. Too much sodium, too much crap. This is so much better - homemade, healthy, nourishing, and delicious.

Wednesday, September 10, 2008

The Perfect Chocolate Chip Cookie?

I don't think you can ever have too many chocolate chip cookie recipes. I've made so many different ones I can't even recall them all, but some have been totally wicked and some have been OK, but in the end, I've never met a chocolate chip cookie I've never liked. In fact, I've never met any chocolate chip cookie dough I haven't liked either.

So, in July the food blogosphere was abuzz with a lot of hoopla around this New York Times article and accompanying chocolate chip cookie recipe, touting this particular cookie to be "perfect." The secret: chilling the cookie dough overnight, or for at least 24 hours. The article tells why: this resting time allows "the dough and other ingredients to fully soak up the liquid — in this case, the eggs — in order to get a drier and firmer dough, which bakes to a better consistency.” Furthermore, "A long hydration time is important because eggs, unlike, say, water, are gelatinous and slow-moving... Making matters worse, the butter coats the flour, acting...'like border patrol guards,' preventing the liquid from getting through to the dry ingredients. The extra time in the fridge dispatches that problem."

Before reading this article, I theorized that the chilling time a) allowed the gluten sufficient rest after mixing and b) allowed the sugar to develop flavour, as it would in bread dough risen in the fridge. But, the article explains the science behind this method far better than I ever could.

So, of course, after hearing all the buzz, I had to try this recipe myself. I remained faithful to the recipe apart from a few things. First, I don't see the point in using both cake flour and bread flour. Not every home baker is going to have a variety of flours on hand like I do, and I don't even have cake flour around because I don't use it often enough, and what's the point of combining a low-gluten flour with a high-gluten flour when all purpose flour is a perfectly decent mid-gluten flour? Second, I did not put the sea salt on top of the cookies before they baked. I just plain forgot. 24 hours will do that to you. I also didn't turn my chocolate chips upside down so their flat sides were up; I thought that was ridiculous! Additionally, I made my cookies far smaller than the generous golf-ball size stipulated by the recipe.

If the dough was anything to go by, these were going to be outrageously good cookies. And sample the dough I did...and did, and did...

While I was not as adventurous with this recipe as my good blogpal Cakespy was, I was totally happy with the results. When they came out of the oven, my cookies were beautifully pale golden brown and were the perfect combination of crisp and chewy.

Will I chill again? Probably. Though I tend to be more of an instant gratification kind of baker, I think the waiting was worth it. But then again, I'm sure this cookie would be just dandy baked off immediately rather than sticking it in the freezer overnight. Or, I could just as happily eat the dough right out of the bowl, couldn't I?

Tuesday, September 09, 2008

Restaurant Review: Main Street Diner

Yeah, nothing works up a bigger appetite than waiting in a huge, long line-up to get your passport done - which is exactly what I did at the end of August. Luckily, it didn't take as long as I'd anticipated, so I actually had a free afternoon. My dad and I decided to take a trip to Nelson's Save-On Foods to do some grocery shopping, but I was starving so we did lunch first. My choice: The Main Street Diner.

I love this place. Back when I was a kid, it was called Milly's, and a trip to Nelson was never complete without a meal there. Milly's is where I had my first taste of Greek food: avgolemono soup, souvlaki, and feta cheese. My favourite in those days was the Baja Melt, which is pita smothered in salsa, shrimp, cheese, and served with sour cream. It seemed to exotic and it was such a treat to go there.

Even though the name has been changed for a while now, I still refer to Main Street as Milly's, and the menu is very similar, too. The melts are still there as are the Greek favourites. And the food is still awesome. My dad doens't understand why I like it so much because he thinks it's a bit plain, but the Main Street is consistently good and besides, I like it for sentimental reasons!

Apart from the Greek stuff and melts, the Main Street's impressive menu also includes a large selection of burgers, sandwiches, salads, fish & chips, and seafood. My favourite, as I mention in my review of Rossland's Sunshine Cafe, is the club house, but Main Street does a fantastic seafood club. After my annoying passport clinic experience, I was hungry and this sandwich fit the bill. My dad, who'd waited at my work for me to finish at the passport clinic, had a Greek salad (no olives) because he'd been snacking while waiting for me.

My sandwich was astounding. Piled very high with shrimp salad, crab salad, black forest ham, lettuce and tomato, and accentuated with seafood sauce, it was hard to get my mouth around, and the bread was barely able to contain all the filling. It was excellent. The Main Street does good fries, too - nice and chunky ones, and of course I had those (other side choices are coleslaw or cottage cheese). The restaurant still serves its food on the same dark brown, heavy stoneware dishes, too, which is nice to see.

As I said above, the menu is large and everything I've had off of it previously has been great. These include the calamari, the regular club house, the oyster burger, the avgolemono soup, and their Khalua cheesecake. Their daily soups have also been delicious when I've had them. Their portions are ample and their prices are fair. My sandwich was $14.95, for instance. Lunch for my dad and me came to just under $30. I sent my compliments to the kitchen and left pretty happy - not to mention full!

Monday, September 08, 2008

No-Knead Bread

My good blogfriend Karen inspired me to try this recipe after producing an excellent result herself. When she told me she was making a no-knead bread, I assumed she was making a batter bread, but I was pleasantly surprised to find out that this is no batter bread (I have nothing against batter breads per se; I'm just not a huge fan).

Karen's result was so gorgeous I had to try it, too. In fact, I've now tried it twice, once with white flour (bread flour, actually) and once with 100% whole wheat flour.

The recipe originally appeared in the New York Times, and I highly recommend you read the accompanying article because it gives you the scientific reason - in layman's terms - why this method of breakmaking works so well. Basically, you mix the dry ingredients with water and let the dough sit for a minimum of 18 hours. The gluten develops itself in this time, rather than being developed by kneading. Also, you bake this loaf in an oven-proof pot, or Dutch Oven, as this mimicks the conditions created in a commercial steam-injected oven. I've actually baked a loaf of bread in my KitchenAid cast iron Dutch Oven before, the Kazakh Family Loaf, and I had a great result.

The first time I made this recipe, I added some dried herb mixture to the dough and some parmesan cheese to the top. I had to add more water than the recipe called for because the initial amount wasn't enough to incorporate all the dry ingredients. I got an absolutely stunning result, and I couldn't wait to try this recipe again. Luckily, my dad needed bread and since I regularly make him 100% whole wheat bread (he hates white flour, though I notice he loved my pizza pretzels just fine) I offered to make it for him using this new method.

To the 100% whole wheat, though, I did add 1/4 tsp of gluten, because whole wheat flour is naturally low in gluten, and since the more gluten the better when it comes to bread baking, I thought a bit extra wouldn't hurt at all. And it didn't. Again, I got a fabulous loaf, though shorter and more dense. My dad was pretty happy.

The crust on both loaves was superb, and since there is a high water percentage in this recipe, the crumb was tight and the bread's texture was light and spongey and contained many lovely air bubbles.

All around, a fantastic recipe that even your kids can make, and it takes so little effort and comes out so beautifully, you'll never want to buy store-bought bread again. Trust me.

Thank you Karen!

Also, my fellow foodblogger the Underground Baker, did a post here (scroll way down) closer to when the recipe was first published. Her loaves are stunning, too.

Saturday, September 06, 2008

Dove Chocolate Review

I was pleased recently to discover that there are some blogs out there devoted to chocolate. One of my favourites is Choklit, in which Amanda reviews all kinds of chocolate bars. Another one is Jim's Chocolate Mission. I was totally excited to find blogs whose contents specifically revolve around chocolate because, in case you didn't know, I'm a total chocoholic. To unabashedly steal an idea, I have decided to do a chocolate review of my own.

This past winter, I saw a new product on the shelves around here: Dove chocolate. I didn't quite know what to think when I saw it because I always associate the brand name Dove with soaps and other toiletries. Turns out this is ridiculous, although that was the natural connection my brain made at the time. The Dovebar has, according to this page on their web site, been around for quite some time, and Dove's parent company happens to be Mars - Mars of Mars Bar fame.

I only got around to buying my first Dove bar just over a month ago; the cost was a little high, but one day I decided to splurge.

Man...the instant I bit into it, I couldn't believe I didn't try this earlier! It was heavenly. It was the Dusk bar, which is milk chocolate with a hint of dark, and I suddenly felt as if all the cares in the world were far and distant from my mind. The flavour was smooth, and more milky than my favourite milk chocolate bar, Cadbury's Dairy Milk. But it was the texture that got me: this was almost like eating truffle filling - ganache. The chocolate was so incredibly silky on my tongue I almost felt I'd melt along with it.

Since this, I've had the 71% dark, and though the mouthfeel was still satiny, I didn't think it was as flavourful as the dusk bar. I've also had the regular dark chocolate bar, and it sent shivers up my spine the same way the Dusk did.

So, now Dove goes to the top of my favourites list, along with the Dairy Milk, and Green & Black's dark chocolate with mint filling. Unfortunately, Dove isn't available everywhere around here; I've only seen it at Shoppers Drug Mart and Wally World. Hopefully it'll catch on other places, too!

Friday, September 05, 2008

101 Uses for a Roast Chicken #6: Panini Time

We make paninis at work: turkey, bacon, & provolone, and chicken, brie, and apricot salsa. Both are amazing, but my preference is the turkey one. We grill them to order on our Breville grill and I have one once a week for lunch. At home, I have access to my roommate's George Foreman grill, which is a very cool machine to have around.

It's been way too hot this summer to roast chickens, but it has cooled down recently, and whole chickens were on sale at the local overpriced grocery store this week. So I bought one, and made this sandwich.

Say what you want about grocery store bakeries, but Save-On Foods makes astonishingly great breads (the muffins aren't bad, either). After my passport clinic nuisance on Thursday, my dad took me to Nelson for lunch and for some grocery shopping. I bought a loaf of roasted garlic bread (also available in potato & rosemary, 2-olive kalamata, and another I can't remember right now) and the scent taunted me all the way on the hour's drive home! When I finally got to sink my teeth into it, it was divine. I must add also that Save-On makes one of the best ciabatta breads I've ever had. I often splurge if it's on sale, and they do a mini version, too, which is handy for the days Dad and I like to just have a picnic in the park.

Anyway, this panini. It would have been better with a milder, creamier cheese, as the cheddar didn't go well with the pesto, but as it was grilling, that scent of roasting garlic made my mouth water. This could have used some bacon, too - something a little salty to round out the other flavours. But, we live and learn, don't we? There was nothing wrong with this combination; it just could have used some tweaking.

If you don't have a panini grill or a George Foreman, no problem. Grilling this like your traditional grilled cheese would work just as well.

Enjoy!

Thursday, September 04, 2008

Soft Baked Pretzels: Pizza & Plain

Sometimes I outdo even myself.

Sometimes, for reasons known only to the universe, I crave pizza pretzels. My local overpriced grocery store makes and sells them, but they're not very good. Usually, they're just a bun in the shape of a pretzel (at least that's what the bread part tastes like), with some pizza sauce and some cheese not fully melted on the top. They do in a pinch - but just in a pinch. I have to be pretty desperate if I'm going to buy one from there.

About a year ago, I made soft pretzels using a recipe from Canadian Living. I was boiling water for bagels anyways, so I figured I'd do up some pretzels while I was at it. They turned out brilliantly, though I had some issues shaping them.

The other day, I really wanted a pizza pretzel, but because I'm trying to make more and buy less, and because I had some extra pizza sauce kicking around from the pizza night I had a few weeks ago, and I had some extra mozzarella from a lasagne I recently made, I thought I could make my own fantastic pizza pretzels just fine.

And so I did. I spent more time shaping them properly this time, and I only had enough sauce and cheese to do four of the eight pretzels pizza style, but still, I got excellent results.

I can't seem to find the pretzel recipe on the Canadian Living site to link to, so I'll repost the recipe here. It's from the October 2007 issue, though.

Soft Pretzels

1 tsp granulated sugar
1 1/2 cups warm water
1 pkg. dry yeast ( 2 1/4 tsp)
3 - 4 cups bread flour
1 tsp salt
2 tbsp baking soda

Topping

1 egg, beaten (optional)
2 tsp coarse salt

1. Combine sugar, salt yeast, and 3 cups of flour. Add water to make a sticky dough. Turn out onto floured surface and knead for 10 minutes or until smooth and elastic, adding more flour if necessary. I used my Kitchen Aid and developed the dough on speed 2 for about 6 - 8 minutes.

2. Place in a well-greased bowl, turning to grease all over, and cover with plastic wrap or a wet tea towel. Let rise until doubled in bulk.

3. Punch down the dough. Cut into 8 pieces. On a lightly floured surface, roll each piece into a 20" rope. Form into a circle, crossing the ends left over right above the circle 3" from the end. Pick ends up and cross left end over right again. Bring ends over and under to bottom of circle, overlapping by 1/4" to create a pretzel shape; press to seal. Place on parchment-lined baking pans. Cover and let rise for 15 minutes.

4. Add 2 tbsp baking soda to large, wide saucepan of boiling water. (I added 2 tbsp of honey, but this is optional.) Boil pretzels, 3 at a time, turning over once with slotted spoon, until puffed up and set - about 1 - 2 minutes. Transfer back to baking sheets and let cool slightly.

5. Brush with egg wash, if using. Sprinkle with coarse salt. Bake at 400F fro 25 - 30 minutes, rotating if necessary, until golden brown and bottoms sound hollow when tapped. Transfer to racks and cool.

As for the pizza toppings, I just brushed on some sauce and sprinkled on some mozzarella and cheddar cheeses. I didn't egg wash these ones, though I did for the plain.

The result: awesome. I took a couple hiking the next day and froze the rest so I'll have them around the next time I get a craving.

Wednesday, September 03, 2008

Garden Bounty: Eating Weeds

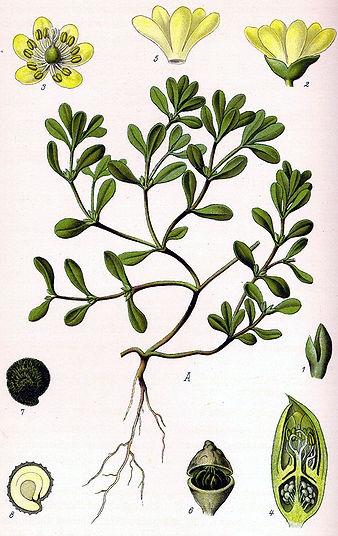
If you read my other blog at all, you may recall that a couple of months ago my small garden was overcome by a nasty weed. I had some issues identifying this weed, but thanks to my good blogfriend Karen, who took it upon herself to contact an Edmonton greenhouse, I was able to find out the name of the bane of my existence. It was portulaca, AKA common purslane.

After identification, all of a sudden all kinds of people were telling me how nutritious this plant is, with it's high Omega-3 content and other wonderful vitamins and minerals. My friend E, who comes from the southern US, said she remembers putting purslane on salads when she was a child. Another blogfriend of mine even found me a potato salad recipe containing purslane.

I didn't want to hear it! All I wanted was for the purslane to disappear from my life - and my garden! I hold it responsible for the death of my chives, the non-appearance of the onions I planted, and the removal of a couple of marigold plants! Not only that, it's herbicide resistant, and though I wouldn't want to use any nasty chemicals in my garden, I also got very sick and tired of picking this weed. With my gravely soil and the smallness of the plant, not to mention the fact that it was everywhere, it was a major pain in the ass. It made me bitter and resentful, and I eventually gave up the weeding and almost gave up the garden altogether.

And then, lo and behold, the weeding I had done appeared to have controlled the purslane somewhat. I went out after neglecting the garden for a week or two, and I saw that the patches I'd weeded were now portulaca-free. In some spots, I purposely let it grow where I knew it wouldn't harm an already robust plant (like my rosemary and beans, for instance). The other day, I saw that it actually has tiny yellow flowers.

Then, I see that the August 2008 issue of Gourmet has a recipe for Purslane and Parsley Salad. This made me do a double take. I don't know why, but it did. Now, I don't like tomatoes, cherry or otherwise, and you might have read about the lemon juice shortage. I also don't like parsley enough to have it make up the bulk of a salad, and I don't have 6 cups of purslane in my garden anymore (I should have harvested and bagged the stuff to sell at the farmers' market for God's sake - a great missed opportunity on my part!). So, in short, no I did not make this salad from Gourmet magazine. But, I did decide to get wild and crazy and go out and pick some of the purslane to see what it tastes like.

The exeperiment: purslane three ways.

1. Purslane plain. Crisp, juicy, but somewhat tart, kind of like an unripe berry. My purslane isn't very big, though. Perhaps if I let it get bigger, it might sweeten up a bit. But, I don't want it getting any bigger!

2. Purslane with dip. This was much better, but only because of the dip. It disguised any tartness. Like many veggies we see displayed on platters, they are merely a means of getting lovely, creamy dip into our mouths, right? Such was the case with this part of the experiment.

3. Purslane with freshly ground sea salt. Meh.

The verdict: I'm not about to start cultivating purslane/portulaca for culinary uses. In fact, I hope to eradicate it fully from my garden next year by laying down mulch when I put the garden to bed for the winter.

Tuesday, September 02, 2008

Coffee Chocolate Chip Muffins

I love it when I get a cookbook that leaves me wanting more and more. One such book was Beyond the Great Wall, which I reviewed here. From that book, I've become addicted to dumplings and a bit of a dumpling-making machine. Also, I love the Kazakh Family Loaf recipe, and have made it since the review. I plan on making the Green Tea Shortbread again soon, too. Another book I reviewed, Little Cakes from the Whimsical Bakehouse, has given me some great joy, too, particularly with their absolutely amazing blueberry muffin recipe. Today, I wanted to bake something sweet, for some quick gratification of my sugar cravings, but also to freeze for future sugar cravings. I am also going into squirrel mode and starting to stockpile and cook/bake stuff for the winter. The Coffee Chocolate Chip Muffins on page 56 were incredible when I made them for the book review, and so I decided to revisit the recipe again today.

Incidentally, I have four cookbooks coming to me this fall for reviewing, which I'm very much looking forward to. But, since I'm trying to cut down on possessions (moving 6 times in 2 years does that to you) I'm being much more ruthless about what I keep on my limited shelf space and what gets discarded. Cookbooks - though I am truly a cookbook junkie - are notoriously heavy and difficult to move around, so I'm trying my very best to only keep the best of the best, and those that make good reference books. I hope the stuff I get this fall will be shelf-worthy.

Anyways, onto the recipe.

Coffee Chocolate Chip Muffins, from Little Cakes from the Whimsical Bakehouse

Beat at high speed in a large bowl, until fluffy:
3 sticks/12oz/1.5 cups butter
1 cup sugar
1/2 brown sugar, packed
2 large eggs
5 tbsp instant espresso powder

Sift in:
4 cups all purpose flour
2 tbsp baking powder
1/4 tsp salt

At low speed, add until just combined:
1 cup milk
1 cup chocolate chips (I used 1 1/2 cups)

Scoop the batter into prepared muffin tins. Bake at 350F for 20 - 25 minutes or until tester inserted in centre comes out clean. You should get about 18 regular-sized muffins. I, however, do enjoy a smaller muffin, a mini muffin, so, I got 16 regular-sized muffins and a dozen minis. Perfect for two-bit occasions.

I cannot rave enough about how amazing these muffins are. They melt in your mouth, the balance of coffee and chocolate flavour is perfect, and the texture is so delicate and cakey you think you're eating a high-class cupcake.

And, just as a little extra bit of inspiration for you: this muffin, warmed up, served with vanilla ice cream & chocolate sauce...um...think about it! HEAVEN!

I also cannot say enough about having silicone muffin cups. If you can get your hands on a set, I highly recommend them. They are so easy to work with, are totally reusable, and are easy to keep clean.

Enjoy!

Monday, September 01, 2008

End of Summer Canning

When I moved back to the bosom of my family in July 2006, I discovered shortly thereafter that my SIL's family has a tradition of canning some of our summer bounty: pickles, salsa, jam, tomatoes, antipasto, and pasta sauce are amongst the items. My dad makes a day trip to the Okanagan, purchasing hundreds of pounds of produce that is fresh and relatively local, and one day at the end of August, my SIL, her mom, me, her friend, and whoever else might be interested, all get together to do the canning, splitting the jars and the costs among us depending on how much we take.

I have canned before. Shortly after I got married in 2002, I decided canning would be a great idea for some reason, and I organized a day with two other friends. I went to the Byward Market to get ingredients, bought a canner and jars from Zellers, and we spent a day making pickles and salsa. The pickles turned out OK but our salsa left a lot to be desired. It was OK, but we never canned again, and I left (for all intents & purposes, anyway) in Sept. 2004 to attend culinary school.

So, I was happy to see that my SIL's family canned, only they have a much bigger production - and a large outdoor propane burner that makes everything go super fast. I missed pickle day and I don't like antipasto, so I participated in tomato and salsa day.

Here is the salsa recipe we use, and this year we quadrupled it.

1/2 lb jalapeno peppers (10 -15 small)
8 cups chopped, peeled tomatoes
3 cups peppers, chopped
2 cups chopped onions
4 cloves garlic
1 bunch cilantro
1/2 cup vinegar
1 can tomato paste
1 tbsp sugar
1 tbsp salt
1 tsp oregano
2 tsp paprika

You can chop most of this stuff in a food processor, but it is important to peel the tomatoes, which means you put them into boiling water for a minute or so, then put them immediately into cold water. The skins should come off quite easily. Mix the salsa up in a vat! Bring to boil and boil for 5 minutes. Fill canning jars, wiping the rims clean. Process in a canner for 15 minutes. This is also a great fresh salsa to serve and keep in the fridge. During our canning day, we take out some before it's cooked and much on chips dipped in it, and it's so wonderfully fresh.

We never seem to have a shortage of jars, but my SIL has picked up many extras at the local thrift store for very cheap, so if you don't want to spend a lot of money, you might want to see if you can find second hand jars this way, and then you only have to buy new lids. Rings can be second hand or new. But, there is a difference between a good lid and an el-cheapo lid, which we learned the hard way. Bernardin brand jars and lids are always reliable and we've never had a problem with them sealing properly. However, this year, we also used some cheaper lids, and many of them buckled after processing, which means they didn't seal properly. So, just to let you know: don't use Home Discovery Cinch Seal Lids. Also, last year, someone brought non-Bernardin jars, and we found that the bottoms fell out of some of them when removed from the canner! Very ungood.

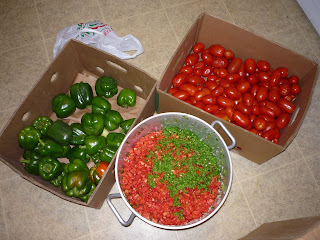
As for the tomatoes we did this year, that was very easy. Again, we peeled them, but as they were romas, no chopping was necessary. Just fill the jars and press down on the tomatoes so that there are no air pockets. We did have lots of peppers and garlic left over, so we chopped up the peppers and added them to some of the jars, and we added two cloves of garlic to each jar. Also, one heaping teaspoon of coarse salt, and we were on our way. I think these were processed in the canner for 15 or so minutes, too.


I came home with 12 jars of tomatoes and five jars of salsa (I don't go through as much salsa as some people in my family do), and a great time was had by all. It's a lot of work, but it's so worth it in the winter months when you can just go down into the basement and find yourself a home-canned jar of something from the summer. I'm looking forward to making soups and pasta sauces with my tomatoes, and having various Mexican-ish dishes with my salsa, not to mention chips!

Sunday, August 31, 2008

Cookie Time

I live on a small income and can't afford to buy presents most of the time, as one would for a birthday celebration or similar, but I can afford to bake cookies. Sunday Aug. 17 was a bittersweet day. Sweet because I got to go to the lake and swim and refresh my body from the horrible heat wave we'd been having. Bitter because it was the last time I'll see my brother and SIL for a long time as they're moving way across the country. They set out the next day to drive from BC to Nova Scotia, and they needed snacks. Both of them love cookies (who doesn't?) so I made them a huge whack to take with them for their trip.

I made three kinds: Farmland Flax (recipe here), Mint Chocolate Chocolate Chip, and Applesauce Raisin Chews. The latter two came from one of my favourite cookbooks, The Cookie Bible. I've made lots of recipes from this book and they've all turned out wonderfully. Also, since I do mail cookies every so often, this book has really good advice on how to send cookies via the post. If you can get a copy of it, I highly recommend it.

As for the cookies...

Applesauce Raisin Chews (not pictured...I forgot and then it was too late), page 80 of The Cookie Bible

1 cup butter, softened
1 cup firmly packed brown sugar
1 cup applesauce
1 egg
1 tsp vanilla
2 cups all purpose flour
1 tsp baking soda
1 tsp ground cinnamon
1/2 tsp salt
2 1/2 cups oats
1 cup raisins

Oven: 350F. Cream, beat, fold, scoop etc. You know the drill. Bake 12 - 15 minutes.

Mint Chocolate Chocolate Chip Cookies
This recipe is an adaptation of the Double Chocolate Cranberry Chunkies recipe on page 56, a recipe I make often to give as gifts, however, I haven't any cranberries on hand so I winged it - with excellent results.

1 3/4 cups all purpose flour
1/3 cup unsweetened cocoa powder, sifted
1/2 tsp baking powder
1/2 tsp salt
1 cup white granulated sugar
1/2 cup packed brown sugar
1 egg
1 tsp vanilla
2 cups chocolate chips
1 tsp pure peppermint extract

Oven: 350F. Cream, beat, fold, scoop. Etc. Etc. Bake 10 - 12 minutes. It is best to underbake these ones slightly so they come out fudgey. Be sure your oven is no hotter than 350F because otherwise your chocolate chips will burn.

Mailing cookies is quite easy. What I recommend is using a metal cookie tin, and I find mine for 25 cents at my local thrift store. You'll need something really sturdy for the mail and I'm afraid that most cardboard might not cut it. Once you have your tin, line it with paper towel or tissue paper. Then wrap the cookies tightly in saran wrap in groups of 3 or 4, depending on their size and the tin's size, making sure to keep different types of cookies separate (some ingredients will impart or soak up other flavours of other cookies). Pack the cookies in tightly, using more paper towel or tissue paper to plug any big gaps. Wrap the tin in bubble wrap, then put the whole thing in whatever you plan on mailing it in. Mark the package FRAGILE or have the post office people put on "fragile" stickers. If possible, freeze the cookies between baking and mailing, and if you have a few days between packing them in the tin and mailing, stick the tin in the freezer. This helps keep the cookies fresh and gives them as good a start as possible on their journey.

Chocolate Covered Bacon: So Right, or So Wrong?

I found this article on Yahoo! this weekend. I couldn't help but feel that the picture in the article (different from the picture here, which came from the NY Times) made the idea seem extremely unappetizing.

I don't know. I'd have to try it before coming to a conclusion, but I would definitely give it a sporting chance.

What do you think? Yay or nay?

Friday, August 29, 2008

100 Desserts

Just for fun...I enjoyed the Omnivore's 100 so much. I have tried to include some more obscure stuff, and although I did some research here, most of these come from my own travels and experience.

1. Bold what you've tried.
2. * What you've made.
3. Cross out what you wouldn't like.
4. Italicize something you've tried but didn't like.

1. Baklava*
2. Chocolate Cake*
3. Blueberry Pie*
4. Real Italian Gelato
5. Dessert Pizza
6. Lemon Meringue Pie*
7. Rice Pudding*
8. Spotted Dick
9. Amaretti
10. Jello Chocolate Pudding
12. Spumoni
13. Angel Food Cake
14. Creme Brulee*
15. Deep Fried Ice Cream
16. Chocolate Fondue
17. New York Cheesecake*
18. Fruit Crumble or Crisp*
19. Sacher Torte*
20. Jam Roly Poly
21. Crepes Suzette*
22. Quark Cake
23. Maple Sugar Pie
24. Key Lime Pie (the real stuff!)
25. Bananas Foster
26. Creme Caramel
27. Oeufs a la Neige
28. Baked Alaska*
29. Gingerbread*
30. Blancmange
31. Linzer Tart*
32. Carrot Cake*
33. Steamed Pudding
34. Nanaimo Bar*
35. Flan (the South American kind)
36. Sernik
37. Pastel de Nata
38. Wagashi
39. Marzipan
40. Dulce de Leche
41. Gulab Jamun
42. Tiramisu
43. Moroccan Date Cake
44. Black Forest Cake*
45. Scottish Shortbread*
46. Halva
47. Clafuti
48. Pumpkin Pie*
49. Gajar Halwa
50. Plum Pudding
51. Pflaumenkuchen
52. Makroud el Louse
53. Eclairs*
54. Palmier*
55. Financier
56. Napoleons*
57. Pastel de Tres Leches
58. Wagon Wheel
59. Treacle Tart
60. Date Squares
61. Eve's Pudding
62. Pears Poached in Red Wine
63. Snickerdoodles*
64. Churros
65. Artisan Cheese Platter
66. Caramel Apple
67. Sex in a Pan
68. Devil's Food Cake
69. Red Velvet Cake
70. Mousse*
71. Chocolate Dipped Strawberry*
72. Coconut Cream Pie
73. Semifreddo
74. Granita*
75. Tortoni
76. Sticky Toffee Pudding
77. Peanut Buster Parfait
78. Zucchini Cake
79. Cannoli
80. Mont Blanc
81. Haupia
82. Eight Precious Pudding
83. Trifle*
84. Popcorn Balls*
85. Ambrosia
86. dessert soup
87. Pasha
88. Berry Fool
89. Sweet Potato Pie
90. Bread Pudding
91. Raisin Pie
92. Strawberry Shortcake*
93. Apple Duff
94. Fruit Cake
95. Pineapple Upside Down Cake
96. Waffle Cone
97. Mango Sorbet
98. Truffles*
99. Cherries Jubilee
100. Rice Crispy Square*

Thursday, August 28, 2008

Garden Bounty: Lettuce Surprises

One of the things I was looking forward to this summer was my lettuce crop. I planted two rows of romaine, and they were among the first plants to sprout up out of the ground. But, they were also, therefore, among the seedlings at most risk during our June snow/monsoons and general late growing season. For a week in June, I was covering my lettuce plants with cardboard so that frost/snow/hail didn't kill them off.

Well, they survived! The plants didn't get too big, though, in comparison to the heads of romaine you see in the grocery store. But, who cares? Size isn't everything, right? Right?

I don't know. What I do know is that lettuce at my local overpriced grocery store goes for between 89 - 99 cents per head, and for the last two summers, the lettuce available in the stores has been crappy - really crappy. Brown-edged, buggy, slimy, and without much shelf life. Last week at work, when I was washing the lettuce for the next day's sandwiches, I had to throw quite a bit of our three heads of leaf lettuce away because it was in such rough shape. And it wasn't just at the local overpriced place; everywhere seems to have icky lettuce this year. I have also noticed that other produce has been looking iffy as well. I couldn't find a decent potato two weeks ago locally, but did find a couple that were OK at Save-On Foods, which is in Nelson, and hour away from here. Cabbage has looked off, as have peppers. Many of the apples at my local place also have appeared on the sketchy side. I don't know what is going on, but it's pretty bad. I was hoping to have beautiful lettuce that I didn't have to pay for.

I got more than I was bargaining for.

The big thing I haven't liked about gardening is the bugs. I'm not an insect fan. I planted marigolds in hopes of warding off some of the nasty beasties, but to no avail. My lettuce has been crawling with ants, wasps, earwigs, spiders, beetles, and God only knows what else. Someone - I have no idea who - laid some eggs. I was not happy to see this, and needless to say, I got rid of this leaf immediately and checked all other leaves extremely closely so that I wouldn't be ingesting any extra protein. This was lettuce surprise number 1.

Number 2 was the fact that when I went to cut off the leaves from the plant, a milky white substance oozed forth from where the stems attached to the rest of the plant. It looked like dandelion milk. When I think of dandelion milk, I also think ew, because...well, just because. So, when I saw romaine milk, I was all of a sudden put off my own lettuce.

Surprise number 3 was pleasant: lettuce regenerates itself after you cut the leaves from the plant. I had no idea this would happen. Who'd've thunk it? Certainly not I. I was just expecting to have a finite amount of romaine and I was fine with that. It looks, however, that I'll have more than I know what to do with.

Finally, the verdict. I made my favourite lettuce dish, Caesar Salad. I used Renee's light Caesar dressing, some organic croutons I bought cross border shopping the other week, and some parmeasan from the local overpriced grocery store. I made sure my lettuce was extra squeeky clean and free of unwanted reproductive deposits.

Unfortunately, I didn't like it. It was tough and bitter and I nearly cried because I was so looking forward to it! I could barely chew it. Now, I'll have to pawn off my lettuce to anyone unsuspecting enough to take it from me. I don't know if the newer, regenerated stuff will be better, but man...What I had just wasn't good.

Am I back to grocery store lettuce? I'm not sure yet. I just know that if I plant a garden again next year (still undecided on that front) I will try another variety of this veggie.

Wednesday, August 27, 2008

Anadama Bread

Sometimes we have to branch out, right?

I needed bread, and it's cooled off considerably in the past few days, so I thought I'd make myself a loaf. Previously, I have made Anadama Bread, and posted about it here. Coincidentally, that was almost exactly two years ago...I wonder where this impulse came from, eh?

Anyways, I searched around on the net for a new Anadama recipe and came up with this one here. It involved way more molasses and it also required cooking up a cornmeal mush mixture, rather than just adding cornmeal raw to the flour mixture. I was game, so away I went.

When I was kneading the dough in my mixer, though, I thought it was a little dark. In fact, it looked a lot like gingerbread. But I plowed on!

Well, all I can say is this: I probably would have enjoyed gingerbread a whole lot more. This loaf was way too molasses-y and the taste was really intense. I like molasses well enough, but not this much. It was nearly unpalatable for me. I was hugely disappointed! The texture was great, however. I called my dad up to see if he would like the loaf, as he's much more into...um...robustly flavoured bread.

Ah well. Not everything we make is a raging success, right?

During my research on Anadama Bread, I came across this site, which has a page telling the "real and authentic" story about the invention of this loaf.

Who knows? I just know I'm going back to my old tried and true recipe.

LinkWithin

Blog Widget by LinkWithin