Wednesday, September 30, 2009

Beef Stew & Biscuits, Commercial Style

Here are some shots I took at work the other week, when beef stew & biscuits were on the menu. I'm not a fan of beef stew, but this looked really good & smelled just great. My shift ends before dinner, so I didn't get to sample it, but the residents, I heard were happy. The biscuits, which I made, turned out great! Dessert was provided by one of the residents, who spent the morning making homemade apple pie for everyone.

First, the cook started off using the grill to brown about half a cow's worth of stewing meat.

Meanwhile, potatoes & turnips get par-cooked.

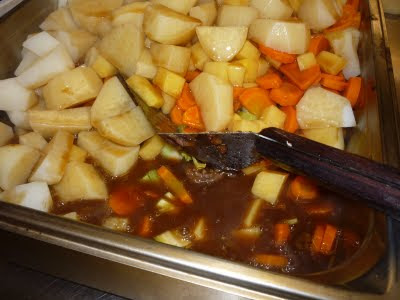
The cook chopped up onions, celery, & carrots, then added them, along with the potatoes & turnips, to a big pan with the beef.

Some gravy (Bisto) gets going...

The gravy gets added to everything in the pan...

And we get this...
...And this...Then the whole thing gets covered with foil and put in the oven at 250F for 4 or so hours...And here are my biscuits (recipe here, minus the dill & cheddar):
And here are the gorgeous apple pies that resident made for dessert!
A great meal!

Tuesday, September 29, 2009

Cooking with Kylie: Stir-Fried Beef with Oyster Sauce

After having lackluster results with Kylie's recipes using the cooking sherry I'd purchased since I can't find shao hsing wine around here in the boonies, I consulted with Palidor of Crazy Asian Gal about what I could use in the sherry's place. She suggested saké. Today, with the last remaining few bucks in my food budget, I strode into the local well-used government-controlled liquor store and asked where the saké was located. The helpful clerk showed me and there was a selection of exactly one saké, priced at $10.80. I hesitated momentarily, because there was a bottle of sherry on the shelf next door for half the price, but it wasn't dry and I wasn't sure it would be suitable.

In the evening, I made Kylie's Stir-Fried Beef with Oyster Sauce.

Oh, what a difference! This dish really popped, and it was much more complexly flavoured than the previous two recipes I've made using the sherry in place of the shao hsing wine! It was simply delicious.

I'm really enjoying cooking from this book; the recipes are easy to put together, simple as the title suggests, and the dishes aren't bogged down with heavy sauces like the food found in Western Chinese restaurants.

Another winner from Kylie! And now that I have the saké, I feel like going back & making the previous two dishes to see what they taste like. All in good time!

Sunday, September 27, 2009

Magazine Monday #51: Onion Bialys

Note to self: always read - and follow - recipe directions.

Aahhhhh...lots of cool recipes in this month's Canadian Living, and one of them was for these Jewish buns called Onion Bialys. They really appealed to me, and I had everything on hand, so off I went. Basically, these are small buns with an onion & poppyseed filling.

I did read the entire recipe first, I just forgot a pretty significant step: the pressing of the shaped buns into 3" discs. Because shaping these as they were supposed to be shaped would have kept the onion & poppy seed filling in the bun rather than it exploding everywhere during the first few minutes of baking, when the yeast gets one last push before dying off.

The onion got a little toasty as a result, but other than that, they were a nice bun, and I'd make these again. Next time, I'll follow the directions, though!

Saturday, September 26, 2009

Friday, September 25, 2009

Camping Grub Part 4: S'moreos

So, just a light Friday post to conclude this week-long Camping Grub 2009 series. And this time we have quintessential campfire food: s'mores - only made with Oreo cookies.

I made these in July during my first - and only other - camping trip of the season, and I adored them right away. I like them better than the original s'more made with graham crackers, in fact. I cannot take credit for this example of brilliance; the credit must go to Cakespy, who posted about S'moreos here.

Forgive the gloomy night shots, please, but here you go.

I don't have a ton of patience when it comes to toasting marshmallows, so my s'moreos are not terribly photogenic...
Shan, however, has a talent for toasting the perfect marshmallow!And so she gets a very photogenic s'moreo...
Nice, eh?

And that about covers it for this year's camping grub! Can't wait for the next camping season!

Thursday, September 24, 2009

Camping Grub 2009 Part 3

When my SIL Shan cooks a meal, she really cooks a meal. On top of her day job, she & her mom, C, also have a catering business, so Shan can cook, man, and there is always a ton of food. Camping trips are no exception. You know if you camp with Shan, you will get a huge, slap-up, tasty meal.

So for night #3, there was a feast: chicken marinated in white wine, garlic, and herbs; marinated grilled green peppers; fried potatoes; grilled corn on the cob; and sauteed asparagus.It was totally excellent! The corn, again, was sweet, tender, and delicious. The asparagus was a bit tough, but still good. My dad came for dinner this night, on his way back from Nelson, and he brought us a trifle for dessert from Save-On Foods. Sorry for the crappy night shot...Tomorrow's post: S'moreos! Woo-hoo!

Wednesday, September 23, 2009

About Me

I was moved beyond words this morning when Dave of My Year on the Grill wrote a post about...well, me. You can read it for yourself here.

Rarely am I speechless.

Thank you, Dave.

Dave did a bit of research for his post over on my regular blog, Wandering Coyote. I have a few ReTorte readers who also read WC, but I don't know how many exactly. The WC blog is, as Dave said, a much darker than this food blog, which I try to keep mainly positive and enthusiastic. WC is where I let my "dark" side out a bit...OK, quite a bit. You should not be put off by the fact that my tagline is "Tattooed, Pierced, and Potty-mouthed;" I really am friendly!

In the spirit of being open with you all over here on ReTorte, and to give you a bit more information about me, and to clear up a couple of Dave's questions, here is a bit of personal, non-food related information about yours truly.

1. I have two tattoos: one on my back and one on my left ankle. The back one is of a moon goddess and I got it in celebration of my 30th birthday. The ankle one is my "divorce tattoo" which I treated myself to after my divorce.


2. I am divorced & have been for 4 years now.

3. I live with three mental illnesses: Major Depressive Disorder, Dysthymia, and BPD. I am doing really, really well right now, though!

4. I have 12 piercings, all but one of them are in my ears. The one not in my ears is in my nose. I used to have a lip ring, but due to a long story involving WalMart, dentists, incompetent piercers, and passport photos, I had to take it out. I do want to get it re-pierced, though. I'm also thinking about an eyebrow ring, but I'm not 100% on that yet.

5. I listen to a lot of heavy metal music, and my favourite band is Nightwish!

6. I have a bratty but cuddly cat named Juno!

7. I definitely am potty-mouthed, but I do try to control it as much as possible!

8. I have a degree in creative writing from the University of Victoria. I got this in 1998, well before my pastry training at PICA.

9. I lived in Ottawa, Canada's capital, for seven years and, although I had good friends there, I hated that city more than I can possibly put into words. Don't get me started.

10. I currently live in the town I grew up in, after swearing I'd never move back here when I left in 1992. Sometimes necessity is a bugger. I got sick, I needed to be around my family, and my father, youngest brother, and sister-in-law all live here.

Anything else you want to know? Leave a comment!

And again, Dave, you are the best! Thank you for making my day!

Camping Grub 2009 Part 2

My SIL and I share the food duties while camping. The first night we kept very simple and had the ultimate camping food: smokies! These were really nice cheddar-filled ones and really hit the spot after setting up camp & having a dip in the lake to cool off. It was HOT that afternoon, let me tell you!

But it was night #2 where we got more ambitious and this is where I stepped up.

Recently, Dave of My Year on the Grill, had a great recipe for grilling tilapia in corn husks and I thought this would be excellent camping grub. So, this is my version, using red snapper my SIL had in the freezer.

The first step involved getting decent corn, which is a challenge. Remember my corn rant from the summer? Yeah, well, I wasn't optimistic about our corn opportunities, and indeed, when we got to the reasonably priced big box grocery store, the corn was in shitty, shitty condition. But, as we were about to give up, the produce guy came out with a whole new shipment of corn from Taber, Alberta, and it was peaches 'n cream - SCORE! Five cobs went for $1.98.

So, I carefully peeled back the husks, keeping them attached to the bottom of the cob, and discarded the silk. I secured the cob end of the husks with butcher's string. This was a bit time consuming and required patience and care - two things I actually had at the time, surprisingly enough. Next I soaked the whole thing in water for about 20 minutes. Luckily, the beer cooler had a lot of nice clean water in the bottom - it was perfect for soaking the cobs! While I was doing all this, our red snapper was happily marinating in some Barefoot Contessa Tequila Lime Marinade I found in the reduced bin at the local overpriced grocery store.

Next came the fun part: making corn husk packages with the fish tucked nicely inside. This was messy & time consuming, but it worked out better than I was expecting. Making sure the fish was covered well - as well as possible, that is - our two fillets were a bit too big for the husks, but this is camping grub, right? It doesn't have to be perfect! - I secured the ends with butcher's string.Then, onto the BBQ it goes:
It took about 20 minutes...
The results: spectacular!I made some rice to go with the meal, and it was wonderful! The corn, I am happy to report, was excellent - sweet, tender, juicy, and definitely the best I had all season.And the best part - no dishes! The cobs & everything just went right into the fire pit! Genius! Thanks Dave for this fantastic idea!

Tuesday, September 22, 2009

Camping Grub 2009 Part 1: Breakfast

Camping last week was excellent! The weather was perfect, except for the last night & the morning we packed up, when it rained. But other than that, it was hot and sunny, and the lake was still nice enough to swim in.

And of course we ate well! Let's start my 2009 Camping Grub series off with breakfast.

On Morning #1, we opted for a cooked, greasy camping breakfast of bacon & eggs, cooked over the camp stove. We also had toast made from a loaf of no-knead bread I made the day before we left. The camping toaster gadget was broken, so my SIL toasted the bread gently over the BBQ.There is something about cooking food on a camp stove out in the woods just makes everything taste way better!

On Morning #2, we had a super easy breakfast made by my SIL before we left: homemade peach crisp, made with local peaches. We had this with some vanilla yogurt and it was excellent!On Morning #3, it was raining, so we had breakfast in the trailer. I had made some granola at home and we had it with, again, vanilla yogurt. The recipe for the granola is here, but I used some coconut in it, and only used whole almonds as I was out of hazelnuts. Yum!
The full camping Flickr set, including all our food, some gorgeous scenery, and a gigantic bug, is here.

Sunday, September 20, 2009

Magazine Monday # 50: Chocolate Walnut Tart

My dad's friend, who lives near Kelowna, has a walnut tree and some time ago I was gifted with a bag of walnuts from it. Yeah, I said "a while ago" because I let the nuts - still in their shells - sit around my kitchen for over a month. Why? Because I hate cracking nuts. Remember my hazelnuts from last year and the blister I got cracking them all? Well, I wasn't too excited about a repeat blister or sore hands. But, I didn't want to let the nuts go to waste, so I got out my cracker and set to work.

Man...About halfway through the bag - which yielded me 1 whole cup of nuts - I had a blister and a bruised-feeling palm. I'd also made a mess: the nuts were harder to crack than the hazelnuts and I guess letting them "mature" over the summer wasn't a good idea and the shells flew all over the place as I cracked them. My kitchen table & floor were both a disaster. But I had my one measly cup of nuts, enough for this Chocolate Walnut Tart recipe that came from the Feb. 2009 issue of Taste of Home, which came to me via my good friend Pierce earlier this summer. My nuts didn't need to be chopped; I had such a hard time prying them out of their shells that they were all in pieces - but my fingers were nice and soft from the oil and smelled really nice, so it wasn't all bad...

Chocolate Walnut Tart

Pastry for 9" single crust pie
1 cup coarsely chopped walnuts
1 cup semi-sweet chocolate chips
3 eggs
3/4 cup dark corn syrup
1/2 cup packed brown sugar
1/4 cup butter, melted
1 tsp vanilla

1. Press pastry into bottom & up sides of 9" fluted tart pan with removable bottom; trim off excess pastry. Sprinkle nuts & chocolate chips into crust.

2. In a bowl, combine the remaining filling ingredients & mix well. Pour into crust.

3. Bake at 350F for 25 - 30 minutes or until top is bubbly and crust is golden brown. Cool on a wire rack. Refrigerate leftovers.

OK. This was a massive FAIL. FAIL, I tell you!

First off, I made this in a 9" square pan because I wanted to freeze most of the tart and cutting it into squares would be much simpler. A 9" square pan is 81" in total area; a 9" round tart pan is 63.6" in total area. I mean, this is basic math, here...Correct me if I'm wrong. Anyway, my point is the square pan is bigger than the tart pan, so the filling was spread over a larger surface area.

But my tart didn't set! At all! I baked it for the allotted time, at the correct temperature, according to my oven thermometer. I then put it in for an additional 10 minutes - twice. Then, I put it in again, only to take it out shortly thereafter because the crust was getting too brown, as was the top. Upon cooling, the filling still didn't set. The sides were OK, if a bit gooey, but OK nonetheless, but the centre was a different story altogether. I refrigerated it for several hours, and still it didn't do its thing. It was a mess.HMPH!!! I was not happy and couldn't figure out where I'd gone wrong. The pan size shouldn't have made a difference. This is basically a pecan pie filling, and I've made tons of them before, and never had this problem. The only thing I can think of was that it was the recipe itself. Perhaps 2 eggs would have sufficed, instead of 3. I don't know.

I managed to salvage the squares around the edges and freeze them for our camping trip, and the middle I picked away at when I needed a sugar craving - but still, I found this to be a waste of valuable ingredients for me, not to mention the time I put into cracking all the nuts! Grrrr!

Saturday, September 19, 2009

Friday, September 18, 2009

Heaven on a Plate

Yeah, baby! This dish rocked my world - and I totally whipped it out of my ass after being inspired by this dish made my MonicaJane of Yes, We Cook, and sort of by Nigella's so-so pasta dish I made a while back. This was so easy to make it wasn't funny, and it made a ton of left-overs so I didn't have to cook for a few nights. And it was spectacular - SPECTACULAR, I tell you!

Penne with Chicken, Mushrooms, Thyme, Lemon, and Goat's Cheese

500g penne (1lb package)
140g package goat's cheese (not feta; soft, unripened goat's cheese)
1/2 lb mushrooms, sliced
4 boneless skinless chicken thighs, cut into bite-sized pieces
1 tsp dried thyme
zest of 1 lemon + juice of 1/2 lemon
3 cloves garlic, crushed or grated
salt & pepper

1. Cook pasta according to package directions.

2. While the pasta cooks, saute the chicken until cooked through. Remove from pan, leaving any accumulated juices. Add mushrooms & thyme & saute until mushrooms have cooked down. Return chicken to pan, add garlic, and stir. Keep warm until pasta is cooked.

3. Drain pasta & return to pot. Add chicken & mushrooms, lemon zest & juice, and add the package of goats cheese. Stir together; the cheese will get all melty and create a "sauce". Season with salt & pepper to taste.I can't tell you how good this was! I am really enjoying cooking with chicken thighs, too; I didn't think I would, but I am rethinking my opinion of them. They certainly are WAY more affordable than breasts, I can tell you that. I would like to have used more exotic mushrooms (MonicaJane's recipe uses shiitake, which would have been great) but I only had a choice between regular white mushrooms, brown mushrooms, and portobellos, but the portobellos were way too expensive for my budget. So, I used white mushrooms (the browns weren't very fresh-looking).

A great meal! Thanks for the inspiration, MonicaJane!

Thursday, September 17, 2009

Latest Article

Here is a scan of my most recent food column from Bread 'n Molasses.

Click to enlarge!

Wednesday, September 16, 2009

Cooking With Kylie: Stir-Fried Chicken Fillets with Cashews

So, this is my third recipe using Kylie Kwong's Simple Chinese Cooking (I've also made soy sauce eggs and Mongolian Beef). I was attracted to this dish because of its simplicity and the fact that I had cashews on hand. I made half a recipe, which gave me two hearty meals, and since I don't like cucumber, I stir-fried in some sliced zucchini in its place.

Stir-fried Chicken Fillets with Cashews (adapted by moi)

Marinade

1 tbsp shao hsing wine or dry sherry
1 tbsp cornstarch
1.5 tsp cold water
1/2 tsp sea salt

Chicken

400g boneless, chicken thighs (about 4 thighs)
1 medium zucchini
2 tbsp veg oil
1/2 cup raw cashews
3 cloves garlic
1 tbsp shao hsing wine or dry sherry
1 tsp sea salt
3 finely sliced green onions

1. Combine chicken with marinade ingredients & marinate for 30 minutes.

2. Chop veggies.

3. Heat oil in wok & stir-fry chicken until cooked through and slightly browned. Remove from wok with slotted spoon & place in a bowl.

4. Stir-fry veggies until tender. Add nuts & stir-fry until golden.

5. Return chicken to wok with accumulated juices. Increase heat to high and add wine/sherry. Stir-fry for a few more moments. Season with salt.

6. Serve & garnish with some more green onions.

I suspect that, with this recipe, I was really missing the shao hsing wine. Try as I might, I cannot find this ingredient anywhere in da boonies. We simply don't have the population for specialty ingredients like this, and I think I'm going to need to get to a larger centre, like Vancouver or Calgary, in order to do pick up some of these more obscure items. Instead of shao hsing wine, I've been using cooking sherry, which is OK, but this dish needed a lot of help flavour-wise. I wound up adding a bunch of soy sauce to boost the flavours.

I served this over rice, and it was a good meal. I really liked using the chicken thighs; they aren't something I use a lot - I always thought them too fatty. But they are quite succulent and flavourful, and not to mention, cheaper than breasts. I'll definitely cook with them again!

I probably won't make this recipe until I get my hands on some real shao hsing, but it's still not a bad recipe. Worth attempting again once I get the right ingredients.

LinkWithin

Blog Widget by LinkWithin