Showing posts with label spices. Show all posts

Monday, April 04, 2011

Peruvian Chicken & Rice Soup

I finally got around to making that delicious Peruvian Roast Chicken carcass into a soup. It was very straightforward and I used the same flavours in the soup that appeared in the rub on the roast - minus the mint, though, because I was out of it. I use a lot of mint and my AeroGarden can barely keep up!

The stock was a very basic carcass-celery-carrot-onion-garlic affair, with some salt & pepper. As usual, I did it in my crock pot. The flavours still on the carcass infusing themselves into the stock were utterly mouthwatering.

For the soup, I used:

  • carrots
  • onion
  • cabbage (from a coleslaw mix)
  • 1/2 cup of white rice
  • more garlic
  • 1 720 mL bottle passata

For the spices, this is a general idea of what I used but I think I adjusted after tasting, so I recommend you do the same thing.

  • 1tbsp cumin
  • 1 tbsp sugar
  • 2 tsp oregano
  • 2 tsp paprika
  • generous squeeze of lime
  • 1 tsp chili powder
In the end, it was really missing the mint, so I'll know for the next time to make this when mint is readily available to me. Otherwise, the results were fantabulicious and I got 9 servings in total. Which means I got 12 meals from one measly carcass - awesome! I am cheap and proud of it!

Wednesday, March 02, 2011

Peruvian Roast Chicken

Long have I been a reader of Future Grown-Up's blog, Growing Up (And Having Fun) After 40. She makes a ton of delicious stuff - well, everything she makes looks delicious - and long have I been threatening to make some of her recipes. Alas, I haven't gotten around to keeping to that goal, until now. The other day, FG-U posted a recipe for Peruvian Roast Chicken with Garlic & Lime that so excited me I immediately went over to my freezer and took out my very last roast chicken from my last cross border shopping expedition. I was also excited because my herb AeroGarden is producing mint like crazy, and I had tons of fresh mint I didn't have to buy to use in this dish; everything else I had on hand. And so, last night, I made the chicken.

PHENOMENAL! Abso-freaking-lutely fan-frakking-tastic! This is one of the tastiest roast chickens I've ever made, if not the most tasty roast chicken I've ever made.

There recipe is here.

Making the paste was a beautiful thing, the colours, the scents...


And here is the end result:


The only thing I would change next time - and there will be a next time - is to perhaps halve the salt; I found the 2tbsp to be a bit too much.

Other than that - perfection!

Thanks FG-U!

Friday, November 27, 2009

Family Dinner: Veggie Curry & Chicken Kebabs

You might recall the wonderful gift that my good blog friend and fellow foodie Palidor sent me last month. It contained a packet of Palidor's dad's own homemade curry powder, and I thought it would be great to share this with my own family, who are quite partial to curries. My SIL, Shan, suggested a veggie curry to go with some chicken kebabs she was making, so that's what we did. The results were amazing!

Here's what I did for the veggie curry.

Veggie Curry with Palidor's Dad's Curry Powder

1 onion, sliced
1" piece of ginger, peeled & grated
several cloves of garlic
3 tomatoes, diced
1 zucchini, sliced
1 red pepper, sliced
1 large carrot, sliced
a couple of cups of sliced mushrooms
1 can coconut milk
1 tbsp curry powder
cilantro

1. I sauteed the onion and ginger in some olive oil until the onions were nice & soft & translucent. I then added all the other veggies and sauteed them until they cooked down. I added the curry powder and let this all cook for a bit. The fragrance rocked! Everyone's mouths were watering and we couldn't wait to try the curry!

2. Near serving time, I added the can of coconut milk & the garlic & simmered for a few minutes until we were ready to rock 'n roll. I garnished with cilantro. I had made some nice rice to go along with our meal, too. The end result:
What beautiful colour! And it tasted awesome! Everyone was totally in love with this!

Shan made chicken kebabs by marinating chicken strips in some Greek yogurt, paprika, garlic powder, and lemon. Then she threw them on the BBQ. They were great! It was a fabulous meal all around, and we even had naan to go with it.Thank you so much, Palidor, for sharing a piece of your family with me and my family! This was a great gift!

Tuesday, November 03, 2009

Butter Chicken

Save-on Foods had Patak's curry pastes on sale when I was there the other week, so I picked up a jar of butter chicken sauce. I love Patak's; I always have a jar of mild curry paste on hand because it's easy to use and very versatile.

I've only had butter chicken a few times in my life, and I've always liked it as long as the spice was kept down. This mild sauce was perfect.

I used the directions on the jar!

This was soooooooooo gooooooooood! Rich and wonderful and just perfect. And it took no time at all! I'll definitely be making this again, and am thinking it would actually be good with shrimp, and even salmon. Hmmmm...

Friday, October 30, 2009

Pumpkin Time!

Good old LOGS (local overpriced grocery store) actually had a decent deal of for once in a blue freakin' moon: pumpkins for 19 cents/lb. For $2.53 I got these beauties:I spent yesterday roasting them up, pureeing the meat, and freezing the pumpkin in one and two cup portions. I got exactly 14 cups of pumpkin puree from these two pumpkins! Woo-hoo!I also saved all the seeds and roasted them, in addition to the seeds my roommate gave me when she emptied out the pumpkin she bought for Halloween. I decided to have some fun with the spices Palidor sent me in her care package recently. I made three different kinds of roasted pumpkin seeds (always a favourite snack of mine at this time of year!): curry flavour, using the curry powder Palidor's dad uses; Chinese Five Spice; and just plain salted.The curry ones smelled absolutely out of this world! They needed some help in the flavour department, however. I think these would be good on a salad or as a garnish. I can tell you, though, that I am so looking forward to making a real curry with this powder because the aroma blew me away. The Five Spice were OK...They also needed a bit of help. I think, in retrospect, I should have added some sugar to them. The salted ones were great!

Thanks again, Palidor!!!

Have a great Halloween everyone!

Friday, October 16, 2009

Thanks to Palidor!!!!


Once again, the thoughtfulness and generosity of my blogging community humbles me.

Today, I received a wonderful box from Palidor, author of Crazy Asian Gal. The box was bursting full of 13 different spices, including star anise, whole cardamom, and Palidor's dad's curry powder. Many are spices I cannot get where I am or are so exotic I couldn't afford them at all. Some, like the macha powder, I'd never heard of! Also in the box were some gourmet hot chocolate mixes and some Halloween candies. My office smells wonderful!

Palidor, thank you so much! I am very much looking forward to using these spices in different ways, and learning how to cook with them. The oncoming winter requires lots of hot chocolate, so those are going to be very nice when the cold weather hits.

You are so very kind, and I can't tell you how much I appreciate this gift!

Monday, October 05, 2009

Magazine Monday # 52: Spatchcocked Chicken

The universe works in mysterious ways. I get my June issue of Canadian Living Magazine in the mail and it contains a feature on spatchcocked chicken. I get curious because, let's face it, the name is catchy. The page gets bookmarked but I'm too cheap to pay $2.29/lb (SALE price) at LOGS for a whole chicken, and I beg a family member - dear old Dad - for a trip to the States so I can refill my rapidly emptying pantry & meat collection with decently-priced US stuff. We make a date to go, and while this is going on and my anticipation of the shopping spree gets higher and higher, two foodbloggers I discover within days of each other feature posts on spatchcocked chicken (the first was Katherine Aucoin of Smoky Mountain Kitchen and her recipe is here; the other is Chris of Nibble Me This, and his recipe is here). Also, as the shopping date draws nearer, I get a cookbook to review in which there is also a recipe for spatchcocked chicken. These all add up to one thing: the universe is insisting I spatchcock a chicken!

So, on the big day, I get a whole chicken for $0.98/lb in the States a mind-boggling, ridiculously low price in my world, and on Saturday night, I got out my shears and my June 2009 issue of Canadian Living and spatchcocked away!

The Canadian Living definition of "spatchcocking" is this: "spatchcock, v., to split and flatten small poultry by removing the backbone and pressing on the breastbone."

The advantages, according the the article, are:

  • Opening the bird decreases cooking time, which keeps the meat moist.
  • Because of even exposure to heat, the thighs, legs, and breast cook more evenly than when cooking a whole bird

It also adds, "When grilling a spatchcocked bird, grill over indirect heat to prevent skin from burning."

Well, there was snow on them thar hills on Saturday, so I wasn't grilling anything outside.

Here are the instructions provided in the article:
  1. Using sharp scissors, cut bird down each side of backbone and remove bone
  2. Turn breast side up; press firmly on breastbone to flatten
  3. Tuck wings behind back. If desired, insert criss-crossed metal or wooden skewers to keep bird flat
  4. Grill or roast as desired

Well, surely this would be easy enough, right? Right? Well, no.
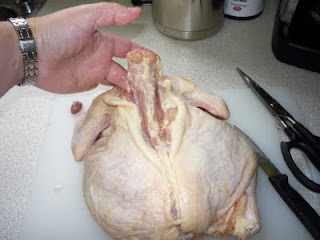
First of all, I'm not an expert on chicken anatomy, or any anatomy, and I had a hard time ascertaining which side of the chicken the backbone was located on. This was made more difficult than usual because the bird was so big and plump - not small and scrawny like the ones I'm used to getting up here at LOGS. It was really hard to tell the breast from the back - it was that meaty. I am not kidding. Eventually I figured it out - the neck gave it away. The neck, I know from looking at my own body, is attached to the back, not the front. Right? Right.

So, onto the spatchcocking. Now that I'd found the backbone, I had to cut it out. With my shears. It seemed simple enough - until I began cutting. The monstrous crunching of bone that resounded through my kitchen and the crunching I felt in my hand via the shears nearly killed me. I had to stop and settle myself down, I was so upset by the sound of the crunching in my ears. This was the most revolting thing I think I have ever done in the kitchen. I couldn't leave the chicken half spatchcocked, though; I had to persevere. Despite the fact that my stomach was turning and I felt like throwing up, I continued to cut away, through bone, making that horrible sound.
To me, there is nothing more disturbing than hearing bones break and snap - human, animal, dead animal - it's just gross and sickening.
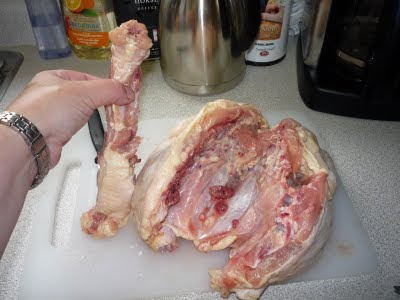
And of course it didn't end there! No! I had to flip the chicken over and press down on the breastbone - breaking more bones and making more crunching noises as more bones snapped under my bare hands. It was pure torture.
I needed to rest after this - and I made up my mind as I rested that I would never spatchcock another chicken. What's the point? It almost put me off the chicken altogether and that's just counterproductive. A roasted chicken with body still relatively intact is just fine and dandy in my books. Crap on a cracker!

Anyway, I eventually made a paste out of these three ingredients...
...The Old Bay Seasoning I got in the USA, too, since I've never seen it up here. My good friend Pierce of Life in the Slow Lane at Squirrel Head Manor highly recommended OBS after she gave it rave reviews in a post she did after she was given a gift bag from the company itself. This stuff smelled heavenly, and it was fantastic on the chicken. Sorry for the crappy picture - I dug in before remembering to photograph!
I served the chicken with roasted potatoes, green beans, and some patty-pan squash from my garden (more on that in a future post).

Sometimes you have to do things just to learn you should avoid them. That is the moral of my spatchcocking tale.

Tuesday, May 26, 2009

Snickerdoodles

It's funny how things come in cycles in the foodblogging world. Lately, I've seen so many recipe for snickerdoodles that I just have to add my own to the collection. I used to make this recipe when I worked at a retreat centre as a cook and baker, and they were always a big hit. The recipe came from the 2000 Bakefest insert that was in that year's Christmas issue of Canadian Living. Because of the size of the recipe I had to make and my time restrictions, I didn't roll these into balls and then roll the balls in the cinnamon sugar; instead, I added 1 tsp of ground cinnamon to the recipe (double for double the recipe, etc.), scooped the cookies out, flattened them with a fork or with a wet hand, and then sprinkled cinnamon sugar on top.

I first heard of snickerdoodles when I was in Baddeck, Nova Scotia, where I spent part of my honeymoon in the summer of 2002. Baddeck is a pretty small place, but it had a nice little bakery/cafe, and on offer one day were snickerdoodles. I'd never heard of them before, so I asked the gal behind the counter what they were, she told me, and I bought one. It was excellent! Funnily enough, I haven't seen too many sold in bakeries since then.

Snickerdoodles (adapted by me)

1 cup butter, softened
1 1/2 cups granulated sugar
2 eggs
1 tsp vanilla extract
3 cups all purpose flour
1 tsp baking powder
1/4 tsp salt
1 tsp cinnamon

For the topping: 2 tbsp granulated sugar and 1 tsp ground cinnamon

1. Cream butter and sugar until light and fluffy. Add eggs, one at a time, and then beat in the vanilla.

2. Sift together the dry ingredients and blend into the butter mixture until combined.

3. Scoop onto baking sheets - lined in parchment or silicone baking mats, preferably. Press down slightly with a fork. Sprinkle with cinnamon sugar.

4. Bake @ 350F for 12 - 15 minutes, or until done.

Enjoy!

Sunday, May 24, 2009

Magazine Monday #39: Spicy Molasses Cookies

Inspired by cookies I've been making at work recently, I decided to make some of my own ginger-snap-like cookies this weekend. I got the recipe, once more, from Canadian Living Magazine, which in February 2008 had a one-page feature on molasses. This was one of the recipes that was part of that article.

The recipe is here.

OK, I am being quite the lazy baker these days, and I didn't want to roll out and cut the dough into cookies, so I kept my dough a bit wetter and scooped the cookies into balls instead. I pressed them with a fork and sprinkled them with sugar, and that was it.

They were really good, and very spicy!

Tuesday, April 28, 2009

Gingersnaps - Commercial Style

On my last baking shift, I made cookies - lots and lots of cookies. The cranberry orange have seemed to fall out of favour with the clientele at the hospital, so the cook made an executive decision to replace them with gingersnaps. Who doesn't love a good gingersnap? This recipe came from one of the residents of the old folks' home I work in who has passed on. The dough is very popular with the staff; as I was scooping out cookies, the volunteer coordinator came along with a spoon and helped herself to a good hunk of dough.

This makes about 5 dozen cookies using a 2oz cookie scoop.

Gingersnaps

1lb butter
4 cups sugar
1 1/2 cups molasses
4 eggs
8 cups flour
8 tsp baking soda
4 tsp each: cinnamon, cloves, ground ginger, and salt

Cream butter, sugar and molasses until light & fluffy. Add eggs, one at time. Beat in baking soda, spices, & salt. Fold in flour.

You're supposed to make little balls of dough, dip them in sugar, then press down, & bake. We don't have time to make all the balls, so we scoop out the dough, press with a fork, sprinkle with sugar, & bake. 350F oven for 12 - 15 minutes.

Man, do these ever smell good! I resisted trying one, but other staff did not!

Tuesday, February 24, 2009

Feasting with Hot, Sour, Salty, Sweet

Last May I reviewed Jeffrey Alford and Naomi Duguid's Beyond the Great Wall, and for the review I made a huge family meal with a menu and recipes taken from the book. It was a hugely successful meal, and BtGW is still on my shelves, still one of the nicest books I own. At Christmas, I was given an Amazon gift certificate by a very generous friend, and one of the books I chose was the volume written before BtGW by the same authors. On Saturday, I made a Vietnamese meal for my family - and it was another resounding success.

Hot Sour Salty Sweet takes us on a culinary journey through southeast Asia and encompasses dishes from not only Vietnam but Cambodia, Thailand, Laos, Burma, and southern China. These countries and their widely varied cultures have on thing in commong: the Mekong River and its tributaries. As with BtGW, HSSW is part cookbook, part travel book, and part photographic ecstacy. The authors blend recipes in with stories of their travels throughout the region and epic photography that'll just make you want to jump on the next plane to Asia. It's on par with BtGW for sure, and I'm just as stoked about having it on my shelves. The recipes were also just as fabulous.

I decided on a mainly Vietnamese menu consisting of (recipes without page numbers are my own):

Salad Rolls
Must-have Vietnamese Table Sauce (p. 28)
Vietnamese Herb and Salad Plate (p. 68), which included Carrot & Daikon Pickled Salad (p. 85)
Deep-fried Rice Balls (p.105)
Baked Vietnamese Chicken*
Aromatic Lemongrass Patties (p. 251)
Banana & Coconut Pudding*

* Recipes to appear in a forthcoming post.

The idea behind the herb & salad plate is, as the authors describe in the recipe: "to wrap, to accompany, to enhance, or to alter the other dishes, or [the herbs and veggies] are simply eaten on their own. The salad platter gives each person a chance to vary tastes and textures, mouthful by mouthful, as the various herbs and salad vegetables complement the cooked food with fresh flavours."

My herb and salad plate included:

Fresh Mint, basil, and cilantro
Lettuce leaves
Lime wedges
Carrot & Daikon Pickled Salad
Bean sprouts
Cucumber slices

Well, it certainly isn't lettuce season in these parts, I can tell you that. The lettuce at the local overpriced grocery store was crappy and expensive, so head lettuce it was. Other than that, this was a fresh, attractive way around which to centre a meal.

The Aromatic Lemongrass Patties were not a recipe from Vietnam, but from Laos. They were really easy to make and tasted great. I didn't use fresh lemongrass, but opted instead to go for a less expensive alternative, lemongrass powder. My local ovepriced grocery store sold this powder in its bulk section, so I decided to try it out. Although I think it lacked the punch of fresh lemongrass, it was certainly aromatic and tasty.

Aromatic Lemongrass Patties (adapted by me)

1lb ground pork
2 green onions, finely chopped
salt & pepper
1 tbsp lemongrass powder

Combine all ingredients by hand and form into small patties (I got about a dozen because I used some of the ground pork for my Dad's salad rolls since he won't eat shrimp). Grill on BBQ or indoor grill for 6 - 7 minutes per side, or until cooked through.

I rarely deep fry anything, but I was compelled to do so by the recipe for Deep-fried Jasmine Rice Balls, also a dish from Laos, though the authors say they might originally be Vietnamese. These treats are apparently common street food in Laos and Vietnam, and normally they're served with herbs, pork, and a sauce. They went perfectly with the herb & salad plate.

Deep-fried Jasmine Rice Balls (adapted slightly by me)

1 large egg
4 cups cooked jasmine rice
1/2 tsp each salt
1 tsp sugar
1/4 cup unsweetened coconut
1 tsp lemongrass powder (I had exactly this amount remaining after making my other dishes with it)
Oil for deep-frying

In a large bowl, combine rice, coconut, seasonings. Add the egg and mix together by hand so egg is evenly distributed throughout the rice mixture. Using wet hands, form into 10 - 15 balls. I chose smaller ones since I was deep-frying in my wok.

You'll need enough oil to get a depth of 1 1/2 - 2" in the bottom of whatever pan or wok you use. Heat to the oil shimmery. Drop a small clump of rice in to see what happens: the oil is ready when the rice sinks and then immediately rises back to the surface, while gently browning. Slide the balls carefully into the oil and fry, in batches, until deep golden brown. Remove with a slotted spoon and drain on paper towels. Serve with herb & salad plate and Vietnamese Must-have Table Sauce.

Here is a round-up of the rest of the meal:


Shrimp salad rolls, containing bean threads, lettuce, carrot, mint, and shrimp. I served these with a Thai peanut dip I had kicking around my fridge in addition to the Must-have Table Sauce.


This was a chicken recipe that I totally whipped up on my own, using the Must-have Table Sauce as a guide. It was the best part of the meal! I'll be posting the recipe soon - I promise!


I didn't quite know what to serve for dessert as the sweet recipes didn't look like they'd go over well with my family, but a recipe for Bananas in Coconut Cream caught my eye on page 298. I made my own, quicker, cheaper version using Jello's coconut cream pie filling. A recipe for this will be posted soon, too. This was a great dessert, actually, and as you can see, I am not above resorting to using such shortcuts at all - but only once in a while!


As with BtGW, I highly recommend Hot, Sour, Salty, Sweet. It's pricey, but it's worth it. It's not just a book, it's an experience!

To see the rest of the pictures, a nice and convenient Flickr set has been created for your viewing pleasure, here.

Monday, February 23, 2009

Magazine Monday #29: Paprika Roast Chicken with Sweet Onion

As you all know, I love roasting my own chickens and doing all kinds of things with the meat and bones. Usually, I season my chicken with salt, pepper, and some garlic powder before roasting. Sometimes I stuff the cavity with fresh herbs and/or garlic cloves. Well, the Feb. 2009 issue of Gourmet Magazine had a recipe in it for roast chicken with paprika and sweet onions that caught my eye, and I decided to make it on Friday night for my dinner.

The recipe is here.

Now, I didn't cut up my chicken as the recipe specifies, and I didn't use cayenne pepper because I don't like it. Instead, I used a full teaspoon of cinnamon and smeared the rub all over the chicken. I stuffed the cavity with some onion and left the rest of the onion to roast in the pan with the chicken.

This smelled amazing as it cooked, and it was a very tasty way to do chicken. I served mine with roast potatoes and green beans. It was a far out meal! And the best part is that I have left-overs to use up and I have another carcass to make soup with - woo-hoo!

LinkWithin

Blog Widget by LinkWithin