Tuesday, January 31, 2006

Chicken Soup

So I had to eat something today other than the four Timbits I pilfered from the accountant's desk this morning. I'm still feeling ill, so I decided to make myself some soup. I did this completely from scratch. I had a couple of bone-in, skin-on chicken breasts thawed out and decided to make a quick stock with them. Here's what I did.

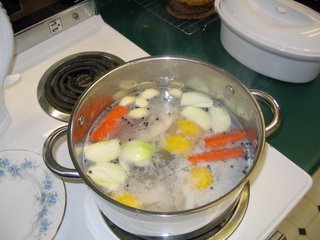
I put the chicken breasts in a dutch oven and covered them with water. I added salt, peppercorns, five cloves of garlic, one quaretered onion, a carrot cut in chunks, and a quartered lemon. Yes! I admit it! I was in the mood for lemon! Again! I covered the pot and brought it to a boil, and then let it simmer for about an hour. The chicken totally cooked by then. Here's what the happy mixture looked like, bubbling away on my stove:


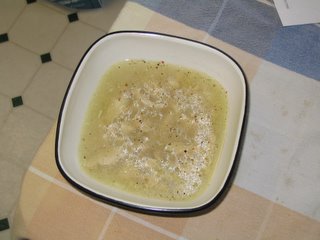
It's important at this stage to adjust your seasonings. I found I had to add about a teaspoon of sugar to cut the sourness of the lemon, and I had to add a bit more salt. But after an hour, the stock tasted pretty good. I took out the chicken breasts and strained the stock through a fine sieve. I cut the chicken meat from the bone and added it back to the stock. I also kept the garlic cloves and cut them up for the broth; I love how mellow garlic becomes once cooked gently like this. I brought it all to a boil once more and threw in about 1/4 cup of parboiled rice (as a rule I don't use parboiled, but I had some kicking around from my work's kitchen and it has less starch in it so it worked well). I added more garlic, freshly pressed, and after about 20 minutes, I had soup.

Usually, when making stock, I simmer the bones and aromatics for the better part of the day. This was a super-quick version that turned out well. All I needed was something quick and soothing on a wintry, yucky day, and this hit the spot. I'm sure over the next couple of days the flavours will meld a bit more.

You cannot beat homemade soup. I rarely eat anything canned these days because the sodium content is way too high for my palate. And it doesn't take forever or an advanced degree. It just takes a little imagination and a little patience.

FYI, here is another fabulous chicken soup recipe, though a little heavier and probably not suitable for someone with the flu.

Happy Blogiversary

ReTorte is officially one year old.

I am currently sick, both physically and in the heart, so I'm not going to post a recipe or anything to mark this event because I can barely tolerate the sight of food right now. I will give a brief speech instead.

Thank you to all my regular readers - for your comments, your insights, your stories, and your recipes. You have made ReTorte the fun experience it has been for me over the last 12 months. I hope to update more regularly and use more of my own photos in the future, because sharing what I do in my own kitchen through word and picture is a great joy for me.

Food, cooking, and baking are integral to my journey through life and are a huge part of the fabric of my life. Food is meant to be shared, and blogging allows me to share both the journey and the food with you. And I guarantee you, there will be more, and enough for everyone.

Friday, January 27, 2006

Apple Crisp Cheesecake

Time for another cheesecake recipe. I am a cheesecake freak, and in all honesty, it's really one of the easiest desserts to make. You just have to follow a few guidelines, which I posted previously here. This recipe is spectacular, I must say. It's great as a fall dessert, for obvious reasons, but it's great all year round. I find the best results are with Granny Smiths because of their tartness and they keep their shape when baked, but Golden Delicious also work very well.

Apple Crisp Cheesecake

Crust:
2 cups graham cracker crumbs
1 cup quick oats
1/3 cup packed brown sugar
2/3 cup butter, melted

- combine these ingredients and press into a 10" springform pan, building the crust 1 1/2" up the sides of the pan. Chill.

Topping:
1/4 cup quick oats
1/4 cup packed brown sugar
1/4 cup all purpose flour
1 tsp cinnamon
2 tbsp butter

- combine in a small bowl until crumbly and set aside

Filling:
3 packages (250g each) cream cheese (light would probably work but DO NOT use fat free), at room temperature
1 cup packed brown sugar
3/4 cup sour cream (again, light would probably work but DO NOT use fat free)
4 eggs
1 3/4 tsp cinnamon
1/2 tsp nutmeg
2 small apples, sliced and peeled

- beat cream cheese, brown sugar, and sour cream in a large bowl on medium speed until well creamed. Add the eggs, one at a time, beating well after each. Ad spices and combine. Pour into crust. Spread apples over filling. Sprinkle on the topping.
- bake at 325F for 65 - 70 minutes, or until soft set in the centre. Immediately run a knife along the edge of the cake to loosen it from the pan, then cool completely on a wire rack. Chill overnight, or at least for a few hours.

See? Easy and spectacular. Serve with a caramel or butterscotch sauce. This cake also freezes well, if you want to make it in advance, and it should yield 16 servings. Enjoy!

Saturday, January 21, 2006

Tania's Tag: 10 Things You Didn't Know About Me

Tania over at The Candied Quince tagged me for this meme. I feel a little challenged by it, but here goes nothing. I'm going to keep with a food theme, here.

1. Foods I cannot stand, and in fact, make me gag: black licorice, peas, offal, squash (but love spaghetti squash), capers, roe, beef cheek.
2. My first kitchen job was as a dishwasher/server at the University of Victoria Housing, Food, and Conference Services. The pot scrubbing shift I did once a week for a year was to date the highest paying job I've ever had.
3. In the past 10 years, I have eaten at McDonald's a grand total of two whole times.
4. I won't touch fat free yogurt with a 10-foot pole. The texture is just gross.
5. I love to put engevita yeast on my popcorn. I got onto this at UVic, where at their theatre, they had a shaker of it at the concession stand.
6. I won two prizes for cake decoration when I was in elementary school. One was at Rossland's fall fair, where I submitted a cake in the shape of a cat that my mom help me make from a picture in her Betty Crocker cookbook. The other was for a fundraiser that my Brownie troup participated in. The cake was a winter theme with white icing, and I made snowmen out of marshmallows, toothpicks, and food colouring.
7. I have abnormally low cholesterol, so I don't skimp on eggs or butter or full fat sour cream.
8. I have a large cup of homemade cocoa every morning before breakfast, the way many people have a large cup of coffee before they do anything in the morning.
9. My first attempt at breadbaking was a crack at English muffins, supervised by my mother. They were a total disaster, but hey, I was 12.
10. My favourite herb to cook with is cilantro.

That was kinda fun! Thanks Tania, and I don't want to tag anyone in particular, but if one of my readers wants to take up the baton, go right ahead. Just let me know.

Tuesday, January 17, 2006

Bread Baking Tutorial

I made so much bread in school it wasn't even funny. I got extremely sick of it, yet the good thing about making so much of it so often (we made 9 batches of croissant dough daily, a dozen loaves of bread daily, baguettes and epis almost daily, and several dozen buns daily - and I'm sure I'm missing something! Oh yeah, a dozen large cinnamon buns made from brioche dough daily) is that whipping up a batch of bread for my single self is no big deal at all. It's easier for me than tromping off to the store in the snow and cold. That, and I find making bread, in small quantity and by hand, quite a theraputic and satisfying task. I'm tactile; I like the feel of kneading dough by hand.

The school recipes for bread used a starter we made from a potato and an onion, a bottle of beer, and flour and water. I haven't made my own starter because I'm moving soon and don't want to go to the trouble. That, and starter, once you get it going, can be rather like a pet: it needs regular food, water, and TLC. Only it ain't cuddly and it doesn't purr.

Bread involves very simple ingredients: water, flour, salt, sugar, yeast. Sometimes you can use milk instead of water, which adds flavour and nutritional value. Salt is always necessary in breadmaking because not only does it add flavour, but it inhibits the yeast growth so your bread doesn't go crazy in the proofing (i.e. rising stage). Sugar is also necessary, because it feeds the yeast; some recipes don't require it, but follow the recipe. Other sweeteners can be used, too, like honey or molasses. All purpose flour is just fine, but if you can get yourself some good bread flour, you'll get an even better result because there's a higher gluten content in bread flour, and gluten is what makes your dough elastic and your bread rise higher.

Here is a recipe I've used that has given me good results. It's from the Fleishmann's Best Ever Breads recipe book that my mom gave me a few years ago, when she taught me how to make bread for the first time. For more tips and details, this is a great site.

Basic White Bread (yield = 2 loaves)

5 - 5 1/2 cups white flour
3 tbsp sugar
2 packages quick yeast (8g each, or 1 package = 2 1/4 tsp)
1 3/4 tsp salt
1 1/2 cups water
1/2 cup milk
1 - 2 tbsp butter or margarine

Combine the dry ingredients in a large bowl. Heat the water and milk and 1 tbsp of the butter to very warm. Gradually add it to the flour mixture to form a soft dough. You don't want it to be too sticky, nor do you want it to be too stiff. Depending on the humidity of your surroundings, you may need to add liquid (or reduce the flour) or add some flour. Sometimes you won't need the full five cups of flour, sometimes you might need the full 5 1/2. That's part of breadmaking and it may never be the same way twice.

Now, I have a Kitchen Aid mixer and I do this first part, and some of the kneading, in it. I don't want to overwork the motor, even though it's got high wattage, so after the ingredients are combined, I develop the dough for a while on a higher speed, then finish it off by hand. If you don't have the luxury of a stand mixer, kneading the dough by hand until it's smooth and elastic might take you 8 or so minutes.

Once the dough is developed, let it rest a few minutes while you clean up, then shape it or put it in a loaf pan and allow it to rise. I do this in the oven with the light turned on and a pan of boiling water in the rack below. I turn the oven on to warm for a few minutes, then turn it off, leaving the light on. Also, brush some melted butter over the exposed parts of the dough to keep it from drying out. Once the dough is doubled in size, preheat your oven (removing the dough if you're rising it in there!) to 400F. High heat gives your bread the extra bit of push from the yeast before the yeast completely dies off. You can score your loaf if you wish, with a sharp knife or razor blade. Put your bread in the oven with a pan of boiling water and bake until golden brown and it sounds hollow when tapped on the bottom.

This is an excellent site that gives detailed instructions for the steps above.

Commercial bread ovens like the one I used in school have a steam injection function. Steam helps give the crust crunch and shine, and helps the dough retain its moisture. You won't get as much from the pan of water in the oven, but it's worth the extra bit of effort, in my opinion.

There are millions of bread recipes out there. Let me know how this one works out, or if you have any others you've had good results with that you'd like to share.

Sunday, January 15, 2006

Lemon Delicious


Lemon Delicious
Originally uploaded by wanderingcoyote.

Sorry for the unexciting photo...

If you haven't discovered by now that I'm a fan of using citrus in my desserts, I'm sure that'll come across quite clearly in little time. It's just something I'm drawn to because the flavours are so compelling for me. And the possibilities seem endless because citrus is so versatile.

I made this recipe last night. I was going to take the grapefruit sorbet to the dinner I was invited to, but I wanted something warm instead. My mom made a version of this but I don't have the recipe. After a brief search through my rather large cookbook collection, I found this recipe in Complete Cook by Le Cordon Bleu. If you have a bit of money to invest (I paid $45 for this a few years ago) this is actully a pretty good cookbook that covers the basics of French cooking and patisserie with very accessible recipes, ingredients, and methods. I used it as a reference in school quite a bit, since I wasn't fan of the texts we had.

This recipe can be served warm or cold. It has a light souffle-like layer on the top and a lemon sauce on the bottom. It serves four.

1/4 cup unsalted butter, at room temperature
1/3 cup sugar
zest of one lemon
2 large eggs, separated
2 tbsp all purpose flour
3 tbsp lemon juice
1 cup milk
icing sugar for dusting, if desired

- 350F oven, greased 8" square pan or small casserole

1. Beat the butter to soften it, using and electric mixer. Beat in the sugar until light and creamy, then add the zest and egg yolks until well blended. Gently fold in the flour, followed by the lemon juice.
2. In a small saucepan, heat the milk until tepid, then fold it into the lemon mixture. Make sure the milk is barely warm - if it's too hot the flour and yolks may cook and the mixture will be too heavy.
3. In a large, clean bowl, beat the egg whites with a pinch of salt until soft peaks form. Gently fold this into the lemon mixture, careful to not lose any volume.
4. Bake in a water bath for 30 - 35 minutes, or until the top is pale golden and firm to the light touch.

I added a couple more tablespoons of lemon juice because I didn't think it was lemony enough originally. Taste it before you bake it to make sure you think the flavour is right.

Grapefruit Sorbet


Grapefruit Sorbet 1
Originally uploaded by wanderingcoyote.

Yep, yet another citrus recipe!

I was in the mood for some sort of dessert that used ingredients I had on had and that was fat free. Although this recipe contains lots of sugar, I felt better about eating it than I would have some ice cream. But now I wonder if grapefruit ice cream might be the next thing I try, because grapefruit is one of my favourite fruits (right up there with fresh pineapple).

I have a Cuisinart ice cream maker, which I got a few years back on sale at Sears for about $80. It's probably the best $80 I've ever spent because I get a lot of joy from this little machine. It's easy to use, quick, and it incorporates the perfect amount of air into the ice cream or whatever to get a light consistency. And I feel better eating homemade ice cream than store bought stuff, because the commercial ones have all kinds of chemicals and fillers in them that are not good for you.

My basic ice cream recipe is here. This sorbet recipe came from the recipe book that came with the ice cream maker. I added the vodka as my own touch.

2 cups sugar
2 cups water
1 1/2 cups freshly squeezed ruby red grapefruit
zest of 1 grapefruit
1 oz vodka (I used Smirnoff's orange flavoured one)

1. The day before you want your sorbet, combine the sugar and water in a saucepan and bring it to the boil. Let it boil for a couple of minutes, or until the sugar is completely dissolved and you have a perfectly clear syrup (we call this simple syrup in the pastry world and we use it for all kinds of things). Remove from heat and let it cool. Put it in the fridge overnight so it's completely cold for using the next day. This is crucial if you're using this particular ice cream maker because the drum has a freezing liquid in it that will melt if you put warm liquid into it.
2. Zest the grapefruit and sqeeze the juice into the sugar syrup and mix well to combine.
3. Throw into your ice cream maker. Add the vodka near the end when the sorbet is almost done in the machine - alcohol affects freezing. In the Cuisinart machine, the whole process took just under half an hour.
4. Scoop into a container and freeze until firm.

We made sorbet in school, but we were taught to use a densitometer or sugar thermometer to measure the density of the sugar syrup. I cannot remember what it had to be, and the chef instructor I had in the advanced kitchen had to admit that this device is hard to find these days. But this method of using a simple syrup of 50/50 worked fine and it froze well.

This is more summery, but if you need a fat free sugar fix, it works in January just as well as it would in July. Enjoy!

Saturday, January 14, 2006

Steak & Kidney Pie


Steak & Kidney Pie
Originally uploaded by wanderingcoyote.

To be honest with you, I'm only posting this because the pie looks so nice. I detest steak and kidney pie, and I didn't actually make the filling for this myself - someone associated with my work did. This has been my dad's traditional birthday dinner for as long as I can remember, and none of us ate it as kids because we just thought it was beyond gross. Currently, my brother will partake in a piece now, but my other brother and I cannot. When I served this pie to my dad, the smell nearly knocked me over.

When I was growing up and before my parents split up, my mom used to make this for my dad every year. She got a piece of steak from the butcher and a fresh kidney. One of my main memories from around Christmas time is going into the kitchen and seeing the kidney soaking away in the dishpan, oozing red fluids. It was enough to make me gag.

The pastry I made for this recipe came from the shortening box - nothing fancy at all. I glazed it with an egg wash, which gives it a golden brown colour upon baking.

Dad's Cake


Dad's Cake
Originally uploaded by wanderingcoyote.

I made this cake for my dad's 60th birthday, which was Christmas Eve. I used my favourite chocolate cake recipe and iced this with an Irish Cream icing. The decoration was done with that same icing with the addition of some cocoa powder. I don't like piping writing with icing; I much prefer to use melted chocolate because it's much easier to pipe. But, we live and learn. It was superb finish to the steak and kidney pie meal, and my dad was thrilled. And that's all that mattered.

Sunday, December 18, 2005

Wandering Coyote's Christmas Faves

I'll be leaving tomorrow for my Christmas vacation with my family. I thought I'd post some of my favourite Christmas recipes for you to check out. I don't know if I'll make any of them while away, but if you try them, let me know how they turn out! In the meantime, I wish all my readers a holiday time full of good food, good fun, and good fellowship.

Christmas for me always meant having special things we never had at any other time of the year. The following two recipes were made by my mother every year, only at this time of year. I looked forward to Christmas because I loved these two particular items. They're very simple but very good.

Creamy Salmon Spread

1 can drained red salmon
1 package cream cheese, at room temperature
1/2 small onion, grated
4 tsp fresh lemon juice
2 tsp horseradish
1/2 tsp Worcestershire sauce
1 or 2 drops tobasco sauce
salt & pepper

Directions.

Combine.

How hard is that?

Cheese Ball

8 oz cream cheese, at room temperature
8 oz medium or sharp cheddar cheese, grated
1/3 cup mayonnaise
1 small grated onion
1 clove garlic, crushed

Directions

Mix well. Roll into a ball and roll the ball in some chopped nuts. Or, press it into a bowl.

Got it?

Christmas Chip Cookies

I can't remember where I got this recipe, but it was during my time in Ottawa. These are really good. I bought the Christmas (i.e. red and green) M&Ms or Smarties at Bulk Barn.

1 1/4 cups firmly packed brown sugar
3/4 cup butter
2 tbsp milk
1 tbsp vanilla
1 egg
1 3/4 cups flour
1 tsp salt
3/4 tsp baking soda
2 cups M&Ms or Smarties

1. Preheat oven to 375F.
2. Cream butter and sugar until light and fluffy. Add egg, milk, and vanilla and beat until fluffy. Sift in the dry ingredients and combine. Add the M&Ms or Smarties until mixed in. Drop onto cookie sheet and bake 8 - 10 minutes for chewy cookies or 11 - 13 minutes for crisp cookies.

Two-Tone Chocolate Shortbread

This came from the 1998 Bakefest insert that comes in Canadian Living. I love these little booklets and get lot of great recipes from them. In fact, I look forward to the Christmas edition of Canadian Living just for the Bakefest booklet!

1 cup softened butter (DON'T use margarine, for crying out loud! This is shortbread!)
1/2 cup granulated sugar
1 1/2 cups all purpose flour
1/2 cup cornstarch
2 oz (or 2 squares) semi sweet chocolate, melted

1. In a large bowl with electric mixer, beat butter and sugar until fluffy. Sift together flour and cornstarch. Beat into butter mixture until just mixed.
2. In a 9" square baking pan, drop half of dough in small portions, scattering randomly. Combine melted chocolate with remaining dough. Drop small chocolate portions in between white dough portions in pan. Press top lightly to flatten.
3. Bake at 300F for 25 minutes or until firm to touch in centre. Let cool and cut into squares or bars. These also freeze very well.

Nanaimo Bars

Okay - I definitely only make these at Christmas because they are so decadent and having them around the house at any other time of the year is just not a good plan. These are one of my absolute favourite food items ever! This particular recipe comes from Canadian Living magazine.

Base:
2 cups graham cracker crumbs
1 cup flaked coconut
1/2 cup finely chopped walnuts
1/2 cup butter, melted
1/3 cup cocoa powder, sifted
1/4 cup granulated sugar
1 egg, beaten

- In a bowl, stir together all ingredients. Press into a 13x9" pan, greased or parchment-lined. Bake at 350F until firm, about 10 minutes. Let cool completely on a rack. Like, completely, eh? As in cold.

Filling:
1/2 cup butter
1/4 cup custard powder (like Bird's)
1 tsp vanilla
4 cups icing sugar, sifted
1/4 cup milk

In a large bowl, beat the butter, custard powder and vanilla until light and creamy. Alternately beat in icing sugar and milk in two additions of each. Spread over COOLED base. Refrigerate for one hour or until cold.

Topping:
8 oz semi-sweet chocolate, chopped
2 tbsp butter

- Melt chocolate and butter in a bain marie, i.e. in a bowl over a saucepan of hot, not boiling water. Spread over filling. Refrigerate until almost set. With the tip of a sharp knife, score into bars. Refrigerate until the chocolate is set. Cut into bars along lines. (NB: if this isn't working neatly, use a hot knife. Put hot water into a pitcher and dip the knife in, then cut the bar. Repeat, wiping off the knife with a clean cloth or papertowels.)

Enjoy, everyone! See you in the New Year!

Sunday, December 04, 2005

Party Salads


Party Salads
Originally uploaded by wanderingcoyote.

This was something I was pleased with: the salads I made for the the Christmas party dinner last night. This was my first attempt at tomato roses and I spent a long time carving those mushrooms into stars, also something I'd never done before. The picture hardly does them justice!

Christmas Cake


Christmas Cake
Originally uploaded by wanderingcoyote.

This is the cake I made for a luncheon we catered last Thursday. It's a 16"x24" slab of Orange Cake. I was not happy with how it turned out at all. I am capable of so much better and just couldn't make my vision conform to what I wanted in reality. Everyone but me was thrilled with it.

Pulla


Pulla
Originally uploaded by wanderingcoyote.

This is a Finnish recipe I got from my friend Anita, who is half Finnish. Her mom gave her a copy of a cookbook (keittokirja) put out by the Emmaus Lutheran Church in Burnaby and all most of the recipes are from the homeland, and all are printed in both Finnish and English. Anita has fond memories of pulla, as her grandmother used to make it. She was craving it last weekend and I offered to make her some. She frowned and said, "It's a little complicated." I frowned back and said, "I'm a professional." That sealed it, and away I went.

This is very similar to the French milk bread (pain au lait), only flavoured with cardamom. Try to get the freshest cardamom you have for the best results.

Finnish Pulla Dough

2 cups milk, 120 - 150F (or very warm but not scalding)
2 tbsp quick yeast
2 tsp salt
1 egg, beaten
3/4 cup sugar
1 tbsp ground cardamom
approx. 2 cups all purpose flour
1 cup butter, softened

1. Throw all your dry ingredients into a large bowl. Add the milk and mix. Add the egg and mix. Remove the dough onto a floured surface and begin kneading it, gradually adding the butter in knobs. Alternately, put the warm milk into the Kitchen Aid bowl and throw all your dry ingredients on top. Add the egg and mix on speed one. Develop the dough on speeds 2 - 6, gradually adding the softened butter.

2. Knead the dough until smooth and elastic. It might be slightly sticky after the butter is added, but that's ok. By hand, this'll take a good 6 - 8 minutes of muscle power; in the KA it'll take about 4 - 5 minutes.

3. Let the dough rest for 5 minutes. Then roll it out into a rectangle approximately 1/4" thick. Spread it with thin layer of butter, and on top of this sprinkle brown sugar and cinnamon. Dot with more butter. Roll up as in a jelly roll and slice into 1 cm thick slices. I got 9.

4. Place in a greased baking dish. In this case, I used a 9" glass pie plate. Allow the dough to rise to double its bulk. I typically turn my oven onto low and turn the light on. Once the temperature light has gone out, I let some of the heat out and place a pan of boiling water in the oven. This should be sufficient heat to rise and mine took about an hour to double.

5. After the dough has risen, preheat the oven to 400F. Bake for 30 minutes or until golden brown. (The original recipe calls to brush the dough with sugar water before baking.)

Notes

- You can do several things with this dough other than make cinnamon buns. You can make Boston Cake, which is like a cinnamon bun only includes raisins and apple chunks. You can make Shrove Tuesday buns, which involves dividing the dough into small buns and baking them. Once out of the oven, you cut the buns and spread them with the following filling: 2 cups icing sugar, 2 cups ground almonds, 1 egg white. Whipping cream can also be added to the middle along with this filling. Additionally, you can braid this dough, dividing it in 3 and rolling it out into 15" strips. Braid, pinch ends, and tuck under.
- I halved this recipe to make the 9 cinnamon buns, and that's about all the Kitchen Aid bowl I used could tolerate.

Saturday, November 26, 2005

Baked Rigatoni and Meatballs

My mom got this recipe from an old issue of Canadian Living and made it once in a blue moon. It was so good though and I have since made it for dinner parties I've thrown with good friends to ooh and ahh over it. There are a lot of ingredients, but don't be put off.

Baked Rigatoni and Meatballs

2 tbsp olive oil
1 onion, diced
2 cloves garlic, crushed (use as much as you'd like, though)
3 cups sliced mushrooms
1 green pepper, diced
1 1/2 tsp each dried basil and sugar
1 tsp dried oregano
1 tsp salt
3/4 tsp pepper
1 can (28oz) diced tomatoes, or whole tomatoes broken up
2 tbsp tomato paste
3 1/2 cups rigatoni pasta
1 1/3 cups grated mozzarella cheese
1/4 cup grated parmesan cheese

Meatballs:
1 egg, beaten
1/3 cup finely chopped onion
1/4 cup fine breadcrumbs
2 cloves garlic, crushed
3 tbsp parmesan cheese
1 tsp dried oregano
salt & pepper
1 lb lean ground turkey (you can use lean ground beef if you'd like; I prefer the turkey myself)

1. For the meatballs, combine the ingredients until well blended and shape into balls. My mom used to put them in a plastic colander on a plate and microwave them and this worked very well. You can bake them or brown them on the stovetop for 8 - 10 minutes - whatever works. Cook them just before you put them into the sauce, and make sure they're thoroughly done (i.e. no longet pink in the middle).
2. Saute the veggies and spices in the olive oil until softened. Stir in tomatoes and paste and bring to a boil. Reduce heat and simmer for 30 minutes or until slightly thickened. Add meatballs.
3. Cook rigatoni until al dente. Drain and return to the pot; add sauce and meatballs. Transfer to an 8 cup casserole and sprinkle with cheeses.
4. Bake at 400F until cheese is melted and the top is golden.

Bon Appetit!

Friday, November 18, 2005

Pumpkin Harvest Cheesecake

For my American readers, heading into Thanksgiving, I present to you a fabulous change from the usual pumpkin pie (not that there's anything wrong with it). I made this a while back and it was great.

Pumpkin Harvest Cheesecake

Crust:
3/4 cup chocolate wafer crumbs
1/3 cup finely chopped pecans
3 tbsp butter, melted

- Heat oven to 350F. Combine ingredients and press onto bottom of 9" springform pan. Bake 10 minutes. Let cool.

Filling:
1 1/2 cups pumpkin puree (NOT the pie filling!)
3 eggs
1/2 cup firmly packed brown sugar
1 1/2 tsp cinnamon
1/2 tsp ground ginger and nutmeg
3 packages (250g each) cream cheese, softened
1/2 cup sugar
1 tbsp cornstarch

- Whisk together pumpkin, eggs, brown sugar, and spices. In a separate bowl, using an electric mixer, beat cream cheese, sugar and cornstarch; blend into pumpkin mixture. Pour over crust. Bake 50 - 55 minutes, or until centre is just set.
- Remove from oven and run knife around edge of cake. Cool completely. Refrigerate overnight.

As you can see, cheesecake isn't a complicated feat to take on. Here are a couple of tips, though, to help you not get a huge crack down the centre of your finished product.

1. Do run a knife around the edge of the cheesecake gently as soon as you take it out of the oven. The cake will sink as it cools (expansion and contraction of heated materials, etc.) and if you loosen the edges, they won't tug at the cake as it sinks.
2. Don't overbeat your filling. If you add too much air to it, it'll puff up too much and then sink even more as it cools.
3. Some recipes call for baking the cheesecake in a waterbath. I generally don't do this unless the recipe specifically states it. I have found that the extra moisture in the oven increases the baking time and inhibits the setting of the cake. But the waterbath does insulate the cake and this can help prevent cracking. Like I say, follow the recipe.
4. If you do get a crack, you can cover it by making a simple glaze using sour cream, a bit of sugar, and a bit of whipping cream to loosen it. I would only do that on cheesecakes that are predominantly white, though. In this case, just plate it and add a dollop of whipped cream, sift some cinnamon over top and voila! Enjoy!

LinkWithin

Blog Widget by LinkWithin