Tuesday, April 25, 2006

Ginger Rhubarb Loaf


Ginger Rhubarb Loaf
Originally uploaded by wanderingcoyote.

In order to feel like I accomplished something yesterday, I decided to bake this. The day before, the neighbour came over with a the season's first rhubarb. I chopped it up and froze most of it, keeping a cup back for this loaf. I'd been craving something like pound cake, but I didn't have enough eggs on hand for that. After a search through all my recipes, I decided to go with the Cardamom Loaf recipe from about a year ago. You can find it here. A few simple substitutions, and voila.

The substitutions are as follows:

- instead of 2 tsp cardamom, I used 2 tsp ginger
- I added 1 cup finely chopped rhubarb. The rhubarb was in a freezer bag, and I added to it 2 additional tbsp of sugar, 1/4 tsp cinnamon, and 1 tbsp flour. You can can combined the rhubarb and these ingredients in a bowl, too. I would try to use fresh rhubarb rather than frozen because as frozen rhubarb thaws, it goes all mushy and loses its shape. Make sure the rhubarb is cut small; the bigger the pieces, the more risk you run of having raw spots in the loaf, because fruit gives off liquid as it bakes and that can impede proper baking.
- I found I needed an additional 1/3 cup of milk for some reason; play it by ear. You don't want too liquidy a batter, nor too stiff a batter.
- I baked this in a metal loaf pan in a convection oven at 325F, and it turned out fine. If you use a glass pan, decrease the temperature by 25 degrees or so. In a regular oven, you can bake this at 325F or 350F.


Enjoy!

Saturday, April 22, 2006

Trifle Made Easy


Strawberry Shortcake Trifle
Originally uploaded by wanderingcoyote.

Today my brother and his girlfriend are hosting a post-Easter pot luck dinner, and I got elected to bring dessert. I awoke with energy this morning. Yesterday I was thinking of bailing on the pot luck because I felt magnatized to my bed, but this morning I felt great and was super productive. I decided to give the pot luck a go, and decided that a trifle would be an easy thing to take to dinner.

My maternal grandmother made the most awesome trifle. She bought a jelly roll from the grocery store and sliced it, lined a trifle bowl with the slices, and then added liquid jello. She put this in the fridge overnight to set and then added a layer of custard (Bird's) and lastly a layer of whipped cream. It was quite heavenly. I made it for a Christmas dinner several years ago and it was a big hit.

Since then, I've discovered that the sky's the limit with trifle. Originally, it was designed to use up stale cake/pastry pieces. You added some fruit, custard, whipped cream, and Bob was your uncle. I prefer to use fresh ingredients, and have evolved beyond jello by using fresh berries.

A note about bowls, before we go much further. Obviously, since a trifle involves layers, you want to show those layers off in a glass bowl. I own a beautiful footed trifle bowl that makes a stunning presentation, but alas it is in Ottawa still, pending shipping when a friend of mine moves out west next month. If you can, get creative. There are some vases I've seen that would make stunning trifle bowls - again, the sky's the limit. The bowl in the above picture is a glass salad bowl. Use what you have on hand, and if you don't have a glass bowl don't worry. The trifle will speak for itself as it is consumed!

The Components

You'll need:

- 1 8" layer of sponge cake, cubed, of your choice (the recipe I use follows),or a few cups of cubed pound cake, or a few cups of angel food cake. Again, use your imagination and preferences as a guide. You need enough cubed sponge to line the bottom of your trifle bowl and make a thick layer. You don't want too thin a layer of sponge because this is the base. I'd say, on average, depending on the size of your bowl, the bottom sponge layer should be about a quarter of the bowl.
- 1 box Jello vanilla pudding, yielding approx. 2 cups. Yes, this might seem like cheating to you, but let me tell you, this tastes way, way better than Bird's custard and it's way cheaper and far quicker and easier than making a homemade pastry cream.
- Fresh berries of your choice, or a medly of berries. Two cups minimum, again depending on the size of your trifle bowl, and more if you wish to garnish the top of your trifle with the berries. This trifle I just made used one pound of strawberries.
- 1 cup whipped cream, minimum (again, this is dependent upon your bowl) sweetened, whipped to soft peaks
- chocolate shavings, or other suitable garnish - get creative. I used a chocolate bunny left over from Easter and took my vegetable peeler to it to get the shavings.

Assembly

Once you've put your sponge in the bottom of your bowl, you may wish to sprinkle it with some sort of booze. Sherry is traditional. You don't have to, especially if you have a nice moist cake. If you're using something day old or that's been in the freezer a while, you may want to hydrate the sponge with some type of booze or simple syrup (a 50/50 combination of water and sugar, brought to a boil for a few minutes, then cooled - a staple in the pastry kitchen let me tell you), or even a fruit syrup from tinned fruit.

Make up the pudding and whisk it until thoroughly combined. Pour over the sponge. Put the berries in next.

Again, depending on the size of your bowl, you can either add another, thinner, layer of cubed sponge or just proceed to the whipped cream stage. In the trife I just made, I added a second layer of sponge because I could.

Spread your whipped cream smooth on top of the trifle, and garnish as you want. You can do whatever you want on the top, really. You can pipe whipped cream if you're feeling adventurous and have the equipment, or you can do a fruit arrangement as I did.

Simple, eh?

The Sponge

This recipe came from the Dieticians of Canada cookbook, and is called Lazy Daizy Cake. It's an excellent recipe and is very versatile.

2 eggs
1 cup sugar
1 tsp vanilla
- beat until light and fluffy

1 cup flour
pinch salt
1 tsp baking powder
- combine

1/2 cup milk, scalded
2 tsp butter, melted in the milk

Add the flour and milk in alternate additions, with three of flour and two of milk. Combine until just mixed.

Pour batter into prepared 8" round or square cake pan. Bake at 350F for 35 minutes, or until tester inserted in centre comes out clean. Remove from pan and cool completely.

Voila.

Enjoy the trifle, and enjoy the compliments you'll get when serving it!

Friday, April 14, 2006

Thai Chicken Curry Soup


Chicken Stock
Originally uploaded by wanderingcoyote.

I've been feeling super crappy lately. For more details, see my Wandering Coyote blog. I felt like some comfort food, and I had the energy to be creative. I also had on hand some pantry items I wanted to use up. So, I made this soup.

I usually make my own chicken stock. This one was made using a chicken carcass from a while back that I'd frozen. I usually save a leg or two and the wings so there's enough meat in the soup, but in this case, I added two chicken thighs since the people that helped me eat the roasted chicken also consumed both legs and one wing. Well, I would have been a poor hostess to refuse them, wouldn't I?

I used the method outlined in this post, only with a carcass as opposed to actual cuts of meat, you should simmer the stock much longer to get the maximum amount of flavour. In this case, it was 41/2 hours. I used, as aromatics: 2 small leeks, 2 small carrots (unpeeled but washed), several cloves of whole garlic, two quarter sections of a lemon (I knew this soup would be Thai-inspired, so I used the lemons instead of lemongrass), a bunch of whole peppercorns, and 2 quarter-sized rounds of ginger. Later on in the cooking process, I added 2 chicken thighs and a handful of cilantro - whole, not cut up and with stems. I added salt to taste, and voila.

Thai Chicken Curry Soup

The above made about 4 cups of stock, and that's what you'll need for this recipe. In addition (if this looks like deja vu to some of you, you're not crazy; similar ingredients are found in my Thai curry recipe from nearly a year ago):

- 1 can coconut milk (398mL)
- about 3-4 cups of veggies of your choice; I used cauliflower cut up small, 2 julienned carrots, 10 large mushrooms, sliced, and a can of whole baby corn, quartered
- 2 tbsp Thai fish sauce
1 1/2 tsp Thai red curry paste, or to taste (you can substitute other curry pastes)
- 2 tbsp lime juice
- 2 - 3 tbsp sugar, or to taste (add it in 1 tsp at a time so you can adjust it easily)
- 1/3 cup rice
- 2 large cloves of garlic, crushed
- 2 tsp minced ginger
- 1 cup chopped cilantro

Once I'd taken the meat of the chicken bones and strained my stock, I added the rice and brought it to a boil. I added the chicken and turned the heat down to a low simmer. I added the veg all at once with the ginger. Then I mixed the curry paste, fish sauce, and sugar together and added it to the soup, followed by the garlic. I added the coconut milk last. Then I added about a cup of chopped cilantro. I had to add sugar to it to balance out the flavour.

The smell alone was like an elixir from the heavens! It tasted awesome and looks just lovely, too. I am going to put it in containers to freeze and keep a bit out for lunches this week.

I'm glad I took the time to do this today. Creating a delicious new recipe was just what my weary soul needed.


Thai Chicken Curry Soup
Originally uploaded by wanderingcoyote.

Wednesday, April 12, 2006

Linguine with White Clam Sauce

I haven't been well lately and haven't been eating well. My roommate has been cooking for me and I've been feeling guilty about it. So last night I felt like I had the energy and desire to cook a proper meal, and I made this great recipe, which originally came from Cook Great Food by the Dieticians of Canada. This is a great cookbook full of healthy recipes and lots of ideas. My wasband got custody of the book, but luckily I remembered this recipe because I made it so often. I used this cookbook lots, so if you have a chance, check it out.

Linguine with White Clam Sauce

1 can clams, drained and nectar reserved
1 small can (154mL I believe) evaporated milk
1 small onion, diced
1 1/2 cups sliced mushrooms
1/3 cup white wine (if you don't do booze, non-alcoholic wine works as does chicken stock - just use a little less because the wine reduces and the other fluids don't)
2 tbsp flour
freshly crushed garlic to taste (I used 4 smaller cloves)
salt & freshly ground pepper to taste
linguine, or other long pasta

1. Get the pasta going. The sauce will cook in the time it takes to cook the pasta.

2. In a large skillet, saute the onions in a bit of olive oil until translucent. Add mushrooms and saute until they've reduced in size. Deglaze the skillet with the wine and let it bubble away until the wine reduces by half. Reduce the heat to medium low. At this point, sprinkle the flour over the mixture and mix it in well. Then add the clam nectar, clams, and the evaporated milk. Add the garlic. Simmer gently for a few minutes and adjust seasonings as necessary. Serve and enjoy!

Sunday, March 26, 2006

Apple Rhubarb Crisp


IMG_0791
Originally uploaded by wanderingcoyote.

I know crisps are traditionally fall fare when apples are plentiful, and I know that rhubarb is not quite in season, but I made this today because Granny Smiths (the best baking apple ever) were on sale, my roommate, J, had rhubarb in the freezer, and I wanted to make a dessert to compliment J's roast chicken dinner.

Funny story about the rhubarb. It came from the neighbour's plant last year. J took some to a coworker who claimed it was the best rhubarb she'd ever tasted. When the coworker asked the rhubarb plant's owner if she could have a cutting of the plant to grow in her own garden, the lady said no way. It's a weed, right?

Speaking of which, we had a huge rhubarb plant in our back yard when growing up. I mean huge. My mom made rhubarb everything when we were kids, and it took a while for it to grow on me. My brother, on the other hand, hated the stuff. One spring, my dad and brother were out doing yardwork and my dad entrusted my brother with the weed killer to eliminate some pesky dandilions etc. Well, my brother went to town with the weed killer and sprayed it on the rhubarb plant. We had no rhubarb that year and my mom was pissed off. But it came back the next year! And, I hate to say it, we ate that rhubarb. I shudder to think what chemicals were floating around my body afterwards, and hope I don't get any cancer as a result!

So here's what I did this afternoon.

Apple Rhubarb Crisp

4 Granny Smith apples, peeled & sliced
approximately 3 cups chopped rhubarb
4 tbsp cornstarch
2 tsp ground ginger (or to taste)
2 tsp cinnamon (or to taste)
1/2 cup sugar (or to taste)

Topping:

I cup oats
1/3 cup whole wheat flour
1/3 cup brown sugar
cinnamon & ginger to taste
1/3 - 1/2 cup butter

Combine rhubarb & apples in a bowl. Add the cornstarch sugar and spices. Toss to coat thorougly. Chuck in a large casserole that has been well-oiled.

For the topping, combine the oats, flour and sugar. Add the spices. Cut the butter into in the mixture either with a pastry cutter or by rubbing the butter into the mixture with your hands. It should be crumbly and just hold together when squeezed. Sprinkle on top of the fruit and pat down gently.

Bake at 375F for 45 minutes to an hour, depending on the thickness of your apple slices and the depth of your casserole dish. You know it's done when it's bubbly and when you spear it with a sharp knife, the apples are tender.

Vanilla ice cream is a wonderful accompaniment, as is just straight whipping cream poured over the top. My mom used to serve this with evaporated milk poured over it.

My mom always claimed that by adding ginger to rhubarb it eliminated the feeling that you're teeth were sticking together, a sensation she claimed she had when eating rhubarb without ginger. I don't know about this. I've eaten rhubarb without ginger before and didn't have this experience. But they are a good combination nonetheless.

Rhubarb is quite tart, so don't skimp on the sugar. Taste the mixture after you've added the sugar to make sure it's sweet enough for you. Don't eat the raw rhubarb, but there should be some juices in the mixture at this point, so taste that.

We make strawberry rhubarb pies at work, and you can make a strawberry rhubarb crisp, too. Both fruit will be plentiful this summer.

Enjoy!

Wednesday, March 22, 2006

Neglect

One of my goals for this year was to pay more attention to this blog and try to get more traffic on it. It hasn't happened. Let me fill you in, if anyone's still reading this.

I left a job in the interior and moved to Victoria near the middle of February. I did an intensive job search here and was hired on as a pastry apprentice at a bakery. I had to also find a place to live in a matter of a couple of days at the end of February and for a while it was really iffy. I did get a place - a great place - at the eleventh hour. I started my new job March 2 and moved in the night before. It's been a very steep learning curve with early mornings and long hours, necessitating early nights and less time online.

If you want to read about my pastry apprenticeship adventures, you can to so at my Wandering Coyote site. I just posted a couple of pictures of my humble creations there. I might start a new blog just to write about my apprenticeship journey, but I'm not sure I can handle a third blog, especially after I've neglected this on so long. We'll see.

Monday, February 13, 2006

Cantonese Fish & Vegetable Soup

Well, I'm off on another cliff jumping adventure starting tomorrow, so I won't be posting here for a while. I'm moving to Victoria, BC, on Saturday and will hopefully find work there soon after. Actually, I'm looking for a pastry apprenticeship, so I have lots of pavement pounding ahead of me, and lots of talking myself up - both things I dread but both are necessary if I'm ever going to get anywhere. You can read about my adventures on my Wandering Coyote site.

This recipe comes from one of my Moosewood cookbooks. I've made this soup quite a bit and it's very flavourful and easy to make. Cod filets are best because they retain their shape, but if you can't get them or they're too expensive for you, halibut or another firm-fleshed white fish will work just as well. I know it's a little late for Chinese New Year, but you don't need a special occasion to make this.

Cantonese Fish & Vegetable Soup

5 dried shiitake mushrooms, soaked in 1 1/2 cups boiling water
1 large onion, thinly sliced
3 cloves of garlic, minced or pressed (or use more or less to your taste - the more the merrier as far as I'm concerned)
1 tbsp freshly grated gingerroot
2 tbsp veg. oil
1 large carrot, julienned
4 cups water
1 1/2 lbs cod filets, cut into bite-sized chunks
1/4 cup soy sauce
1 tbsp dark sesame oil
3 tbsp cornstarch dissolved in 3tbsp water
1 red pepper, diced

1. Soften the mushrooms in the boiling water; discard stems & slice the mushroom caps. Reserve the liquid.
2. In soup pot or dutch oven, saute onions, garlic, carrots, and ginger until soft & fragrant. Add the four cups of water, mushrooms & soaking liquid. Bring to boil. Add fish.
3. In a small bowl, combine the soy sauce, sesame oil, and dissolved cornstarch. Add to the broth with the diced pepper. Simmer until thickened and serve.

Enjoy!

Tuesday, January 31, 2006

Chicken Soup

So I had to eat something today other than the four Timbits I pilfered from the accountant's desk this morning. I'm still feeling ill, so I decided to make myself some soup. I did this completely from scratch. I had a couple of bone-in, skin-on chicken breasts thawed out and decided to make a quick stock with them. Here's what I did.

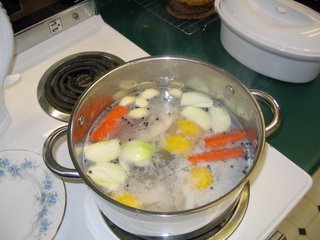
I put the chicken breasts in a dutch oven and covered them with water. I added salt, peppercorns, five cloves of garlic, one quaretered onion, a carrot cut in chunks, and a quartered lemon. Yes! I admit it! I was in the mood for lemon! Again! I covered the pot and brought it to a boil, and then let it simmer for about an hour. The chicken totally cooked by then. Here's what the happy mixture looked like, bubbling away on my stove:


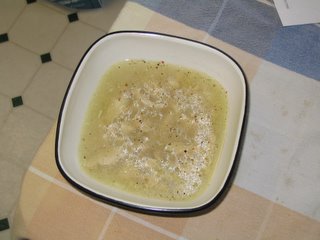
It's important at this stage to adjust your seasonings. I found I had to add about a teaspoon of sugar to cut the sourness of the lemon, and I had to add a bit more salt. But after an hour, the stock tasted pretty good. I took out the chicken breasts and strained the stock through a fine sieve. I cut the chicken meat from the bone and added it back to the stock. I also kept the garlic cloves and cut them up for the broth; I love how mellow garlic becomes once cooked gently like this. I brought it all to a boil once more and threw in about 1/4 cup of parboiled rice (as a rule I don't use parboiled, but I had some kicking around from my work's kitchen and it has less starch in it so it worked well). I added more garlic, freshly pressed, and after about 20 minutes, I had soup.

Usually, when making stock, I simmer the bones and aromatics for the better part of the day. This was a super-quick version that turned out well. All I needed was something quick and soothing on a wintry, yucky day, and this hit the spot. I'm sure over the next couple of days the flavours will meld a bit more.

You cannot beat homemade soup. I rarely eat anything canned these days because the sodium content is way too high for my palate. And it doesn't take forever or an advanced degree. It just takes a little imagination and a little patience.

FYI, here is another fabulous chicken soup recipe, though a little heavier and probably not suitable for someone with the flu.

Happy Blogiversary

ReTorte is officially one year old.

I am currently sick, both physically and in the heart, so I'm not going to post a recipe or anything to mark this event because I can barely tolerate the sight of food right now. I will give a brief speech instead.

Thank you to all my regular readers - for your comments, your insights, your stories, and your recipes. You have made ReTorte the fun experience it has been for me over the last 12 months. I hope to update more regularly and use more of my own photos in the future, because sharing what I do in my own kitchen through word and picture is a great joy for me.

Food, cooking, and baking are integral to my journey through life and are a huge part of the fabric of my life. Food is meant to be shared, and blogging allows me to share both the journey and the food with you. And I guarantee you, there will be more, and enough for everyone.

Friday, January 27, 2006

Apple Crisp Cheesecake

Time for another cheesecake recipe. I am a cheesecake freak, and in all honesty, it's really one of the easiest desserts to make. You just have to follow a few guidelines, which I posted previously here. This recipe is spectacular, I must say. It's great as a fall dessert, for obvious reasons, but it's great all year round. I find the best results are with Granny Smiths because of their tartness and they keep their shape when baked, but Golden Delicious also work very well.

Apple Crisp Cheesecake

Crust:
2 cups graham cracker crumbs
1 cup quick oats
1/3 cup packed brown sugar
2/3 cup butter, melted

- combine these ingredients and press into a 10" springform pan, building the crust 1 1/2" up the sides of the pan. Chill.

Topping:
1/4 cup quick oats
1/4 cup packed brown sugar
1/4 cup all purpose flour
1 tsp cinnamon
2 tbsp butter

- combine in a small bowl until crumbly and set aside

Filling:
3 packages (250g each) cream cheese (light would probably work but DO NOT use fat free), at room temperature
1 cup packed brown sugar
3/4 cup sour cream (again, light would probably work but DO NOT use fat free)
4 eggs
1 3/4 tsp cinnamon
1/2 tsp nutmeg
2 small apples, sliced and peeled

- beat cream cheese, brown sugar, and sour cream in a large bowl on medium speed until well creamed. Add the eggs, one at a time, beating well after each. Ad spices and combine. Pour into crust. Spread apples over filling. Sprinkle on the topping.
- bake at 325F for 65 - 70 minutes, or until soft set in the centre. Immediately run a knife along the edge of the cake to loosen it from the pan, then cool completely on a wire rack. Chill overnight, or at least for a few hours.

See? Easy and spectacular. Serve with a caramel or butterscotch sauce. This cake also freezes well, if you want to make it in advance, and it should yield 16 servings. Enjoy!

Saturday, January 21, 2006

Tania's Tag: 10 Things You Didn't Know About Me

Tania over at The Candied Quince tagged me for this meme. I feel a little challenged by it, but here goes nothing. I'm going to keep with a food theme, here.

1. Foods I cannot stand, and in fact, make me gag: black licorice, peas, offal, squash (but love spaghetti squash), capers, roe, beef cheek.
2. My first kitchen job was as a dishwasher/server at the University of Victoria Housing, Food, and Conference Services. The pot scrubbing shift I did once a week for a year was to date the highest paying job I've ever had.
3. In the past 10 years, I have eaten at McDonald's a grand total of two whole times.
4. I won't touch fat free yogurt with a 10-foot pole. The texture is just gross.
5. I love to put engevita yeast on my popcorn. I got onto this at UVic, where at their theatre, they had a shaker of it at the concession stand.
6. I won two prizes for cake decoration when I was in elementary school. One was at Rossland's fall fair, where I submitted a cake in the shape of a cat that my mom help me make from a picture in her Betty Crocker cookbook. The other was for a fundraiser that my Brownie troup participated in. The cake was a winter theme with white icing, and I made snowmen out of marshmallows, toothpicks, and food colouring.
7. I have abnormally low cholesterol, so I don't skimp on eggs or butter or full fat sour cream.
8. I have a large cup of homemade cocoa every morning before breakfast, the way many people have a large cup of coffee before they do anything in the morning.
9. My first attempt at breadbaking was a crack at English muffins, supervised by my mother. They were a total disaster, but hey, I was 12.
10. My favourite herb to cook with is cilantro.

That was kinda fun! Thanks Tania, and I don't want to tag anyone in particular, but if one of my readers wants to take up the baton, go right ahead. Just let me know.

Tuesday, January 17, 2006

Bread Baking Tutorial

I made so much bread in school it wasn't even funny. I got extremely sick of it, yet the good thing about making so much of it so often (we made 9 batches of croissant dough daily, a dozen loaves of bread daily, baguettes and epis almost daily, and several dozen buns daily - and I'm sure I'm missing something! Oh yeah, a dozen large cinnamon buns made from brioche dough daily) is that whipping up a batch of bread for my single self is no big deal at all. It's easier for me than tromping off to the store in the snow and cold. That, and I find making bread, in small quantity and by hand, quite a theraputic and satisfying task. I'm tactile; I like the feel of kneading dough by hand.

The school recipes for bread used a starter we made from a potato and an onion, a bottle of beer, and flour and water. I haven't made my own starter because I'm moving soon and don't want to go to the trouble. That, and starter, once you get it going, can be rather like a pet: it needs regular food, water, and TLC. Only it ain't cuddly and it doesn't purr.

Bread involves very simple ingredients: water, flour, salt, sugar, yeast. Sometimes you can use milk instead of water, which adds flavour and nutritional value. Salt is always necessary in breadmaking because not only does it add flavour, but it inhibits the yeast growth so your bread doesn't go crazy in the proofing (i.e. rising stage). Sugar is also necessary, because it feeds the yeast; some recipes don't require it, but follow the recipe. Other sweeteners can be used, too, like honey or molasses. All purpose flour is just fine, but if you can get yourself some good bread flour, you'll get an even better result because there's a higher gluten content in bread flour, and gluten is what makes your dough elastic and your bread rise higher.

Here is a recipe I've used that has given me good results. It's from the Fleishmann's Best Ever Breads recipe book that my mom gave me a few years ago, when she taught me how to make bread for the first time. For more tips and details, this is a great site.

Basic White Bread (yield = 2 loaves)

5 - 5 1/2 cups white flour
3 tbsp sugar
2 packages quick yeast (8g each, or 1 package = 2 1/4 tsp)
1 3/4 tsp salt
1 1/2 cups water
1/2 cup milk
1 - 2 tbsp butter or margarine

Combine the dry ingredients in a large bowl. Heat the water and milk and 1 tbsp of the butter to very warm. Gradually add it to the flour mixture to form a soft dough. You don't want it to be too sticky, nor do you want it to be too stiff. Depending on the humidity of your surroundings, you may need to add liquid (or reduce the flour) or add some flour. Sometimes you won't need the full five cups of flour, sometimes you might need the full 5 1/2. That's part of breadmaking and it may never be the same way twice.

Now, I have a Kitchen Aid mixer and I do this first part, and some of the kneading, in it. I don't want to overwork the motor, even though it's got high wattage, so after the ingredients are combined, I develop the dough for a while on a higher speed, then finish it off by hand. If you don't have the luxury of a stand mixer, kneading the dough by hand until it's smooth and elastic might take you 8 or so minutes.

Once the dough is developed, let it rest a few minutes while you clean up, then shape it or put it in a loaf pan and allow it to rise. I do this in the oven with the light turned on and a pan of boiling water in the rack below. I turn the oven on to warm for a few minutes, then turn it off, leaving the light on. Also, brush some melted butter over the exposed parts of the dough to keep it from drying out. Once the dough is doubled in size, preheat your oven (removing the dough if you're rising it in there!) to 400F. High heat gives your bread the extra bit of push from the yeast before the yeast completely dies off. You can score your loaf if you wish, with a sharp knife or razor blade. Put your bread in the oven with a pan of boiling water and bake until golden brown and it sounds hollow when tapped on the bottom.

This is an excellent site that gives detailed instructions for the steps above.

Commercial bread ovens like the one I used in school have a steam injection function. Steam helps give the crust crunch and shine, and helps the dough retain its moisture. You won't get as much from the pan of water in the oven, but it's worth the extra bit of effort, in my opinion.

There are millions of bread recipes out there. Let me know how this one works out, or if you have any others you've had good results with that you'd like to share.

Sunday, January 15, 2006

Lemon Delicious


Lemon Delicious
Originally uploaded by wanderingcoyote.

Sorry for the unexciting photo...

If you haven't discovered by now that I'm a fan of using citrus in my desserts, I'm sure that'll come across quite clearly in little time. It's just something I'm drawn to because the flavours are so compelling for me. And the possibilities seem endless because citrus is so versatile.

I made this recipe last night. I was going to take the grapefruit sorbet to the dinner I was invited to, but I wanted something warm instead. My mom made a version of this but I don't have the recipe. After a brief search through my rather large cookbook collection, I found this recipe in Complete Cook by Le Cordon Bleu. If you have a bit of money to invest (I paid $45 for this a few years ago) this is actully a pretty good cookbook that covers the basics of French cooking and patisserie with very accessible recipes, ingredients, and methods. I used it as a reference in school quite a bit, since I wasn't fan of the texts we had.

This recipe can be served warm or cold. It has a light souffle-like layer on the top and a lemon sauce on the bottom. It serves four.

1/4 cup unsalted butter, at room temperature
1/3 cup sugar
zest of one lemon
2 large eggs, separated
2 tbsp all purpose flour
3 tbsp lemon juice
1 cup milk
icing sugar for dusting, if desired

- 350F oven, greased 8" square pan or small casserole

1. Beat the butter to soften it, using and electric mixer. Beat in the sugar until light and creamy, then add the zest and egg yolks until well blended. Gently fold in the flour, followed by the lemon juice.
2. In a small saucepan, heat the milk until tepid, then fold it into the lemon mixture. Make sure the milk is barely warm - if it's too hot the flour and yolks may cook and the mixture will be too heavy.
3. In a large, clean bowl, beat the egg whites with a pinch of salt until soft peaks form. Gently fold this into the lemon mixture, careful to not lose any volume.
4. Bake in a water bath for 30 - 35 minutes, or until the top is pale golden and firm to the light touch.

I added a couple more tablespoons of lemon juice because I didn't think it was lemony enough originally. Taste it before you bake it to make sure you think the flavour is right.

Grapefruit Sorbet


Grapefruit Sorbet 1
Originally uploaded by wanderingcoyote.

Yep, yet another citrus recipe!

I was in the mood for some sort of dessert that used ingredients I had on had and that was fat free. Although this recipe contains lots of sugar, I felt better about eating it than I would have some ice cream. But now I wonder if grapefruit ice cream might be the next thing I try, because grapefruit is one of my favourite fruits (right up there with fresh pineapple).

I have a Cuisinart ice cream maker, which I got a few years back on sale at Sears for about $80. It's probably the best $80 I've ever spent because I get a lot of joy from this little machine. It's easy to use, quick, and it incorporates the perfect amount of air into the ice cream or whatever to get a light consistency. And I feel better eating homemade ice cream than store bought stuff, because the commercial ones have all kinds of chemicals and fillers in them that are not good for you.

My basic ice cream recipe is here. This sorbet recipe came from the recipe book that came with the ice cream maker. I added the vodka as my own touch.

2 cups sugar
2 cups water
1 1/2 cups freshly squeezed ruby red grapefruit
zest of 1 grapefruit
1 oz vodka (I used Smirnoff's orange flavoured one)

1. The day before you want your sorbet, combine the sugar and water in a saucepan and bring it to the boil. Let it boil for a couple of minutes, or until the sugar is completely dissolved and you have a perfectly clear syrup (we call this simple syrup in the pastry world and we use it for all kinds of things). Remove from heat and let it cool. Put it in the fridge overnight so it's completely cold for using the next day. This is crucial if you're using this particular ice cream maker because the drum has a freezing liquid in it that will melt if you put warm liquid into it.
2. Zest the grapefruit and sqeeze the juice into the sugar syrup and mix well to combine.
3. Throw into your ice cream maker. Add the vodka near the end when the sorbet is almost done in the machine - alcohol affects freezing. In the Cuisinart machine, the whole process took just under half an hour.
4. Scoop into a container and freeze until firm.

We made sorbet in school, but we were taught to use a densitometer or sugar thermometer to measure the density of the sugar syrup. I cannot remember what it had to be, and the chef instructor I had in the advanced kitchen had to admit that this device is hard to find these days. But this method of using a simple syrup of 50/50 worked fine and it froze well.

This is more summery, but if you need a fat free sugar fix, it works in January just as well as it would in July. Enjoy!

Saturday, January 14, 2006

Steak & Kidney Pie


Steak & Kidney Pie
Originally uploaded by wanderingcoyote.

To be honest with you, I'm only posting this because the pie looks so nice. I detest steak and kidney pie, and I didn't actually make the filling for this myself - someone associated with my work did. This has been my dad's traditional birthday dinner for as long as I can remember, and none of us ate it as kids because we just thought it was beyond gross. Currently, my brother will partake in a piece now, but my other brother and I cannot. When I served this pie to my dad, the smell nearly knocked me over.

When I was growing up and before my parents split up, my mom used to make this for my dad every year. She got a piece of steak from the butcher and a fresh kidney. One of my main memories from around Christmas time is going into the kitchen and seeing the kidney soaking away in the dishpan, oozing red fluids. It was enough to make me gag.

The pastry I made for this recipe came from the shortening box - nothing fancy at all. I glazed it with an egg wash, which gives it a golden brown colour upon baking.

LinkWithin

Blog Widget by LinkWithin