A while ago, my blog friend Megan wrote a post extolling the wonders of Kashi bars, so I just had so suss myself some out. My local overpriced grocery store kept two varieties in stock, but they are $4.99/box. When I was in the States last week, I found a huge variety of Kashi bars for only $2.98/box. With the exchange rate, that came to $3. 58/box. I got myself two whole boxes.
There were so many choices of Kashi bars I was a little light-headed... But I settled on the Cherry Dark Chocolate chewy granola bar and the Dark Chocolate Coconut. The latter is touted on the box as "new" and it must be because I cannot find it on the Kashi web site.
Neither bar contains high fructose corn syrup, which is excellent, and they are whole grain all the way. The cherry ones could have had more cherries in them, but otherwise were quite yummy. The chocolate coconut ones were very chocolatey and rather dangerous! I wish both bars were larger in size; there isn't a lot to them when you take them out of the box.
All in all, quite a nice little snack to have on hand when the old sweet tooth rears it's ugly head. I'd definitely buy these again.
Thanks for the recommend, Megan!
Friday, January 30, 2009
Thursday, January 29, 2009
Whitewater Granola Bars
You might recall that I helped my SIL with some catering a couple of weeks ago. One of the things she made for the concession she and her crew ran at the curling rink that weekend was this granola bar recipe, which comes from the Whitewater Cooks cookbook. Whitewater is the ski resort near Nelson, BC which is the city I go to every so often with my dad to shop and have lunch at, so this is a local book and it's in all the local stores. Almost everyone in my family has a copy - except me; I can borrow it whenever I feel the need. And these granola bars are absolutely fantastic! They are sweet and filling and perfect for hiking, picnics, bagged lunches - you name it!
Whitewater Granola Bars
1 cup butter
1 1/2 cups peanut butter
1 1/2 tbsp vanilla
2 cups brown sugar
1 cup corn syrup
6 cups oats
1 cup coconut, toasted
1 cup sunflower seeds, toasted
1 cup sesame seeds, toasted
2 cups chocolate chips (or 1 cup raisins and 1 cup chocolate chips)
In a skillet, toast coconut, and seeds and set aside to cool.
In a large mixing bowl, cream together butter, peanut butter, vanilla, and brown sugar. Add corn syrup and t hen mix in remaining ingredients. Press into a greased 12x18" (half sheet) cookie sheet. Bake @ 350F for approximately 20 minutes or until golden brown. Let cool slightly and cut while still warm.
The note at the bottom of the recipe states that you can substitute toasted almonds and 1 tsp almond extract for the sunflower seeds and vanilla if you want to switch it up a little.
Enjoy!
Wednesday, January 28, 2009
101 Uses for a Roasted Chicken #12: Chicken & Mushroom Lasagne
OK, so it's been a while since I wrote a post in this series - and I've had two roasters in the freezer for like ages! Ah well. Last Friday I had the opportunity to go cross-border shopping, and I found that ricotta cheese and oven ready lasagne noodles were about half the price they are up here! So, of course I grabbed what I wanted, took out a chicken to thaw on Saturday, roasted the sucker, and made the lasagne on Sunday.
Check out this post for the ingredients and method.
I used about 3 cups of mushrooms in this version, and I used low fat ricotta cheese instead of cottage cheese. The tub I got in the States was way bigger than the tubs I usually get here, 907grams as opposed to the usual 500g.
This was a bit of a drier lasagne, but it was still delish!
Labels:
101 uses for a roasted chicken,
lasagne,
pasta
Tuesday, January 27, 2009
News!
I got some exciting foodie-related news on Friday that I was waiting until it was all confirmed to share with you. Now, everything seems settled enough to tell you all that...
I am going to be a food columnist for a magazine published out of Miramichi, New Brunswick called Bread 'n Molasses!
This opportunity came to me via the miracle of blogging. Kellie Underhill has been reading my Wandering Coyote blog and this one for a while, and she's also the editor of Bread 'n Molasses. On Friday, she contacted me and asked if I'd be willing to contribute a column with a recipe for the magazine because they were in need of someone to take it over.
So now I can officially call myself a food columnist! I am totally stoked!
Pumpkin Bran Muffins
Here is another installment of products made by yours truly at her little baking gig. This time, Pumpkin Bran Muffins, commercial style! These are a fantastic muffin, actually, and the texture is beautiful. Pumpkin tends to do that, and the flavour of pumpkin works well with the bran and, unsurprisingly, the molasses. Again, this makes about 36-42 large, bakery-sized muffins, but the recipe can be divided by four for the home baker.
Pumpkin Bran Muffins
Mix together well:
4 cups oil
4 cups sugar
12 eggs
1 1/2 cups molasses
2 tbsp cinnamon
8 cups bran
1 tin (28oz) pumpkin (NOT pumpkin pie filling)
Add:
7 cups water
4 tsp baking soda
2 tsp baking powder
8 cups flour
Scoop & bake @ 350F. The batter will be both sloppy and a bit lumpy, but don't worry - it all works out in the end.
These muffins fill the kitchen with such a wonderful aroma!
Enjoy!
Labels:
baking for a crowd,
muffins,
pumpkin,
work products
Monday, January 26, 2009
Magazine Monday #25: Mexican Chocolate Pudding
I always look forward to getting Gourmet in the mail each month. I have let go of Bon Appetit becuase I found I was not using the recipes to make a subscription worthwhile, but Gourmet keeps on delivering for me.
This week's Magazine Monday contribution comes from the latest issue of Gourmet, and it's simplicity caught my eye. The recipe for Mexican Chocolate Pudding can be found here.
I didn't have any almond milk on hand, so I substituted 1% spiked with a few drops of almond extract. This was a really easy recipe to put together and it tasted divine. The flavour combination of cinnamon, chocolate, almond, and vanilla was lusciously complex, and the pudding was silky on the tongue. Definitely a keeper!
Labels:
chocolate,
Magazine Mondays,
Mexican,
pudding
Thursday, January 22, 2009
Sour Cream Posy Rolls
I made these last weekend for a family dinner. The recipe comes from my trusty Fleischmann's Best Ever Breads recipe book.
Sour Cream Posy Rolls (adapted by moi)
2 1/2 cups flour
2 tbsp sugar
1 package/2 1/4 tsp instant yeast
1/2 tsp salt
1/2 cup sour cream
1/3 cup water
1/4 cup butter or margarine, melted and cooled
1 egg
Basic bread directions are here. Once the dough is complete, divide it into 12 equal portions and roll each portion into a ball. Put on a greased or parchment-lined cookie sheet and allow to rise, covered, until doubled in size. When they are risen, heat the oven to 400F. Take a pair of kitchen shears or scissors make 6 or so 3/4" deep snips on the edges of the rolls. Beat 1 egg well and brush over the buns, then sprinkle with seeds. Bake about 15 minutes or until done.
Wednesday, January 21, 2009
"New" Banana Bread
For Christmas this year, my SIL's mom put together a cookbook filled with her favourite recipes to give out to friends and family. Entitled "Tried and True", it contains C's repertoire of long-used, successful recipes, many of them used in the catering business she runs with my SIL on top of her busy day job. The cover art was done by a relative.
Last weekend, Shan & C had a huge catering job involving the mixed curling bonspiel in Castlegar, a weekend long event in which they provided breakfast, run the concession, and do the banquet on Sunday. I helped out by making the banana bread served at the concession. The recipe comes from C's Tried and True cookbook.
New Banana Bread (this is the second of two banana bread recipes in the book...)
1 cup white sugar
1/2 cup butter
2 eggs
1 tsp vanilla
1 cup mashed banana (about two)
1/2 cup sour cream
1/2 cup walnuts (optional)
1 1/2 cup flour
1 tsp baking soda
1/2 tsp salt
Beat sugar and butter. Add eggs. Beat well. Add vanilla, sour cream, and bananas. Beat well. Add flour, soda, & salt. Add walnuts. Bake at 350F for about 1 hour 10 minutes.
You might recall from this post, that I'm not a huge fan of baking with bananas in it. I have tried this loaf, and it has a beautiful texture. Still, it's banana bread, so I can't say very much else about it that's totally positive. If you love banana bread, this is, by all accounts other than mine, a divine recipe!
Enjoy!
Tuesday, January 20, 2009
Restaurant Review: The Element
Castlegar isn't a dining mecca around here by any stretch of the imagination, though Chopsticks is very good and always bustling. When I was a kid, there was a steakhouse we would go to occasionally and there was a great pizza place at one time, but that was about it.
Downtown Castlegar is in need of desperate revitalization, and someone's grand idea of making that area the place to be was to open a big club called The Element. It's been a bit controversial because of hooligans and drunken twats creating public disturbances and blocking traffic. The cops are there regularly, from what I hear. In order to alleviate some of the ruckus, the Element decided to employ a device called The Mosquito, which my blogfriend and Castlegar resident Mike blogged about here.
Amidst all of this I was surprised to hear from various people that the Element does a really good lunch. Mosquito aside, my SIL took me there the other day.
The menu is large and varied, but contains the usual pub suspects. After a long deliberation, Shan settled on The Frog (grilled chicken & brie baked on French bread with red pepper aoli and Spanish onion relish). Um, I'm not sure exactly why it's called "The Frog" but it was apparently pretty tasty. I vacillated between The Frog, the Genovese Panini (grilled chicken, artichokes, cream cheese pesto, Swiss, Spanish onions, bell peppers & tomatoes on Ciabatta), and the Clubhouse, eventually choosing the Clubhouse - my standby favourite. This one came with smoked chicken and a BBQ mayo and was served on foccacia, and it was pretty yummy. Shan and I each had half fries and half salad as sides. The fries were great. Full menu here.
My only complaint is that the service was really, really slow. The waitress did apologize for it, stating that a large group had ordered right before us, but it was still a long a wait for our food.
Would I go back again? Yes. Their dinner menu looks very good!
Monday, January 19, 2009
Delurking Week!
Magazine Monday #24: Fish in Tomato Sauce
In flipping through my recipe binder looking for something completely unrelated to dinner or fish or anything like that, I came upon this recipe from the April 2007 issue of Canadian Living, accompanying an article about sustainable fishing. Apparently, tilapia is sustainably raised and harvested, and is one of six recommended eco-friendly seafood choices. The recipe was simple and involved things I more or less had on hand. It's a shame my local overpriced grocery store didn't have any tilapia in stock when I went to get some yesterday afternoon. I had to use basa instead.
I have a difficult relationship with basa, since it was something we served with way too much regularity at the retreat centre worked at a few years back. When I quit that job, I thought that I could happily live without any more basa in my life. Alas, it was the only decent substitution I could afford when it came to making this dish. In the end, it worked out very well and I was happy with how it turned out.
Tilapia and Tomato Sauce.
This was a simple, quick, and very tasty recipe that I'll definitely be keeping in my binder!
Labels:
greening the kitchen,
Magazine Mondays,
seafood,
veggies
Sunday, January 18, 2009
King Size Blueberry Muffins
Oh, how I am loving my new king size muffin tin! Today I made these beauties.
Blueberry Oatmeal Muffins
2 cups flour
1 cup oatmeal
1 cup packed brown sugar
1 tbsp lemon zest
1 1/2 tsp baking powder
1 tsp baking soda
1/2 tsp salt
1 1/4 cups buttermilk
1 egg
1/3 cup butter, melted & cooled
2 tsp vanilla
1 1/2 cups blueberries, fresh or frozen
Combine dry ingredients in large bowl. Combine wet ingredients in a small bowl. Make a well in the centre of the dry ingredients and add the wet until just combined. Fold in the berries. Scoop & bake @ 350F for 25 - 30 minutes or until done.
Enjoy!
Friday, January 16, 2009
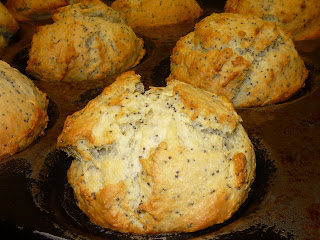
Lemon Poppy Seed Muffins
Another installment of my work products, this time lemon poppy seed muffins - commercial style. This recipe makes 36 commercial-sized muffins. I was skeptical about the lemon pie filling, but in the end the muffins were super moist and cakey and delish! I'm not sure what you'd use in the home kitchen, however; the pie filling we use comes from our supplier in a big bucket that we keep in the fridge. I might have to experiment with some pie fillings at home one of these days.
Lemon Poppyseed Muffins
12 cups flour
6 tbsp baking powder
3 tsp salt
12 eggs
5 cups lemon pie filling
1 1/2 cups poppy seeds
4 cups packed brown sugar
2 cups vegetable oil
6 tsp vanilla
Combine dry ingredients, excluding the sugar, in a big bowl. Combine wet ingredients and sugar in mixer, or whisk together by hand. Make a well in the dry ingredients and add the wet. Combine well. Scoop & bake @ 350F.
The batter is very, very thick and gets hard to mix, necessitating the use of hands (oh, how we would love one of those big commercial mixers! Alas, not in the budget...). They fluff up really nicely, though, and have a great texture.
Enjoy!
Labels:
baking for a crowd,
citrus,
lemon,
muffins,
work products
Thursday, January 15, 2009
Scrambled Egg Quesadilla
Why was I craving eggs the other day? Who knows. I actually wanted to make Huevos Rancheros but when I researched a few recipes, it seemed too complicated to do in a short period of time and I didn't want to have any more beans that what I'd been having recently. So, I decided to make a scrambled egg quesadilla using ingredients I had on hand. Here's what I did:
I fried up two slices of bacon and a bit of red onion. I scrambled two eggs and added a chopped sundried tomato to the egg mixture. I cooked the eggs as you would an omelette, but didn't flip it in half. I wanted the egg to come out the same size approximately as my tortillas. It was a tad tricky to flip, but worked out in the end. I slid the eggs onto one tortilla, then put the tortilla in the frying pan. I sprinkled on top of the eggs the bacon & onion mixture, which I totally forgot to add Mexican seasonings to! Ah well! I sprinkled grated cheddar on top of the whole thing and put on a second tortilla (whole wheat, no less!).
I fried the quesadilla on both sides until hot through and the cheese had melted, and I served it with salsa & sour cream.
It was pretty good, actually, and hit the spot with my egg craving! Next time I'll have to remember to add the seasonings, though I'm not complaining about this at all. This was kinda like an omelette between two tortillas instead.
Labels:
breakfast,
cooking for one,
eggs,
Mexican,
quick and easy meals
Wednesday, January 14, 2009
Going Green: Food Edition
Over at my regular blog, I did a post at the end of December about some ways I strove to be greener during the year. The Feb. 2009 issue of Bon Appetit has a pretty good article in it entitled "50 Ways to Eat Green." The title is pretty self-explanatory: here are 50 ways to eat greenly.
Upon reading the article, I was pleased to see that I already do several of these things. For example:
#1: Eat more chocolate - fair trade & organic that is. I have been endeavouring to purchase more high-quality, fair trade, and organic chocolate for a while. I don't always succeed, but I do buy Green & Black's more than any other brand nowadays.
#3: Fill up your freezer. Check!
#5: Make a bison burger. I have started buying more bison when I feel like having red meat.
#9: Cook more often - to avoid packaging and preservatives. Yep, do this all the time! It's also way cheaper!
#10: Roast a whole chicken. As I mentioned in the other post, I have loved doing this and plan on continuing.
There were a lot of great ideas in this article that would be really easy for me to incorporate:
#4: Don't Read The Omnivore's Dilemma, but rather In Defense of Food instead. The latter apparently encapsulates Michael Pollan's philosophy nicely. The article recommends checking it out of the library. I can do that.
#21: Make your own cereal. Apart from oatmeal, which I regularly have for breakfast, I plan on making that wicked granola a lot more because it's so delicious and easy!
#25: Veg out. I.e. eat more vegetarian/plant-based foods, because they require less energy and resources to produce. I plan on eating more vegetarian dishes this year.
#39: Eat More Tofu. Well, I can tolerate tofu, but my main issue with it is that it's actually very processed. But, according to the article, it's actually way greener than meat, and uses way less water to produce. Apparently, if you replace one pound of beef with one pound of tofu each month, you save 20, 000 gallons of water each year. Tofu Tuesdays anyone?
One thing I do that isn't in the article is that I use a non-aerosol vegetable oil sprayer thingy, very similar to this one (mine isn't stainless steel, it's plastic, but it does the same thing). I hate Pam and it's clones. It's what makes your cookware/bakeware cruddy looking with brown spots that never come off. They also use propellants like butane and other crap I don't want to put into my body. With the pump/sprayer, I can use whatever oil I want to, and with a little muscle power, I get the exact same results as I would with Pam. The device cost me about $8 and I have saved a lot of money by not buying as much oil, too.
What about you guys? What do you do that is green, or is it even a consideration for you? Any ideas you want to share? Let me know!
Tuesday, January 13, 2009
Banana Muffins Even I'll Eat
I'm really enjoying my copy of Baked: New Frontiers in Baking. This banana muffin recipe caught my eye when I started going through the book, and it jogged my memory about a post I saw last month over at Peabody's. These muffins were suddenly at the top of my "must make" list.
Now, I usually don't like baking with bananas in it, though I do like an actual banana itself. I'm not sure why, but banana-flavoured things just don't do it for me. I decided I'd make these muffins - in my new king-sized muffin pan - and send the product over to my brother and SIL's place, since they love banana anything. Well...I can tell you they're not getting all the muffins! I think I have been converted.
Banana Espresso Chocolate Chip Muffins, page 32 of Baked: New Frontiers in Baking
1 1/2 cups mashed, very ripe bananas
1/2 cup sugar
1/4 cup firmly packed brown sugar
1/2 cup butter, melted & cooled
1/4 cup milk
1 large egg
1 1/2 cups flour
1 tsp instant espresso powder
1 1/2 tsp baking soda
1 tsp salt
1 cup semisweet chocolate chips
Preheat oven to 350F. Prepare a 12-cup muffin pan however you like to prepare a 12-cup muffin pan.
In a medium bowl, combine bananas, sugars, butter, milk, and egg.
In another medium bowl, whisk together the dry ingredients and make well in the centre. Add the wet ingredients to the well and stir to combine. Fold in the chocolate chips.
Fill muffin cups and bake about 20 - 25 minutes. Move the pan to a cooling rack and let cool for 15 minutes, then remove the muffins from the pan and cool them on the rack completely. Yeild about 12 muffins.
In my case, I got 6 king-sized muffins and had to bake them for about half an hour, but the results were quite spectacular! And I am totally digging my new muffin tin, too!
Labels:
baking,
chocolate,
fruit,
muffins,
quick breads
Monday, January 12, 2009
Magazine Monday #23: Crispy Black Bean Tacos with Feta & Cabbage Slaw
One of my foodie New Year's resolutions was to eat more vegetarian fare, and the Feb. 2009 issue of Bon Appetit had this recipe for black bean tacos that caught my eye. I made them last night and they were pretty good! I didn't use corn tortillas, however, because I don't like them, but the wheat ones worked fine. I also don't like hot sauce, so I just used some of my regular salsa from this post. All in all, a good meal; the feta was an interesting addition and I really liked the fresh slaw on top of the taco. This was a cheap and easy meal to put together and I think I'll keep the recipe around for the future!
The recipe Crispy Black Bean Tacos with Feta and Cabbage Slaw can be found here.
Labels:
beans and legumes,
cabbage,
Magazine Mondays,
Mexican,
vegetarian,
veggies
Friday, January 09, 2009
Easy Homemade Granola
My mom used to make granola for us kids when we were young, a fact I never appreciated until I was much older. She had a good recipe that she passed on to my brother, who passed it on to me at some point, and then I lost it. When my copy of Baked: New Frontiers in Baking arrived, I was happy to see in its chapter on breakfast a recipe for homemade granola that looked really good. Yesterday I went out and bought the ingredients for it and made a batch.
Easy Homemade Granola, page 47 of Baked: New Frontiers in Baking
2 cups of rolled oats (I assumed it meant whole oats, so that's what I used)
1 tsp cinnamon
1 tsp salt
3 tbsp + 1 tsp vegetable oil
1/4 cup honey
1/4 cup firmly packed brown sugar
1 tsp vanilla
1/3 cup whole almonds
1/3 cup whole hazelnuts
1/3 cup golden raisins
1/3 cup dried cherries (I cannot for the life of me find these anywhere around here, so I substituted dried cranberries)
1. Preheat oven to 325F and line a baking sheet with parchment (or a silicone baking mat).
2. In a large bowl, toss together the oats, cinnamon and salt.
3. In a medium bowl, whisk together the honey, oil, vanilla, and sugar until completely combined.
4. Pour the honey mixture over the oat mixture. Use your hands to combine well (or use a spoon, as I did), making sure the oats are completely coated with the honey mixture.
5. Spread evenly onto baking sheet.
6. Bake for 10 minutes, then remove from oven and flip with a spatula. Sprinkle on the almonds. Bake for 5 minutes, then remove from oven, flip, and sprinkle on the hazelnuts. Bake for a further 10 minutes, then remove from the oven.
7. Let cool completely. Sprinkle on raisins and cherries. Break up granola with hands and put into an airtight container. According to the recipe, it'll keep for a week.
This tastes amazing! Almost too amazing - it's almost like candy! In fact, it's almost like apple crumble topping, which of course is the best part of apple crumble. I doubt this will be sticking around these parts for a week!
Thursday, January 08, 2009
Zucchini Fries
I was supposed to make these last night to accompany my burger, but as I was about to cut into my zucchini my roommate gently pointed out that it wasn't actually a zucchini but a cucumber. I hate cucumbers and I was ticked. So, after work today I went to the store and acquired a real zucchini. This recipe is from the same issue of Clean Eating Magazine as the burgers from yesterday.
Zucchini Fries
cooking spray
4 small zucchini, trimmed & cut into "fries"
1/4 tsp sea salt
freshly ground pepper, to taste
1 tbsp olive oil
2 tbsp Parmesan cheese, grated finely
1. Preheat oven to 450F. Line a baking sheet with foil and spray with cooking spray.
2. Toss zucchini with salt & pepper. Coat thoroughly.
3. Arrange zucchini on baking sheet in a single layer and roast, tossing half way through cooking, for 18 - 20 minutes, or until tender and lightly browned. Transfer to plate and sprinkle with cheese.
Easy-peasy! And pretty good, I might add, too. I thought this was a cool new way to do zucchini and I think I'll be making this again! Enjoy!
Wednesday, January 07, 2009
Chicken & Chickpea Burgers
This recipe came from Clean Eating Magazine and it appealed to me right away, though the original recipe calls for ground turkey. I made them tonight and used my new cast iron grill pan.
Chicken & Chickpea Burgers
1 15oz can chickpeas, drained & rinsed
1/2 cup scallions, roughly chopped
1 tsp ground cumin
1 tsp ground black pepper
1/4 tsp salt
2 tbsp Worcestershire sauce
3/4 lb ground chicken breast
cooking spray
1. In a food processor, combine chickpeas, scallions, cumin, pepper, salt & Worcestershire sauce. Pulse until smooth.
2. Transfer to a large mixing bowl and add chicken, mixing by hand until combined.
3. Form into four patties. Heat a non-stick frying pan to medium-high and coat with cooking spray. Cook patties 4 - 6 minutes per side.
4. Serve on a bun with whatever you want. I used some red onion, sauteed mushrooms, lettuce, and some low-fat mayo.
These burgers tasted really great, but they were really mushy and didn't stick together when I went to flip them. They kind of disintegrated when I removed them from the pan. I think they needed some bread crumbs to bind the mixture together and keep them from crumbling. Other than that, I thought this was a pretty good recipe, and adding the chickpeas not only increased the nutritional value of the burger, but if you're on a budget, it also stretches the meat out so you can get more meals out of it - great if you're on a budget like I am.
Labels:
burgers,
chicken,
chickpeas,
quick and easy meals
Tuesday, January 06, 2009
White Bread
After the whole Christmas baking bonanza, you might imagine that I'm a bit baked out, and you'd be right. But sometimes necessity spurs one on to action where otherwise inertia might take hold.
I ran out of bread yesterday, and instead of going to treat myself to a nice and expensive loaf of Terra Bread from my local overpriced grocery store, I got off my butt and baked a loaf of basic white bread. The recipe came from my trusty Complete Cook by le Cordon Bleu. The loaf is pretty big.
White Bread
1 tbsp instant yeast
1 tbsp sugar
4 cups bread flour
1 tsp salt
2 tbsp butter, softened
1 1/2 - 2 cups water
Instructions here.
When it comes to shaping and rising, I just shaped the dough into a ball and let it rise on a sheet of parchment paper. I sprayed the dough with some cooking oil and covered it with plastic wrap. When the dough had risen enough, I picked it up by the corners of the parchment and lowered it into my trusty KitchenAid cast iron pot, which is what I bake my no-knead bread and Kazakh Family Loaf in. The size of loaf meant a much longer than usual baking time, but in the end I got a nice crusty loaf with a good crumb inside.
Monday, January 05, 2009
Magazine Monday #23: Lemon Artichoke Chicken
The Jan/Feb issue of Clean Eating Magazine has quite a few recipes in it that appeal to me, unlike the last issue which I thought was a total bust. This chicken recipe was really good and really easy to make. I halved it since there was only me to feed, and I got two meals from it. I also used regular boneless skinless chicken breasts that I sliced up.
Lemon Artichoke Chicken
1/4 cup whole wheat flour
1/2 tbsp dried oregano
freshly ground pepper, to taste
1/4 tsp (or to taste) salt
1 lb thin chicken cutlets
cooking spray
1/2 tbsp olive oil
1 medium onion, sliced
1 clove garlic, minced
1/4 cup chicken broth
1 14oz can artichokes, drained and chopped into sixths
1/4 cup fresh lemon juice
1 tsp lemon zest
chopped parsley for garnish (optional)
1. In a shallow bowl, thoroughly combine flour, oregano, salt & pepper. Dredge chicken, shaking off excess.
2. Coat a large skillet in spray and heat to medium-high, so the skillet is hot but not smoking. Add the chicken cutlets, in batches if necessary, and cook about 5 minutes on each side, or until done. Transfer to a clean plate and cover with foil to keep them warm.
3. Adjust temperature to medium-low and heat the oil. Cook onion, stirring frequently, until soft & golden. Add garlic and cook for one minute, stirring constantly. Add chicken broth and bring to simmer. Add artichokes, lemon and zest and simmer 2 - 3 minutes until heated through and slightly thickened. Season to taste with salt & pepper.
4. Pour artichoke mixture over chicken and serve.
I served mine with rice and it was a nice meal! Enjoy!
Labels:
chicken,
Magazine Mondays,
quick and easy meals
Friday, January 02, 2009
Gourmet Christmas-Coloured Popcorn!
Before Christmas, I was intrigued by those red & green popcorn kernel trees often found with Christmas gifty stuff, and, lo and behold, I my friend Karen sent me one in her Xmas care package! I promised I'd post pictures of it so she could see what it looked like popped.
Here are the kernels in my new microwave popcorn maker (left), which I purchased especially to pop this popcorn.
And here (right) is the popcorn, popped. As you can see, the colour remained.
It temporarily coloured my tongue a funny colour, but I'm all right with that! I topped the popcorn with butter and a spoonful of engevita yeast.
Thank you, Karen!
Thursday, January 01, 2009
Happy Foodie New Year!
I hope everyone had a great, safe celebration last night. I was in bed at 11:30, but had a nice quiet evening.
2009 should be a great year baking/cooking-wise for me, especially as I was gifted with some new baking pans and I also got a gift certificate to Bear Country Kitchen so I could further outfit myself. I went yesterday and spent the gift, coming home with some cool stuff.
First of all, I mentioned here that I got a new bundt pan, and that it worked out very well the first time I used it. My dad also got me this totally nifty king-size muffin tin, that I have been coveting ever since seeing it on Joanna's blog a while back. I am totally pumped to start muffin-making with it!
I also got a pair of bakers half sheets from my brother and SIL, which come in very handy for all kinds of things.
With my gift certificate, I purchased a cast iron grilling pan and a mini loaf pan. I am looking forward to making burgers and stuff I might normally BBQ in the comfort of my own kitchen, and I am already planning nice desserts that will have totally new presentations made in the mini-loaf pan.
Thanks to a very generous blogging friend of mine, I was able to order a tri of new cookbooks from Amazon this Christmas. These are Baked: New Frontiers in Baking; Hot, Sour Salty, Sweet: A Culinary Journey Through Southeast Asia by the authors that brought us one of my favourite books on my shelf right now, Beyond the Great Wall; and Kylie Kwong's Simple Chinese Cooking.
So, 2009 should be a good year for baking and cooking in this coyote's kitchen!
Happy New Year to all my readers!
Subscribe to:
Posts (Atom)