My mom got this recipe from an old issue of Canadian Living and made it once in a blue moon. It was so good though and I have since made it for dinner parties I've thrown with good friends to ooh and ahh over it. There are a lot of ingredients, but don't be put off.
Baked Rigatoni and Meatballs
2 tbsp olive oil
1 onion, diced
2 cloves garlic, crushed (use as much as you'd like, though)
3 cups sliced mushrooms
1 green pepper, diced
1 1/2 tsp each dried basil and sugar
1 tsp dried oregano
1 tsp salt
3/4 tsp pepper
1 can (28oz) diced tomatoes, or whole tomatoes broken up
2 tbsp tomato paste
3 1/2 cups rigatoni pasta
1 1/3 cups grated mozzarella cheese
1/4 cup grated parmesan cheese
Meatballs:
1 egg, beaten
1/3 cup finely chopped onion
1/4 cup fine breadcrumbs
2 cloves garlic, crushed
3 tbsp parmesan cheese
1 tsp dried oregano
salt & pepper
1 lb lean ground turkey (you can use lean ground beef if you'd like; I prefer the turkey myself)
1. For the meatballs, combine the ingredients until well blended and shape into balls. My mom used to put them in a plastic colander on a plate and microwave them and this worked very well. You can bake them or brown them on the stovetop for 8 - 10 minutes - whatever works. Cook them just before you put them into the sauce, and make sure they're thoroughly done (i.e. no longet pink in the middle).
2. Saute the veggies and spices in the olive oil until softened. Stir in tomatoes and paste and bring to a boil. Reduce heat and simmer for 30 minutes or until slightly thickened. Add meatballs.
3. Cook rigatoni until al dente. Drain and return to the pot; add sauce and meatballs. Transfer to an 8 cup casserole and sprinkle with cheeses.
4. Bake at 400F until cheese is melted and the top is golden.
Bon Appetit!

Saturday, November 26, 2005
Friday, November 18, 2005
Pumpkin Harvest Cheesecake
For my American readers, heading into Thanksgiving, I present to you a fabulous change from the usual pumpkin pie (not that there's anything wrong with it). I made this a while back and it was great.
Pumpkin Harvest Cheesecake
Crust:
3/4 cup chocolate wafer crumbs
1/3 cup finely chopped pecans
3 tbsp butter, melted
- Heat oven to 350F. Combine ingredients and press onto bottom of 9" springform pan. Bake 10 minutes. Let cool.
Filling:
1 1/2 cups pumpkin puree (NOT the pie filling!)
3 eggs
1/2 cup firmly packed brown sugar
1 1/2 tsp cinnamon
1/2 tsp ground ginger and nutmeg
3 packages (250g each) cream cheese, softened
1/2 cup sugar
1 tbsp cornstarch
- Whisk together pumpkin, eggs, brown sugar, and spices. In a separate bowl, using an electric mixer, beat cream cheese, sugar and cornstarch; blend into pumpkin mixture. Pour over crust. Bake 50 - 55 minutes, or until centre is just set.
- Remove from oven and run knife around edge of cake. Cool completely. Refrigerate overnight.
As you can see, cheesecake isn't a complicated feat to take on. Here are a couple of tips, though, to help you not get a huge crack down the centre of your finished product.
1. Do run a knife around the edge of the cheesecake gently as soon as you take it out of the oven. The cake will sink as it cools (expansion and contraction of heated materials, etc.) and if you loosen the edges, they won't tug at the cake as it sinks.
2. Don't overbeat your filling. If you add too much air to it, it'll puff up too much and then sink even more as it cools.
3. Some recipes call for baking the cheesecake in a waterbath. I generally don't do this unless the recipe specifically states it. I have found that the extra moisture in the oven increases the baking time and inhibits the setting of the cake. But the waterbath does insulate the cake and this can help prevent cracking. Like I say, follow the recipe.
4. If you do get a crack, you can cover it by making a simple glaze using sour cream, a bit of sugar, and a bit of whipping cream to loosen it. I would only do that on cheesecakes that are predominantly white, though. In this case, just plate it and add a dollop of whipped cream, sift some cinnamon over top and voila! Enjoy!
Bacon and Cheese Strata
Funny how I'm the breakfast/brunch cook around here, yet this is the meal I have the least imagination for. I purchased a book over the summer to help me out called The Big Book of Breakfast, by Maryana Vollstedt. It has a lot of great recipes in it, and I made this one for a brunch one morning in August.
Bacon and Cheese Strata
4 slices day old white bread, crusts removed
6 slices bacon, cooked and crumbled
6 large eggs
1 1/2 cups whole milk
1/4 tsp salt
freshly ground pepper
2 drops of Tobasco sauce (or to taste)
1/2 cup grated cheddar cheese
3 tbsp chopped parsley
1/2 cups grated Monterey Jack cheese
1/2 red bell pepper, seeded, and cut into rings
1. Arrange the bread slices, slightly overlapping, in a lightly sprayed or oiled 8x11.5" baking dish. Scatter the bacon over top.
2. In a large bowl, whisk together the eggs, milk, salt, pepper, and Tobasco. Fold in grated Cheddar and parsley. Pour the egg mixture over bread and bacon. Sprinkle with grated Monterey Jack. Cover and refrigerate several hours or overnight.
3. Preheat oven to 350F. Bring strata to room temperature before baking. Arrange bell peppers over top. Bake, uncovered, until set - about 45 - 5o minutes. Let stand for 10 minutes. Cut into squares and serve.
Notes
- I used all Cheddar because we don't get Monterey Jack. The beauty of this recipe is you can really add whatever you want.
- This puffs up quite a bit, so make sure your pan is deep enough.
- This recipe makes multiples well. I made it for two dozen and this recipe is supposed to serve 4 - 6 people.
Here are some tips from the beginning of the strata chapter to help you along.
1. Use day old bread, or bread you've lightly toasted, or bread you've let air-dry. This is so the milk/egg mixture will soak up nicely into the bread.
2. Use whole milk, or half-and-half. Low fat milks don't provide enough structure.
3. Make the strata several hours ahead or the night before to allow the bread to absorb the custard. Press the bread down to be sure it is fully covered.
4. Bring the strata to room temperature before baking, or allow an extra 10 minutes of baking time (which is what I did).
5. If the strata becomes too brown on top, cover it with foil for the rest of the baking time.
6. Let the strata stand for 10 minutes before serving.
Bon Appetit!
Tuesday, November 15, 2005
Cake Decoration
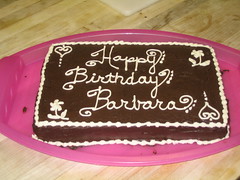
Birthday Cake
Originally uploaded by wanderingcoyote.
I did this yesterday and I think it's the nicest cake I've done yet.
The cake is the chocolate cake recipe I posted a month or so ago. The icing is just a simple buttercream. I piped the writing with a #4 plain tip and the scalloped border was done with a small star tip. For the flowers, I used a petal tip that came with the set I bought back in July. I need more practice with that, but I think this is pretty good. Way better than anything from the local supermarket, that's for sure!
For this cake, I'd charge $15-18. What do you think?
Subscribe to:
Posts (Atom)